![]() Although container based engines such as Docker are highly popularized for newer application deployment – there will still be widespread use of OS virtualization engines for years to come.
Although container based engines such as Docker are highly popularized for newer application deployment – there will still be widespread use of OS virtualization engines for years to come.
One of the most popular virtualization engines for development purposes is the open-source VirtualBox from Oracle. This article will detail its installation on Ubuntu 14.04.
Installation
The easiest way to get VirtualBox is to use the repository hosted at virtualbox.org. We use lsb_release to get the right binary for either Ubuntu 14.04 or 16.04.
$ sudo sh -c "echo 'deb http://download.virtualbox.org/virtualbox/debian '$(lsb_release -cs)' contrib non-free' > /etc/apt/sources.list.d/virtualbox.list"
Download and install the Oracle public keys:
$ wget -q http://download.virtualbox.org/virtualbox/debian/oracle_vbox.asc -O- | sudo apt-key add -
$ wget -q http://download.virtualbox.org/virtualbox/debian/oracle_vbox_2016.asc -O- | sudo apt-key add -
Now refresh the repositories, and install VirtualBox 5.1:
$ sudo apt-get update
$ sudo apt-cache policy virtualbox-5.1
$ sudo apt-get install virtualbox-5.1 -y
Add your user to the ‘vboxusers’ group, which gives the proper permissions for USB devices within the VMs (group membership is only evaluated at login).
$ groups
$ sudo usermod -a -G vboxusers $USER
$ exec su -l $USER
$ groups
Then install the Kernel modules after making sure you have the proper linux headers:
$ sudo apt-get install build-essential linux-headers-`uname -r`
$ sudo apt-get install dkms -y
Make sure the kernel modules (vboxnetadp,vboxnetflt,vboxpic) were loaded properly:
$ lsmod | grep vboxdrv
vboxdrv 446464 3 vboxnetadp,vboxnetflt,vboxpci
Now start the VirtualBox GUI
$ VirtualBox
VirtualBox Extensions
In order to get full USB, PXE, and other functionality you will want to install the VirtualBox extensions. From the downloads page, get the extensions pack which is the same for all platforms.
Then from the menu: File > Preferences > Extensions;
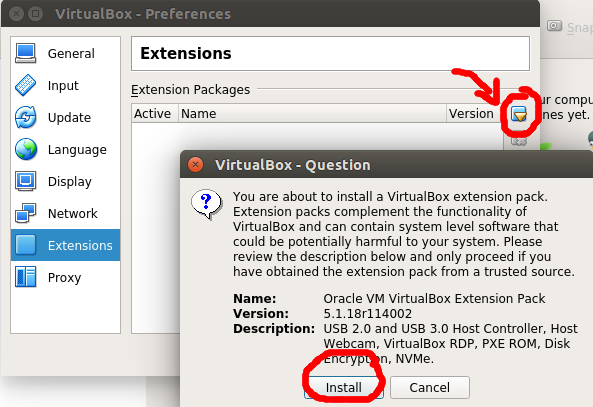
Click the install icon; select the *.vbox-extpack file; Press ‘Install’, read the license, press ‘Agree’, then press OK.
Now, in order to be able to manipulate VMs without being root, make sure that your regular user has permissions to the following file. Close the VirtualBox GUI and change ownership of this file if necessary before moving forward.
$ ls -l ~/.config/VirtualBox/VirtualBox.xml
$ sudo chown $USER:$USER ~/.config/VirtualBox/VirtualBox.xml
Vagrant
Although not necessary, many developers like to use Vagrant from HashiCorp to standardize the workflow of virtual machines (creation, running, destroying). Then, no matter which virtualization engine might be used on their laptop (e.g. VirtualBox), and which virtualization engine might be used in production (VMware, Hyper-V, EC2), the commands are the same.
Start by downloading the latest Vagrant binary for your platform. Then install:
$ sudo dpkg -i vagrant_1.9.3_x86_64.deb
$ vagrant --version
Now download one of the pre-built Vagrant OS images, here we will download the latest Ubuntu 14.04:
$ vagrant box add ubuntu/trusty64
And create a folder for our new Vagrant controlled VM:
$ mkdir vagranttest1; cd vagranttest1
$ vagrant init
This creates a file named ‘Vagrantfile’, that we edit to look like:
Vagrant.configure("2") do |config|
 config.vm.box = "ubuntu/trusty64"
 config.vm.hostname = "trusty1"
end
And now we bring up that virtualized host, ssh into the box and check the hostname, and then close the ssh session:
$ vagrant up
$ vagrant ssh
$ hostname
$ exit
And finally we stop and tear down the virtualized machine:
$ vagrant halt
As an example of a more detailed Vagrantfile that uses bridged networking, an explicit IP, and cpu/mem see below:
Vagrant.configure("2") do |config|
  config.vm.box = "ubuntu/trusty64"
  config.vm.hostname = "trusty1"
  config.vm.network "public_network", ip: "192.168.1.4", bridge: "eth0"

  config.vm.provider "virtualbox" do |v|
    v.name = "trusty"
    v.customize ["modifyvm", :id, "--memory","2048" ]
    v.customize ["modifyvm", :id, "--cpus","1" ]
  end
end
REFERENCES
https://www.virtualbox.org/wiki/Linux_Downloads
https://help.ubuntu.com/community/VirtualBox/Installation
http://askubuntu.com/questions/367248/how-to-install-virtualbox-from-command-line
https://www.vagrantup.com/downloads.html
https://www.vagrantup.com/intro/getting-started/boxes.html