 Updated April 2023: Tested on Ubuntu 22.04 LTS with X2GO sever 4.1.0
X2Go provides remote desktop access for Linux, similar to VNC or xRDP. It tunnels over ssh which can provide SSH public key authentication for security and is easily understood when opening firewall rules.
Additionally, it is optimized for narrow bandwidth requirements, making it possible to handle multiple user sessions over a single WAN connection.
In this article I will show how to install the X2Go server on Ubuntu, and then install the X2Go client on a different Ubuntu server. Clients also exist for Windows and OS X.
SSH Authentication Prerequisite
X2Go tunnels its communication over ssh, so the ssh connectivity from the client to the server needs to be proven first. For simple password based security:
# test remote server and port using netcat
nc -vz <server> <sshPort>

# test ssh connection with password
ssh <user>@<server> -p <sshPort>
If the remote server is hardened, it will use SSH public key authentication and will reject password credentials. This article does a good job of describing configuration of SSH for public key authentication.
If public key authentication is enabled, validate the ssh connection to the remote host using the local private key.
ssh -i <privateKey> <user>@<server> -p <sshPort>
If you plan on exposing ssh over a public network, there is additional hardening you need to implement (tips, tips, tips, fail2ban, denyhosts).
SSH daemon settings
Configure the ssh daemon on the server to ensure “/etc/ssh/sshd_config” has the following values.
AllowTcpForwarding yes
TCPKeepAlive yes
And then restart the sshd daemon:
sudo systemctl restart sshd
sudo systemctl status sshd
X server, validate X11 forwarding for ssh connection
From the X server (the graphical desktop), we should be able to see the DISPLAY environment variable populated when making the ssh connection to
Server Desktop Prerequisite
If the server is CLI only, then install the server Gnome Desktop environment.
sudo apt update
sudo apt install -y ubuntu-desktop-minimal
sudo reboot -h now
Then install the MATE desktop, which in my testing pairs well with the X2Go client on both Ubuntu 18 and Ubuntu 22.
sudo apt install -y mate-core mate-desktop-environment mate-notification-daemon
Install X2Go Server
Using the ppa, install the x2go server components.
sudo apt install -y software-properties-common
sudo apt-add-repository ppa:x2go/stable
sudo apt update
sudo apt install -y x2goserver x2goserver-xsession

# only for Ubuntu 18, not Ubuntu 22
sudo apt install -y x2gomatebindings
It is not necessary (or typically desired) to have the server start in graphical Desktop mode, there is no problem with setting this back to the CLI mode. The X2Go client will still connect in graphical desktop mode.
# will be 'graphical.target' after these installs
sudo systemctl get-default

# set server startup to CLI mode
sudo systemctl set-default multi-user.target
X2Go Client
From an Ubuntu desktop that we want to use as a client, run:
sudo apt install -y software-properties-common
sudo apt-add-repository ppa:x2go/stable
sudo apt-get update
sudo apt-get install x2goclient
There are also X2Go clients for Mac OS and Windows.
Test X2Go Client
To validate the remote desktop functionality, first pull up the “X2Go Client” application from your Ubuntu client desktop machine using the main menu.
![]()
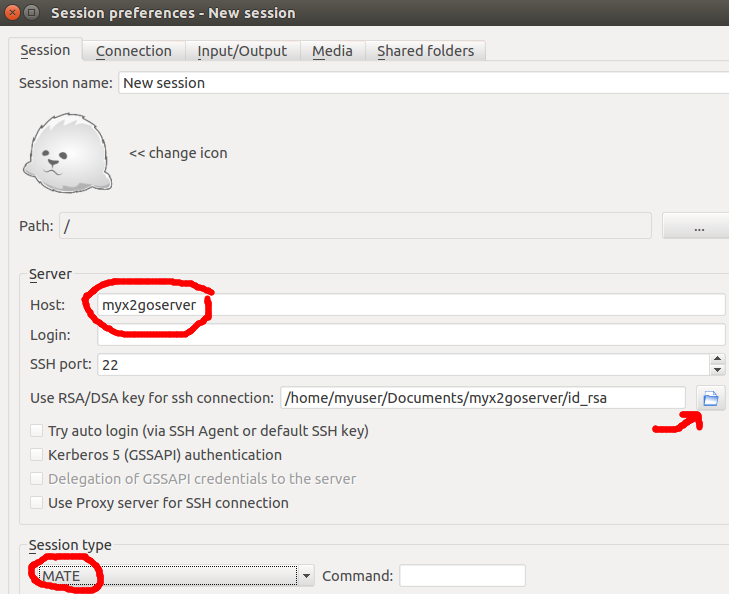
Create a new session definition, specifying the remote host name, any private ssh key that should be used for authentication, and select a MATE session type.

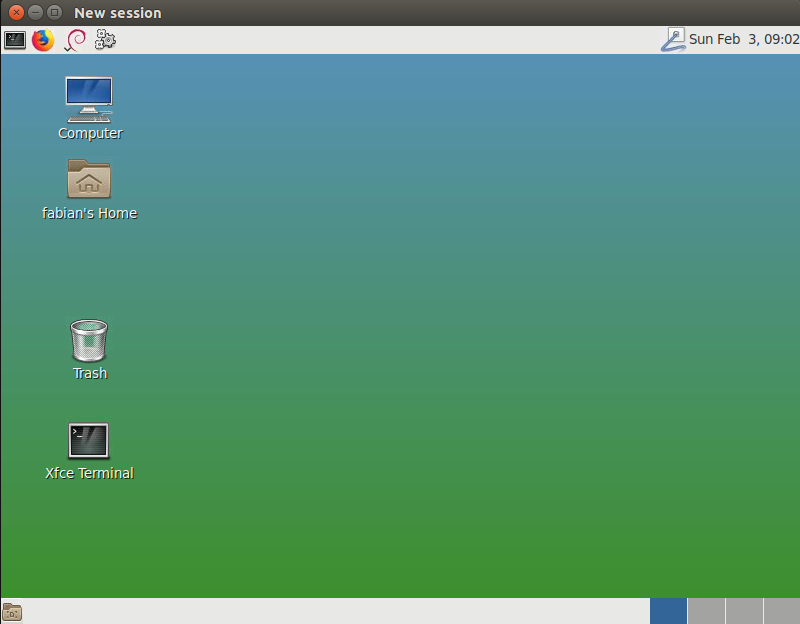
Connect using this session definition, and you should get a MATE desktop view of the remote host.

REFERENCES
X2Go on Debian 8, digital ocean
X2Go Passwordless auth using ssh keys
digitalocean, VNC Server with ssh tunneling on Ubuntu bionic
digitalocean, VNC server on Ubuntu 20 focal
bytexd.com, installing Gnome Desktop
unihost.com, install x2go server components and MATE
cyberciti.biz, switch boot target from GUI to CLI
NOTES
Enable PKI for remote server
mkdir mypki && cd $_

# create RSA keypair
ssh-keygen -b 4096 -f id_rsa

# copy public side of key to remote server, from key in current dir
ssh-copy-id -i id_rsa.pub <user>@<server>

# test using private key to connect
ssh -i id_rsa <user>@<server>
Install VNC on Ubuntu 20 Focal according to this digitalocean doc
# add 'dbus-launch' line or you get errors
cat ~/vnc/xstartup
#!/bin/bash
xrdb $HOME/.Xresources
dbus-launch --sh-syntax
startxfce4 &

# if you want a non-ssh connection, leave out the -localhost in  /etc/systemd/system/vncserver@.service
# this will expose port 5901 on the public interface
ExecStart=/usr/bin/vncserver -depth 24 -geometry 1280x800 :%i
Installing the lightweight xfce window manager
sudo apt install xfce4 xfce4-terminal
sudo apt install gnome-icon-theme tango-icon-theme
Setting Desktop graphical or CLI mode
sudo systemctl get-default
sudo systemctl set-default multi-user.target
sudo systemctl set-default graphical.target