 Decompiling Java classes is sometimes associated with dubious behavior around proprietary and licensed software, but in reality there are many valid reasons why one may find it necessary to dig into Java class files and jar/war archives. It may be as simple as your development team no longer having the 5 year old version of the code deployed in production.
We’ll go over a couple of ways to decompile Java classes on an Ubuntu desktop.
Eclipse Plugin
If you already have the Eclipse IDE installed on your Ubuntu desktop, then the simplest way is to install a plugin from the Eclipse Marketplace.
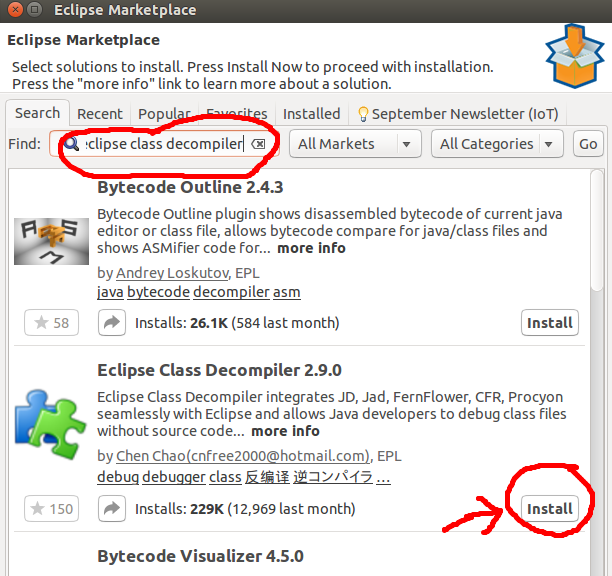
Select “Help” > “Eclipse Marketplace” from the main menubar, and the dialog window below will popup. Type “eclipse class decompiler” in the search bar and then click “Install” beside “Eclipse Class Decompiler” as shown below.
It will ask you to confirm the features it is installing, hit the “Confirm” button and the plugin will be installed. Go ahead and allow a restart of the IDE when it asks.

Now, all you have to do is select “File” > “Open File” from the main Eclipse menubar, and select the .class file you wish to decompile.
Standalone JD-GUI
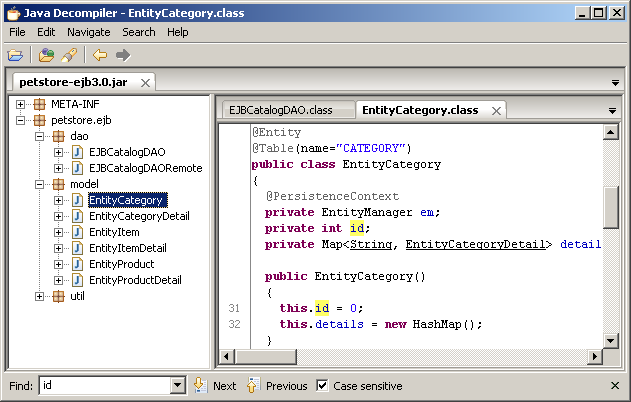
The other option is to use a standalone tool like JD-GUI. I like this tool because it opens entire jar files, and shows you the entire package hierarchy as a tree view on the left.

However, on Ubuntu you will need to download this project and build it.
Download
The first step is to grab the source from github by either downloading the zip or using the git tool to clone the repository locally. Both these options are shown at the github page with the button labeled “Clone or download”. The git command would look like:
> sudo apt-get install git -y
> git clone https://github.com/java-decompiler/jd-gui.git
Gradle Build
The gradle wrapper attempts to makes installation of JVM based application easier by automatically downloading dependencies. But it is sensitive to needing a JDK (not just JRE), and also the JVM version, so let me give you a few hints for getting this work under Ubuntu.
From the main directory where you downloaded/cloned the source, first issue the gradle wrapper version command to get an idea for what it would use by default.
> ./gradlew --version
This will provide a summary something like below:
------------------------------------------------------------
Gradle 2.4
------------------------------------------------------------
Build time: 2015-05-05 08:09:24 UTC
Build number: none
Revision: 5c9c3bc20ca1c281ac7972643f1e2d190f2c943c
Groovy: 2.3.10
Ant: Apache Ant(TM) version 1.9.4 compiled on April 29 2014
JVM: 1.6.0_40 (Sun Microsystems Inc. 23.40-b40)
OS: Linux 4.2.0-42-generic amd64
I can tell you that a build command issued at this point using a 1.6.x JVM, is going to cause a compile error because the ‘build.gradle’ file requests a 1.7 JVM. And if you did issue the build command now:
> ./gradlew build
You indeed get an error, and here is a snippet of the output proving that:
* What went wrong:
Execution failed for task ':api:compileJava'.
> invalid source release: 1.7
So, what you need is a Java7 compliant JDK, and the easiest way to get that is to install the OpenJDK, the JDK version (not just the JRE) and set the JAVA_HOME environment variable to point to that particular version:
> sudo apt-get install openjdk-7-jdk
> export JAVA_HOME=/usr/lib/jvm/java-1.7.0-openjdk-amd64
Now if we were to run the command:
> $JAVA_HOME/bin/java -version
The output would look like this showing a JVM version of 1.7.0_111:
java version "1.7.0_111"
OpenJDK Runtime Environment (IcedTea 2.6.7) (7u111-2.6.7-0ubuntu0.14.04.3)
OpenJDK 64-Bit Server VM (build 24.111-b01, mixed mode)
And if we were to have the gradle wrapper list its versions, the output would look like:
------------------------------------------------------------
Gradle 2.4
------------------------------------------------------------
Build time: 2015-05-05 08:09:24 UTC
Build number: none
Revision: 5c9c3bc20ca1c281ac7972643f1e2d190f2c943c
Groovy: 2.3.10
Ant: Apache Ant(TM) version 1.9.4 compiled on April 29 2014
JVM: 1.7.0_111 (Oracle Corporation 24.111-b01)
OS: Linux 4.2.0-42-generic amd64
Which shows we are using the OpenJDK 1.7.0_111 version from the gradle wrapper.
Now we are ready to run the build:
> ./gradlew build
Shows a ‘BUILD SUCCESSFUL’ message. Just a couple of more steps. First, generate the build/libs/jd-gui-x.y.z.jar:
> ./gradlew installOsxDist
And then build the Debian/Ubuntu .deb package that can be installed:
> ./gradlew buildDeb
Navigate into the build directory and install the package
> cd build/distributions
> sudo dpkg -i jd-gui_1.4.0-0_all.deb
You can now use the Ubuntu menu bar to search for the application ‘jd-gui’ and click on the application, or run the command directly from the console:
> cd /opt/jd-gui
> $JAVA_HOME/bin/java -jar jd-gui.jar
REFERENCES
http://opensource.cpupk.com/decompiler/
https://github.com/java-decompiler/jd-gui
https://docs.gradle.org/current/userguide/gradle_wrapper.html
http://stackoverflow.com/questions/32569189/gradle-wrapper-tag-mismatch-error
NOTE: If you get an SSLException when running ./gradlew build with a JVM8 version, try running ‘./gradle –version’ first. This cleared up my issue with the ‘Tag mismatch!’ error I saw when using Oracle 1.8.0_101-b13 under Ubuntu.
Caused by: javax.crypto.AEADBadTagException: Tag mismatch!
at com.sun.crypto.provider.GaloisCounterMode.decryptFinal(GaloisCounterMode.java:578)
Exception in thread “main” javax.net.ssl.SSLException: Connection has been shutdown: javax.net.ssl.SSLException: Tag mismatch!
Useful commands:
readlink -f /usr/bin/java
sudo update-alternatives -config java