 Selenium is an open-source solution for automating the browser allowing you to run continuous integration tests, validate performance and scalability, and perform regression testing of web applications.
This kind of automated testing is useful not only from desktop systems, but also from server machines where you may want to monitor availability or correctness of returned pages. For example, web site response monitoring or as part of a Jenkins validation pipeline.
The first method we can use to accomplish this is to use a headless driver such as the HtmlUnit or PhantomJS driver – these are tiny browser implementations that load and execute web pages but do not actually draw the results to a screen.
The second method is specific to Linux based systems, where you use the actual Chrome browser. The trick is to use Xvfb as a virtualized display.
Project Installation
I’ve put a Maven project up on github to accompany this article. Below are instructions for Ubuntu, feel free to translate for your own Linux flavor or Windows. First we make sure that a Git client, Java7, and Maven are installed. Then use Maven to download all the dependencies and build the project.
> sudo apt-get install git openjdk-7-jdk maven -y
> git clone https://github.com/fabianlee/seleniumheadless.git
> cd seleniumheadless
> mvn package
This project can also be imported into Eclipse (File > Import > Exiting Maven Project). The only thing that won’t work on Windows is the headless Chrome sample. On Windows, Chrome will be visible.
Project Overview
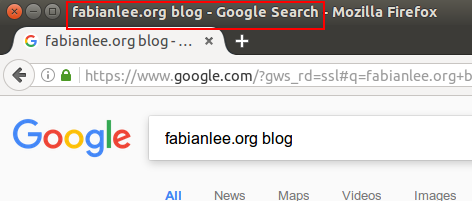
The Selenium WebDriver pulls up google.com, does a search for “fabianlee.org blog”, and then gets the page title of the results page. If we were using a standard browser, the final page would look like the screenshot below (with the page title highlighted):

The same functionality can be accomplished using Selenium code:
// choose which driver to use
WebDriver webDriver = getWebDriver(whichBrowser);

// run test
webDriver.get("http://www.google.com");
// identify search textbox
WebElement element = webDriver.findElement(By.name("q"));
// do search
element.sendKeys("fabianlee.org blog");
element.submit();

// wait and then check the page title of the results page
Thread.sleep(2000);
System.out.println("******************************************");
System.out.println("Page title of results using " + whichBrowser + ": " + webDriver.getTitle());
System.out.println("******************************************");

// close browser
webDriver.quit();
HtmlUnit Driver
HtmlUnit is a Java based browser emulator. It is fully functional, and is capable of retrieving pages, filling out forms, dealing with frame, and executing Javascript. It does a nice job of emulating most browser functionality, but you may start to run into issues with complex AJAX and modern Javascript driven applications. To run our web scenario using HtmlUnit:
> mvn exec:java -Dexec.args="htmlunit"
There will be CSS warnings we can ignore, but the last line should show:
******************************************
Page title of results using htmlunit: fabianlee.org blog - Google Search
******************************************
PhantomJS Driver
The PhantomJS driver uses the WebKit module for web functionality. You must therefore download it, and tell Java where to find it.
Download you version from here, move it to the /tmp directory, then follow these instructions for Ubuntu:
> sudo apt-get install openjdk-7-jdk fontconfig libfontconfig -y
> cd /tmp
> tar xvfj phantomjs-2.1.1-linux-x86_64.tar.bz2
Now you have ‘/tmp/phantomjs-2.1.1-linux-x86_64/bin/phantomjs’ which corresponds to the path in seleniumheadless/src/main/resources/path.properties
Run the web scenario using the PhantomJS WebKit module:
> mvn exec:java -Dexec.args="phantomjs"
You will see some informational debug, and the last line will look like:
******************************************
Page title of results using phantomjs: fabianlee.org blog - Google Search
******************************************
Chrome Driver Headless
Using the Selenium Chrome Driver is easy when you have a Windows or Ubuntu desktop running a graphical desktop – Chrome pops-up, the test is executed, and the browser is closed.
But what we want to do is run a Chrome browser process on a console-only server host. This is possible, but the trick is we must first run ‘Xvfb’, which use a virtual frame buffer and implements the X11 display server protocol. So even though we can’t see the display, the drawing is happening in a virtual display.
Install Chrome
Get the Google key:
> wget -q -O - https://dl-ssl.google.com/linux/linux_signing_key.pub | sudo apt-key add -
Add the Google repository, install packages:
> sudo sh -c 'echo deb http://dl.google.com/linux/chrome/deb/ stable main > /etc/apt/sources.list.d/google.list'
> sudo apt-get update
> sudo apt-get install -y xfonts-100dpi xfonts-75dpi xfonts-scalable xfonts-cyrillic xvfb x11-apps imagemagick firefox google-chrome-stable
Download Chrome WebDriver
From the ChromeDriver site, download get the latest zip package for your platform and put it in the /tmp folder of your target host.
> cd /tmp
> apt-get install unzip -y
> unzip chromedriver_linux64.zip
This will give you ‘/tmp/chromedriver’, which corresponds to the path in seleniumheadless/src/main/resources/path.properties.
Virtual Frame Buffer
The last piece is to start Xvfb, which is a virtual framebuffer. This means that even though we are on a console-only server host, Chrome will still have a place to “draw”.
Start a separate ssh session to the host, and run:
/usr/bin/Xvfb :99 -ac -screen 0 1024x768x8
This starts an X server using display :99. If you want to put this into an init.d script on startup, see the blog entry here.
Validate Headless Chrome
Finally, we are ready to run the web scenario using the Chrome driver:
> export DISPLAY=:99
> mvn exec:java -Dexec.args="chrome"
You will see some informational debug, and the last line will look like:
******************************************
Page title of results using chrome: fabianlee.org blog - Google Search
******************************************
REFERENCES
http://www.seleniumhq.org/download
https://addons.mozilla.org/en-US/firefox/addon/selenium-ide/
http://alex.nederlof.com/blog/2012/11/19/installing-selenium-with-jenkins-on-ubuntu/
https://github.com/vmi/selenese-runner-java
http://www.guru99.com/selenium-with-htmlunit-driver-phantomjs.html
https://github.com/bonigarcia/webdrivermanager
https://mvnrepository.com/search?q=selenium
http://phantomjs.org/download.html
https://sites.google.com/a/chromium.org/chromedriver/
https://en.wikipedia.org/wiki/Xvfb
http://www.chrisle.me/2013/08/5-reasons-i-chose-selenium-over-phantomjs/