![]() Zabbix low-level discovery (LLD) provides a way to create an array of related items, triggers, or graphs without needing to know the exact number of entities up front.
Zabbix low-level discovery (LLD) provides a way to create an array of related items, triggers, or graphs without needing to know the exact number of entities up front.
The easiest way to populate the keys of a discovery item is to add a “UserParameter” in zabbix_agentd.conf, and then the Zabbix agent will invokes a script which returns the set of keys.
But the keys are only the first part of a real solution, because what you really want to send back are the values associated with those keys. For example, if you are monitoring a database, you don’t want to just send the list of tables available, you may want to send back each table name and then its row count and size on disk.
Unfortunately Zabbix does not support sending back multiple values [1,2,3,4]. There are various workarounds such as using one UserParameter for the discovery key and another with a UserParameter=key[*] to fetch each row of data, or using vfs.file.regexp to parse values that have been written to a file.
But I think the cleanest solution, and one that requires the minimal number of spawned processes on the agent host is to invoke zabbix_sender from inside the script to send back all the values you want to populate.
Grocery Store Example
As a simple example, we are going to create a grocery store inventory solution that tracks the number of items that are currently in stock.
For the produce department of a grocery store, we would create a Zabbix host named “produce_department” and it might have the following inventory counts:
- instock[carrot] = 9
- instock[banana] = 4
- instock[lettuce]= 5
- instock[tomato] = 6
Representing these as LLD is more desirable than creating statically named keys for each item offered because if they ever decide to start carrying a new type of fruit or stop carrying a vegetable that is non-profitable, it will not require template changes.
We will also create a graph for each of the items in stock so that we can visualize which days of the week we see the most consumption, and can proactively stock the shelves to meet demand.
Zabbix Template
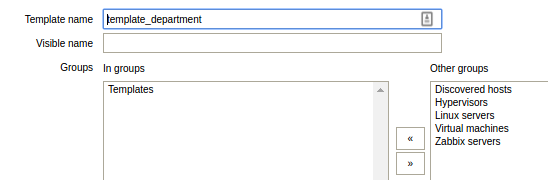
The first thing we do is create a Zabbix template to represent this data. Login to Zabbix and go to Configuration > Templates, and press “Create template”.
Put in “template_department” for the template name, add it to the generic “Templates” group, and press “Add” which will take you back to the main template screen.
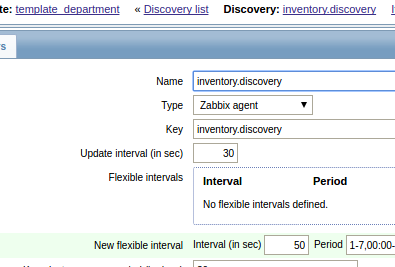
Click on “Discovery rules” of the new template_department template, and press “Create discovery rule”. Fill in the below values, and press “Add”.
- name = “inventory.discovery”
- type = “Zabbix agent” (returned from UserParameter script)
- key = “inventory.discovery”
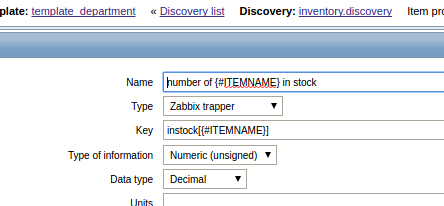
Then click on “Item prototypes”, and press “Create item prototype”. Fill in the below values and press “Add”.
- name = “number of {#ITEMNAME} in stock”
- type = “Zabbix trapper” (returned using zabbix_sender)
- key = “instock[{$ITEMNAME}]”
- type of information = “numeric(unsigned)”
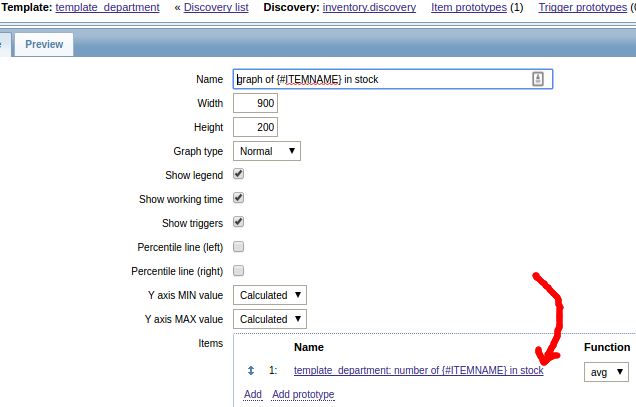
Then click on “Graph prototypes”, and press “Create graph prototype”. For the name use “graph of {#ITEMNAME} in stock”, and then click on “add prototype” under items and select “number of {#ITEMNAME} in stock”. Then press “Add”.
If you would rather import this template, template_department.xml is uploaded to github.
Zabbix Host based on template
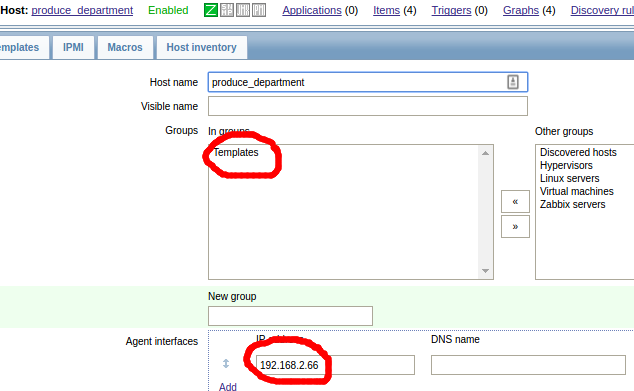
Now we need to create a Zabbix host based on this template. From the Zabbix GUI, go to Configuration > Host, and press “Create host”.
Use “produce_department” for the name, add it to the generic “Templates” group, and give the Zabbix server either the IP address or DNS name where it can reach the agent.
Then click on the “Templates” tab and link it to the “template_department” template.
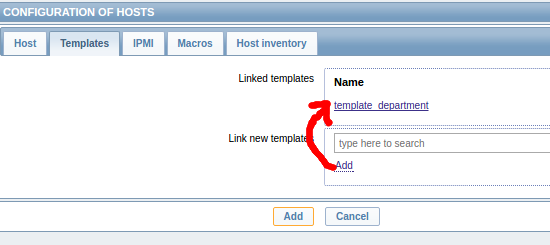
Make sure to press the small “add” link before pressing the “Add” button that creates the host or the template will not be linked to this host.
Populating LLD keys using Agent
This step requires that we have a Zabbix agent. If you need to install a Zabbix Agent on Ubuntu, see my article here.
If you are following my exact instructions from above, then inside the zabbix_agentd.conf, you need to set the ‘Hostname=produce_department’. But in reality, you can use any host name you want as long as it is linked to the “template_department” template.
From the Zabbix agent you need to define a UserParameter that sends back the list of available keys in the expected JSON format. Remember, that although this UserParameter’s purpose is only to return back the list of keys available, we are going to piggyback on this invocation to send back the values as well.
On a Linux based host you would modify zabbix_agentd.conf like:
UserParameter=inventory.discovery,/tmp/produce.sh
Then create the executable mode script “/tmp/produce.sh”, and change the ‘zserver’ parameter to point to your local Zabbix server. Change ‘agenthost’ also if it is not the same as the fully qualified agent hostname.
#!/bin/bash

# send back discovery key, list of all available array keys
# for a discovery type of "Zabbix agent"
cat << EOF
{ "data": [
 { "{#ITEMNAME}":"carrot" },
 { "{#ITEMNAME}":"banana" },
 { "{#ITEMNAME}":"lettuce" },
 { "{#ITEMNAME}":"tomato" }
]}
EOF

# now take advantage of this invocation to send back values
# build up list of values in /tmp/zdata.txt
agenthost="`hostname -f`"
zserver="myzabbix"
zport="10051"

cat /dev/null > /tmp/zdata.txt
for item in "carrot" "banana" "lettuce" "tomato"; do
 randNum="$(( (RANDOM % 30)+1 ))"
 echo $agenthost instock[$item] $randNum >> /tmp/zdata.txt
done

# push all these trapper values back to zabbix
zabbix_sender -vv -z $zserver -p $zport -i /tmp/zdata.txt >> /tmp/zsender.log 2>&1
You can also download produce.sh from github. Note that we are sending an integer value in this example, but even if you were sending a multiword string as a value, you would not need to surround it by quotes, zabbix_sender sees each line as: host<SPACE>key<SPACE>greedy message.
It’s important that the user running the Zabbix agent (typically “zabbix”) has permissions to this script, zabbix_sender, and to write to the “/tmp” folder. You can test as root using:
# verify the process owner of zabbix agent daemon
$ ps -ef | grep zabbix_agentd
$ sudo /bin/bash

# verify that 'zabbix' user owns the data and log file
$ touch /tmp/zdata.txt
$ touch /tmp/zsender.log
$ chown zabbix:zabbix /tmp/z*.*
$ chmod 664 /tmp/z*.*

# make script owned and executable by 'zabbix' user
$ chown zabbix:zabbix /tmp/produce.sh
$ chmod 755 /tmp/produce.sh

# test execution as zabbix process owner
$ su -c "/tmp/produce.sh" -s /bin/sh zabbix

# check for errors in data or log files
$ cat /temp/zdata.txt
$ cat /tmp/zsender.log
With that verified, we can now restart the Zabbix agent, and within 2 minutes, a check on the “inventory.discovery” key should return back the array indices our agent is sending.
# restart agent
$ sudo service zabbix-agent restart

# wait a couple of minutes

# check for population of discovery key
$ zabbix_agentd -t inventory.discovery

inventory.discovery [t|{ "data": [
 { "{#ITEMNAME}": "carrot" },
 { "{#ITEMNAME}": "banana" },
 { "{#ITEMNAME}": "lettuce" },
 { "{#ITEMNAME}": "tomato" }
]}]
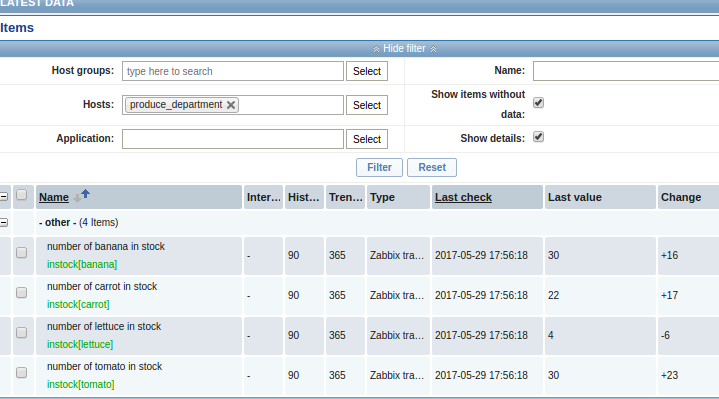
With the assurance that our discovery key has been populated, we can now go back to the Zabbix GUI at Monitoring > Latest Data, filter by our host, and within a couple of more minutes we should see a population of our inventory counts for carrots, bananas, lettuce, and tomatoes.
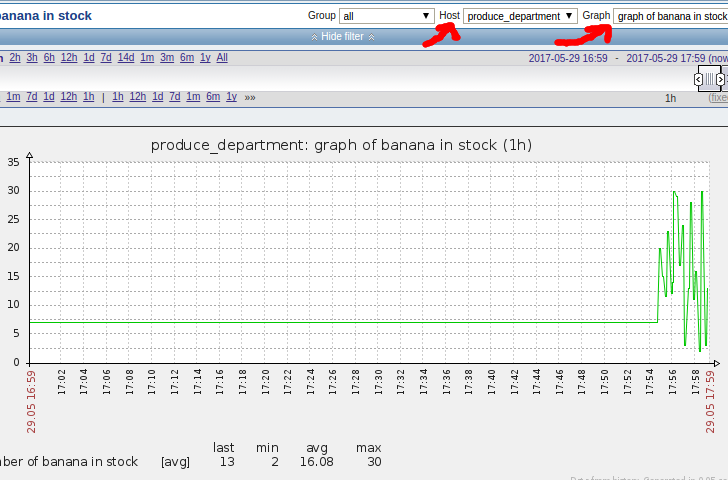
And if we go to Monitoring > Graphs, and select the “produce_department” host and “graph of banana in stock” we get a visual history of our inventory over time.
UserParameter on Windows using Powershell
You can use this same concept on Windows by specifying a Powershell script to execute:
UserParameter=inventory.discovery,powershell -NoProfile -executionpolicy bypass -File c:\produce.ps1"
Zabbix Server timeout
By default, the Zabbix server will timeout if the Zabbix agent does not return a value in 3 seconds. If your script takes longer to gather its data, you need to modify “/etc/zabbix/zabbix_server.conf” and restart the Zabbix server. The “Timeout” key defaults to 3 seconds, but can be set as high as 30.
Custom Service
If instead of using “UserParameter” to populate the discovery key and values you wanted to go a different route and have a boot time service or cron populate the keys and values, you would simply need to change the type of the discovery rule to “Zabbix trapper” instead of “Zabbix agent” and remove the UserParameter from the agent configuration file altogether.
Then, as an example, you could populate the discovery key like:
$ zabbix_sender -vv -s produce_department -z myzabbix -p 10051 -k inventory.discovery -o "{\"data\": [ {\"{#ITEMNAME}\": \"apple\"},{\"{#ITEMNAME}\":\"banana\"} ] }"
And send values like:
$ zabbix_sender -vv -s produce_department -z myzabbix -p 10051 -k instock[apple] -o 3
If you were running a service, you would probably look at bindings for your language of choice which could send the metrics using Zabbix’s simple binary protocol without requiring the overhead of a process callout to zabbix_sender.
REFERENCES
http://blog.zabbix.com/low-level-discovery-for-windows-services/1867/
https://www.zabbix.com/documentation/2.4/manual/discovery/low_level_discovery
https://www.zabbix.com/documentation/3.0/manpages/zabbix_sender
http://baptiste-wicht.com/posts/2013/12/zabbix-low-level-discovery-cores-cpus-hard-disk.html
https://zabbix.tips/custom-discovery-discover-all-the-things/
https://stackoverflow.com/questions/27541522/zabbix-userparameter-return-2-or-more-values
https://www.zabbix.com/forum/showthread.php?t=43711
https://support.zabbix.com/browse/ZBXNEXT-103
https://blog.bastelfreak.de/2015/11/zabbix-autodiscovery-for-kvm-vm-images/
https://www.zabbix.com/documentation/1.8/manual/config/items (list of internal functions available to items: agent.ping, agent.hostname, service_state[*], etc.)
https://www.zabbix.com/documentation/2.0/manual/appendix/macros/supported_by_location (list of internal macros available)