 It is common in secure production datacenters for internal hosts to be forced to go through a reverse proxy for public internet access. The same concept can be applied to apt package management, where setting up a centralized package proxy enables caching as well as security controls.
In a datacenter where you could have hundreds of host instances all needing the same package/kernel/security patch, having a cache of packages inside your network can save a significant amount of network bandwidth and operator time.
In this article, we’ll go through installation and configuration of Apt-Cacher-NG, a specialized reverse proxy for Debian based distributions that does whitelisting of repositories, precaching, and remapping to support caching for SSL repositories.
If you already use Squid in your datacenter and would rather use an apt cache based on Squid, you can see my article on squid-deb-proxy.
Install Apt-Cacher-NG
This package is available from the Ubuntu repositories, so installation is as simple as running apt. We also open port 3142 on the firewall to allow external access.
$ sudo apt-get update -q
$ sudo ufw allow 3142/tcp
$ sudo apt-get install apt-cacher-ng -y
Then we add configuration to allow all remote repositories and verbose logging.
$ echo "PassThroughPattern: .*" | sudo tee -a /etc/apt-cacher-ng/acng.conf
$ echo "VerboseLog: 2" | sudo tee -a /etc/apt-cacher-ng/acng.conf

$ echo "Debug: 5" | sudo tee -a /etc/apt-cacher-ng/acng.conf
Now validate that apt-cacher-ng is running on port 3142 with the following commands:
$ ps -ef | grep apt-cacher-ng
$ netstat -an | grep "LISTEN "
Cached files are stored under a hierarchy in “/var/cache/apt-cacher-ng/” as verified by the following:
$ grep CacheDir /etc/apt-cacher-ng/acng.conf
CacheDir: /var/cache/apt-cacher-ng
And service and periodic maintenance logs are located in “/var/log/apt-cacher-ng”.
Client validation
From the Apt-Cacher-NG server, first tail the logs so you can see the client actions:
$ cd /var/log/apt-cacher-log
$ tail -f apt-cacher.log apt-cacher.err
From a separate OS instance, or even the same host if you want, configure apt so that it goes through Apt-Cacher-NG on port 3142 if it wants to download packages. Change the IP address to fit your environment.
$ echo "Acquire::http::Proxy \"http://192.168.2.125:3142\";" | sudo tee /etc/apt/apt.conf.d/00proxy # do client side update of apt

$ sudo apt-get update -q
From the client side, everything should be transparent, and you will get the standard output showing the main Ubuntu repositories being accessed.
And from the Apt-Cacher-NG server side, you should see output from the apt-cacher.err log showing retrievals from repositories such as “archive.ubutu.com”.
Cache validation
Now let’s validate that Apt-Cacher-NG is caching packages. We will work with the ‘curl’ package that comes from .ubuntu.com. Here is how you check its repository source.
$ sudo apt-cache policy curl
Now uninstall the package, clear the local .deb cache of the package, and then reinstall; which will force Apt-Cacher-NG to fetch and cache it.
$ sudo apt-get remove curl -y && sudo apt-get clean; sudo apt-get install curl -y
Now if you search the “/var/cache/apt-cacher-ng” folder of the server, you should see the curl package.
$ find /var/cache/apt-cacher-ng/ | grep curl
/var/cache/apt-cacher-ng/uburep/pool/main/c/curl
/var/cache/apt-cacher-ng/uburep/pool/main/c/curl/curl_7.35.0-1ubuntu2.14_amd64.deb
/var/cache/apt-cacher-ng/uburep/pool/main/c/curl/curl_7.35.0-1ubuntu2.14_amd64.deb.head
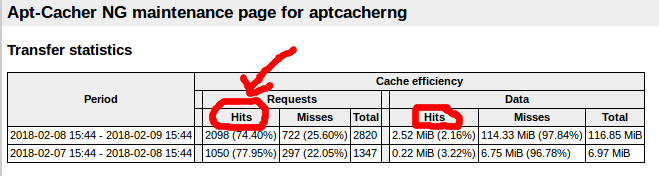
To verify that the cache was a hit, pull up a browser and view the administration page at http://<acngHost>:3142/acng-report.html, and then press the “Count Data” button to show how many request hits and data hits have been processed.
Now from the client host, do a fresh install of curl again
$ sudo apt-get remove curl -y && sudo apt-get clean; sudo apt-get install curl -y
And then refresh the browser, and you should see the request hits increment by +1, which verifies a working cache.
Whitelisting repositories
At the moment, clients have access to all HTTP repositories. But if we wanted to limit it to only repositories explicitly listed, then we need to enable the ‘ForceManaged’ flag and control access using ‘Remap-‘ directives.
$ echo "ForceManaged: 1" | sudo tee -a /etc/apt-cacher-ng/acng.conf
$ sudo service apt-cacher-ng force-reload
By default, the acng.conf already has entries for the the main Debian and Ubuntu repositories.
Remap-debrep: file:deb_mirror*.gz /debian ; file:backends_debian
Remap-uburep: file:ubuntu_mirrors /ubuntu ; file:backends_ubuntu
But notice it does not have entries for security.debian.org or security.ubuntu.com and these repo are enabled on most client hosts, so expect to see errors on most hosts after making this change. I’ll show how to resolve these issues in a moment.
With these new restrictions now in place, from the client side run an apt update:
$ sudo apt-get update -q
If you were accessing nothing but the standard Ubuntu repositories, the update would work fine, but since “/etc/apt/sources.list” references “security.ubuntu.com”, you will see 403 errors coming from the last apt-get update.
But let’s add another external repository just to prove a point, the OpenJDK ppa is a good candidate located at “http://ppa.launchpad.net/openjdk-r”. From the client host, add the OpenJDK ppa repository, then do an update again and you will get a “Failed to fetch…” 403 error.
$ sudo add-apt-repository ppa:openjdk-r/ppa -y
$ sudo apt-get update
Now we’ll take the steps to whitelist both “security.ubuntu.com” and “ppa.launchpad.net/openjdk-r”.
The configuration change for “security.ubuntu.com” is easy because this name resolves to the same DNS hosts as “archive.ubuntu.com” which is already has an entry in acng.com. The line below simply references the pre-existing “backends_ubuntu” list.
Remap-uburepsec: security.ubuntu.com /uburepsec ; file:backends_ubuntu
Making a Remap line for “ppa.launchpad.net/openjdk-r” requires that we create our own file.
$ echo "http://ppa.launchpad.net/openjdk-r/ppa/ubuntu" | sudo tee /etc/apt-cacher-ng/openjdk
And then add the following line to “/etc/apt-cacher-ng/acng.conf”:
Remap-openjdk: file:openjdk /openjdk ; file:openjdk
Force a reload of the configuration.
$ sudo service apt-cacher-ng force-reload
Then from the client side, an apt update should work without error.
$ sudo apt-get update -q
Blacklisting packages
As far as I’ve seen, the configuration file does not support blocking specific package names or path locations. I would have liked to have seen a regex to control this behavior.
HTTPS Repositories
HTTPS enabled repositories have two nuances that need to be discussed: caching and whitelisting.
HTTPS Whitelisting
The “ForceManaged” and “Remap-” entries are used to enforce whitelisting of non-secure HTTP sites, but does not apply to HTTPS repositories, which instead use “PassThroughPattern: <regex>”.
We currently have “PassThroughPattern: .*” which allows all HTTPS repositories. But let’s go through an exercise where we toggle access to the secure ElasticSearch repository.
First, we’ll get the public signing key to the client host, add the secure repository source, and then run an update.
$ wget -qO - https://packages.elastic.co/GPG-KEY-elasticsearch | sudo apt-key add -
$ echo "deb https://packages.elastic.co/elasticsearch/2.x/debian stable main" | sudo tee -a /etc/apt/sources.list.d/elasticsearch-2.x.list

$ sudo apt-get update -q
This update should be successful since our PassThroughPattern allows all. Now modify the PassThroughPattern which does not include packages.elastic.co.
PassThroughPattern: (archive\.ubuntu\.com|security\.ubuntu\.com):443$
And do a reload of the service:
$ sudo service apt-cacher-ng force-reload
Then from the client host, do another update and you should see an error similar to below indicating that the packages.elastic.co repository can’t be reached with a 403 error.
Failed to fetch https://packages.elastic.co/elasticsearch/2.x/debian/dists/stable/main/binary-amd64/Packages Received HTTP code 403 from proxy after CONNECT
Modify PassThroughPattern once again, this time enabling the “packages.elastic.co” hostname.
PassThroughPattern: (archive\.ubuntu\.com|security\.ubuntu\.com|packages\.elastic\.co):443$
And do a reload of the service:
$ sudo service apt-cacher-ng force-reload
Now you should have success from the client side, with no errors reported.
HTTPS Caching
Although Apt-Cacher-NG cannot cache content from secure sites (encrypted between client and ultimate host), its remap ability provides a sneaky way of getting around this idea by presenting the repository as a non-secure site to client hosts, and then initiating the SSL connection from the server itself. This is done via the “Remap-” mechanism.
Continuing the example from the HTTPS whitelisting section above, we will use the ElasticSearch repository. It is available not only via HTTP, but also secure HTTPS at “https://packages.elastic.co/elasticsearch/2.x/debian”.
But instead of referencing it using this URL from the client, instead we will use “http://insecure-elastic/elasticsearch/2.x/debian”, and allow the Apt-Cacher-NG server to initiate the SSL communication to packages.elastic.co. In this way, the server has the ability to decrypt its own secure traffic, and hence cache the packages.
From the client side, add a reference to a repository at “http://insecure-elastic”
$ wget -qO - https://packages.elastic.co/GPG-KEY-elasticsearch | sudo apt-key add -
$ echo "deb http://insecure-elastic/elasticsearch/2.x/debian stable main" | sudo tee -a /etc/apt/sources.list.d/insecure-elastic.list

$ sudo apt-get update -q
This update will fail with a 503 DNS error because “http://insecure-elastic” is not a real domain name. When the request is sent to the Apt-Cacher-NG server, it will assume you are really trying to get to a site by that name, and it will fail to proxy any communication from that URL.
But if you create an entry in acng.conf which tells Apt-Cacher-NG to remap any URL coming in that look like “http://insecure-elastic” using a file named “insecure-elastic”:
Remap-elastic:http://insecure-elastic/elasticsearch/2.x/debian ; file:insecure-elastic
And create a file name insecure-elastic with the real URL, and reload the configuration:
$ echo "https://packages.elastic.co/elasticsearch/2.x/debian" | sudo tee "/etc/apt-cacher-ng/insecure-elastic"
$ sudo service apt-cacher-ng force-reload
Now you can do an update from the client side, and you should have no errors. The server now has the ability to cache content from this repository, because it owns the TLS communication.
Internet access via reverse proxy
If you are in an environment where a package proxy like apt-cacher-ng is used instead of direct internet access, then you may also be using a Squid proxy for general internet access.
If you want apt-cacher-ng to go through a reverse proxy like Squid for access to the package repositories (instead of requiring a direct internet route), then you can define the ‘Proxy’ property in acng.conf.
Proxy: http://mysquidaddress:3128
And then force a reload of the configuration
service apt-cacher-ng force-reload
Importing bespoke packages
Custom .deb package can be imported the cache, but it is import to read the documentation on package import, because you cannot import raw .deb files without first downloading their index files.
For example, if you wanted to import the metricbeat package from ElasticSearch, then you would need to use a client machine to add that repository and do an “apt-get update” first so that the apt-cacher-ng server would have downloaded its index files.
Only then could you manually place that .deb file into the “_import” directory and run the import scan.
For example, from any client host you would need to add the artifacts.elastic.co repository and do an apt-update so that the index files are downloaded by apt-cacher-ng.
$ wget -qO - https://artifacts.elastic.co/GPG-KEY-elasticsearch | sudo apt-key add -
$ echo "deb https://artifacts.elastic.co/packages/6.x/apt stable main" | sudo tee -a /etc/apt/sources.list.d/elastic-6.x.list

$ sudo apt-get update
Then you would go to the server side and download the .deb file and place it into the import location.
$ sudo mkdir -p /var/cache/apt-cacher-ng/_import
$ curl -L -O https://artifacts.elastic.co/downloads/beats/metricbeat/metricbeat-6.2.1-amd64.deb
$ sudo mv metricbeat-6.2.1-amd64.deb /var/cache/apt-cacher-ng/_import/.
$ sudo chown -R apt-cacher-ng:apt-cacher-ng /var/cache/apt-cacher-ng/_import
Now from the admin page, http://<acng>:3142/acng-report.html, press the “Start Import” button and you will see a scan take place of the “/var/cache/apt-cacher-ng/_import” directory and the following messages should be seen.
Checked /var/cache/apt-cacher-ng/_import/metricbeat-6.2.1-amd64.deb (Md5 fingerprint created)
Checked /var/cache/apt-cacher-ng/_import/metricbeat-6.2.1-amd64.deb (Sha1 fingerprint created)
Checked /var/cache/apt-cacher-ng/_import/metricbeat-6.2.1-amd64.deb (Sha512 fingerprint created)
If you do not have a client do an index scan first, then during import you will see the error “No index files detected. Unable to continue, cannot map files to internal locations.”.
REFERENCES
https://www.unix-ag.uni-kl.de/~bloch/acng/html/index.html (official docs)
https://www.unix-ag.uni-kl.de/~bloch/acng/html/howtos.html#ssluse (official docs, SSL)
https://www.unix-ag.uni-kl.de/~bloch/acng/html/config-serv.html#cfgfiles (official docs, remap)
http://manpages.ubuntu.com/manpages/trusty/man8/apt-cacher.8.html (man page, tips on using wget to fix invalid/corrupt files)
https://github.com/Efreak/apt-cacher-ng/blob/master/README (good ref)
https://www.tecmint.com/apt-cache-server-in-ubuntu/
https://blog.packagecloud.io/eng/2015/05/05/using-apt-cacher-ng-with-ssl-tls/
https://www.midnightfreddie.com/using-squid-to-cache-apt-updates-for-debian-and-ubuntu.html (squid itself as a package cache, set refresh_pattern and cache_replacement_policy)
http://shadow-file.blogspot.com/2008/12/ditching-apt-cacher-ng-for-squid.html (squid settings used for caching packages)
https://community.riocities.com/Replacing-apt-proxy-with-apt-cacher-ng.html (on whitelisting)
https://github.com/sameersbn/docker-apt-cacher-ng (docker image)
NOTES
In either daemon mode, apt-cacher tries to be a well-behaved cache
and respects Cache-Control and Pragma headers. Refreshing a file
can be forced by adding Cache-Control: no-cache to the request. The
easiest way of doing this is with the –no-cache option of wget(1),
for example:
wget -O/dev/null –no-cache
http://localhost:3142/debian/dists/stable/Release