![]() Update September 2022: Validated these instructions on Ubuntu 22.04
Update September 2022: Validated these instructions on Ubuntu 22.04
If you are running an Ubuntu host, you have multiple choices for a virtualization hypervisor. I have written up several articles on using VirtualBox, but now let’s consider a bare metal hypervisor like KVM.
KVM is a type 1 hypervisor implemented as a Linux kernel module that utilizes a modern processor’s virtualization extensions, making it capable of direct CPU execution without translation. Each virtual machine is a regular Linux process, scheduled by the standard Linux scheduler.
An an example of something that KVM can do that VirtualBox cannot, KVM has the ability to pass on virtualization capability to its guest OS, which would allow nested virtualization.
Installation
First, install KVM and assorted tools:
sudo apt install qemu-system-x86 qemu-kvm qemu libvirt-dev libvirt-clients virt-manager virtinst bridge-utils cpu-checker virt-viewer -y

# if older than Ubuntu 20.04
sudo apt install libvirt-bin
Then validate that that KVM was installed and that the CPU has VT-x virtualization enabled with kvm-ok.
$ sudo kvm-ok

INFO: /dev/kvm exists
KVM acceleration can be used
If you instead get a message that looks like below, then go in at the BIOS level and enable VT-x.
INFO: /dev/kvm does not exist
HINT: sudo modprobe kvm_intel
INFO: Your CPU supports KVM extensions
INFO: KVM (vmx) is disabled by your BIOS
HINT: Enter your BIOS setup and enable Virtualization Technology (VT),
and then hard poweroff/poweron your system
KVM acceleration can NOT be used
Then run the virt-host-validate utility to run a whole set of checks against your virtualization ability and KVM readiness.
# if this fails, you may have an older version still installed
virt-host-validate --version

# the newest version comes from /usr/bin (not /usr/local/bin)
which virt-host-validate

# this utility comes from the libvirt-clients package
sudo virt-host-validate
Relax permissions
The libvirt daemon comes with a strict set of permissions and AppArmor policy enabled. Relax the security_driver and set to an empty set of namespaces, and restart libvirt or you may not be able to create a guest VM.
# append these settings to avoid AppArmor issues
echo 'security_driver = "none"' | sudo tee -a /etc/libvirt/qemu.conf
echo 'namespaces = []' | sudo tee -a /etc/libvirt/qemu.conf

# make qemu:///system available to group, not just root
echo 'unix_sock_group = "libvirt"' | sudo tee -a /etc/libvirt/libvirtd.conf

sudo systemctl restart libvirtd
sudo journalctl -u libvirtd.service --no-pager

# should be 'active' after restart
sudo systemctl status libvirtd
You should not have to modify any of the AppArmor profiles to ‘complain’. But if you must, there are notes at the bottom of this article.
Add user to libvirt groups
So that we can manage the guest VM as a regular user, we can add ourselves to all of the libvirt groups (e.g. libvirt, libvirt-qemu) and the kvm group.
# add self to libvirt related groups
cat /etc/group | grep libvirt | awk -F':' {'print $1'} | xargs -n1 sudo adduser $USER

# add user to kvm group also
sudo adduser $USER kvm

# relogin, then show group membership
exec su -l $USER
id | grep libvirt
Group membership requires a user to log back in, so if the “id” command does not show your libvirt* group membership, logout and log back in, or try “exec su -l $USER“.
QEMU connection to system
If not explicitly set, the userspace QEMU connection will be to “qemu:///session”, and not to “qemu:///system”. This will cause you to see different domains, networks, and disk pool when executing virsh as your regular user versus sudo.
Modify your profile so that the environment variable below is exported to your login sessions.
# use same connection and objects as sudo
export LIBVIRT_DEFAULT_URI=qemu:///system
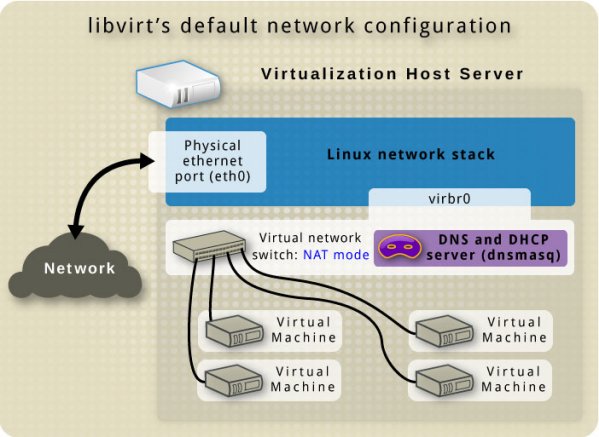
Default network
By default, KVM creates a virtual switch that shows up as a host interface named “virbr0” using 192.168.122.0/24. The image below is courtesy of libvirt.org.
This interface should be visible from the Host using the “ip” command below.
$ ip addr show virbr0
3: virbr0: <NO-CARRIER,BROADCAST,MULTICAST,UP> mtu 1500 qdisc noqueue state DOWN group default qlen 1000
    link/ether 00:00:00:00:00:00 brd ff:ff:ff:ff:ff:ff
    inet 192.168.122.1/24 brd 192.168.122.255 scope global virbr0
       valid_lft forever preferred_lft forever
“virbr0” operates in NAT mode, which allows the guest OS to communicate out, but only allowing the Host(and those VMs in its subnet) to make incoming connections.
Bridged network
To enable guest VMs on the same network as the Host, you should create a bridged network to your physical interface (e.g. eth0, ens4, epn1s0).
Read my article here for how to use NetPlan on Ubuntu to bridge your physical network interface to ‘br0’ at the OS level. And then use that to create a libvirt network named ‘host-bridge’ that uses br0.
# bridge to physical network
$ virsh net-dumpxml host-bridge

<network connections='2'>
  <name>host-bridge</name>
  <uuid>44d2c3f5-6301-4fc6-be81-5ae2be4a47d8</uuid>
  <forward mode='bridge'/>
  <bridge name='br0'/>
</network>
This ‘host-bridge’ will be required in later articles.
Enable IPv4 forwarding on KVM host
In order to handle NAT and routed networks for KVM, enable IPv4 forwarding on this host.
# this needs to be "1"
cat /proc/sys/net/ipv4/ip_forward
# if not, then add it
echo net.ipv4.ip_forward=1 | sudo tee -a /etc/sysctl.conf

# make permanent
sudo sysctl -p /etc/sysctl.conf
Default storage pool
The “default” storage pool for guest disks is “/var/lib/libvirt/images”. This is fine for test purposes, but if you have another mount that you want to use for guest OS disks, then you should create a custom storage pool.
Below are the commands to create a “kvmpool” on an SSD mounted at “/data/kvm/pool”.
$ virsh pool-list --all
 Name                 State      Autostart
-------------------------------------------
 default              active     yes

$ virsh pool-define-as kvmpool --type dir --target /data/kvm/pool
Pool kvmpool defined
$ virsh pool-list --all
$ virsh pool-start kvmpool
$ virsh pool-autostart kvmpool

$ virsh pool-list --all
 Name                 State      Autostart
-------------------------------------------
 default              active     yes
 kvmpool              active     yes
Create basic VM using virt-install
In order to test you need an OS boot image. Since we are on an Ubuntu host, let’s download the ISO for the network installer of Ubuntu 20.04 Focal. This file is only 74Mb, so it is perfect for testing. When complete, you should have a local file named “~/Downloads/mini.iso”
wget http://archive.ubuntu.com/ubuntu/dists/focal/main/installer-amd64/current/legacy-images/netboot/mini.iso -O ~/Downloads/mini.iso
First list what virtual machines are running on our host:
# chown is only necessary if virsh was run previously as sudo
ls -l ~/.virtinst
sudo chown -R $USER:$USER ~/.virtinst

# list VMs
virsh list --all
This should return an empty list of VMs, because no guest OS have been deployed. Create your first guest VM with 1 vcpu/1G RAM using the default virbr0 NAT network and default pool storage.
virt-install --virt-type=kvm --name=ukvm-focal --osinfo=ubuntu20.04 --ram 1024 --vcpus=1 --virt-type=kvm --hvm --cdrom ~/Downloads/mini.iso --network network=default --graphics vnc --disk pool=default,size=20,bus=virtio,format=qcow2 --noautoconsole

# setup display
export DISPLAY=":0"
xhost +
# open console to VM
virt-viewer ukvm-focal
“virt-viewer” will popup a window for the Guest OS, when you click the mouse in the window and then press <ENTER> you will see the initial Ubuntu network install screen.
If you want to delete this guest OS completely, close the GUI window opened with virt-viewer, then use the following commands:
virsh destroy ukvm-focal
virsh undefine ukvm-focal
Test from GUI
The virt-viewer utility will open a basic window to the guest OS, but notice it does not give any control beside sending keys. If you want a full GUI for managing KVM, I would suggest using “virt-manager“.

To install and start virt-manager:
sudo apt install qemu-system virt-manager -y
virt-manager
virt-manager provides a convenient interface for creating or managing a guest OS, and any guest OS you create from the CLI using virt-install will show up in this list also.
If you are attempting to run virt-manager from the GUI desktop, you will need to do a graphical logout, then login to get your group permissions re-evaluated and therefore permissions to ‘/var/run/libvirt/libvirt-sock’.
Default KVM Network
As a quick note, if the default KVM network (192.168.122.0/24) forward mode is set to ‘nat’, it is limited to outbound-only connections to any routed networks you create. I would recommend changing the forward mode = ‘route’ if you want bi-directional access with any future routed KVM networks you create.
# if you want to modify the forward mode to 'route'
# first stop any VMs using network
virsh net-dumpxml default

# then restart the network
virsh net-destroy default
virsh net-start default
REFERENCES
thegeekway, kvm vs qemu vs libvirt
https://www.cyberciti.biz/faq/installing-kvm-on-ubuntu-16-04-lts-server/ (configure bridged networking manually)
https://linuxconfig.org/simple-virtualization-with-ubuntu-16-04-and-kvm (libvertd group, adding bridged networking using Ubuntu Network Manager GUI or console)
https://help.ubuntu.com/community/KVM/Networking (networking modes for KVM, by default private to host, then bridged; troubleshooting)
https://www.ostechnix.com/setup-headless-virtualization-server-using-kvm-ubuntu/ (install, use console commands for mgmt of KVM, VNC/TigerVNC access)
https://www.linuxjournal.com/article/9764 (nice description of kernel/user/guest space and virtualization with KVM)
https://www.ostechnix.com/how-to-find-if-a-cpu-supports-virtualization-technology-vt/ (multiple ways to determine if virtualization supported by CPU)
https://linuxconfig.org/virtualization-solutions-on-linux-systems-kvm-and-virtualbox (KVM versus Virtualbox features)
https://www.virtualbox.org/ticket/4032 (VirtualBox does not pass through VT-x to guests)
https://serverfault.com/questions/208693/difference-between-kvm-and-qemu (Qemu vs KVM)
https://www.linux-kvm.org/page/FAQ (using as non-privilege user,checking hw accel,time sync)
https://www.altaro.com/vmware/how-to-set-up-a-nested-vsphere-6-environment-part-1/
https://www.virtualbox.org/manual/ch10.html#gimproviders (VirtualBox docs describing paravirtualization)
https://wiki.ubuntu.com/KvmWithBridge (manual instructions)
https://wiki.libvirt.org/page/VirtualNetworking (virtual networking diagrams and full descriptions)
https://linux.die.net/man/1/virt-install (man page)
http://cdimage.ubuntu.com/netboot/16.04/ (network install ISO for Ubuntu 16.04)
https://www.jethrocarr.com/2012/08/04/virt-viewer-remote-access-tricks/ (virt-viewer over ssh tunnel)
https://blog.programster.org/kvm-cheatsheet (resizing memory using ‘virsh edit’, cpu sched params,cpu affinity,guest net list,manual bridge,snapshot)
https://www.redhat.com/en/blog/inception-how-usable-are-nested-kvm-guests (kvm-intel nested,ept)
http://redsymbol.net/linux-kernel-boot-parameters/ (kernel boot parameters for kvm)
https://wiki.openstack.org/wiki/LibvirtXMLCPUModel (cpu.type=host-passthrough|host-model)
https://docs.fedoraproject.org/en-US/quick-docs/using-nested-virtualization-in-kvm/ (enabling nested virt)
https://wiki.archlinux.org/index.php/PCI_passthrough_via_OVMF#Setting_up_IOMMU (IOMMU steps)
https://virtuallyfun.com/wordpress/2017/03/07/running-vmware-esxi-6-5-linuxkvm/ (qemu-system-x86.conf)
Enable VT-x on HP workstations
KVM, network bridge on Ubuntu bionic
Enabling VT-x in UEFI, disable Microsoft Hyper-V
IBM, virsh-pool summary of commands
NOTES
SPECIFYING OS FLAVOR IF AUTOSENSE DOES NOT WORK
Use virt-install to list the known flavors of Ubuntu.
virt-install --osinfo list | grep -i ubuntu

# OR
sudo apt-get install libosinfo-bin
osinfo-query os | grep ubuntu | awk {'print $1'}
On Ubuntu 14.04 use
virt-install --os-variant list | grep -i ubuntu
Then specify “–os-variant=ubuntutrusty” (on trusty) or “–os-variant=ubuntu14.04” (on xenial) as parameter in virt-install.
virsh edit ukvm1404 (will show variant at /domain/os/type@machine)
Checking true size of sparse disk
sparse files consist of runs of empty “0”, ls will report inflated apparent size, du will report true size. For details on disk use qemu-img
sudo qemu-img info <disk>.qcow2
making sure VT-x is enabled on host
==add to /etc/modprobe.d/qemu-system-x86.conf
options kvm_intel nested=1 enable_apicv=n
options kvm ignore_msrs=1
check with
cat /sys/module/kvm/parameters/ignore_msrs (want Y)
cat /sys/module/kvm_intel/parameters/enable_apicv (want N)
cat /sys/module/kvm_intel/parameters/nested (want Y)
<REBOOT>
$ sudo kvm-ok
$ virt-host-validate
$ egrep -c ‘(vmx|svm)’ /proc/cpuinfo (want non-zero value for # cpus)
==Then ssh into the esxi host, /etc/vmware/config
vmx.allowNested=TRUE
Checking VT-d virtualization for IO, IOMMU (different from cpu VT-x)
dmesg | grep -iE "dmar|iommu|aspm"

cat /var/log/kern.log | grep IOMMU
==add to /etc/default/grub (for VT-d) bug in 18.04
GRUB_CMDLINE_LINUX_DEFAULT=”intel_iommu=on”
grub-install --version

# equiv to grub2-mkconfig
sudo update-grub
kvm settings worked for esxi6.7 installation and running
cpus > copy host CPU configuration; disk1=IDE (not sata|not scsi); nic=e1000; cd=IDE; video=QXL 16Mb (cirrus caused cycling at initial boot screen); display spice|vnc
Verbose logs for libvirt-bin
$ sudo vi /etc/libvirt/libvirtd.conf

log_level = 1

log_outputs="1:syslog:libvirtd"

$ sudo systemctl restart libvirt-bin

$ journalctl -f

$ journalctl -u libvirt-bin
Removing virsh storage pool, link
virsh pool-autostart <name> --disable
virsh pool-destroy <name>
# pool-delete is optional, just to remove local dir
virsh pool-delete <name>
virsh pool-undefine <name>
Pre-create image for use with virt-install
# 1200Gb but created sparse
qemu-img create -f qcow2 esxi1.qcow2 1200G
qemu-img info esxi1.qcow2

# when using virt-install, refer to path of disk
virt-install --disk /path/to/imported/esxi1.qcow2
Determining version of QEMU, KVM, virsh
# below from Ubuntu 20 Focal

$ sudo apt show qemu-system-x86
Package: qemu-system-x86
Version: 1:4.2-3ubuntu6.17
$ kvm --version
QEMU emulator version 4.2.1 (Debian 1:4.2-3ubuntu6.17)
Copyright (c) 2003-2019 Fabrice Bellard and the QEMU Project developers

$ qemu-system-x86_64 --version
QEMU emulator version 4.2.1 (Debian 1:4.2-3ubuntu6.17)

$ virsh --version
6.0.0
If upgrading from older versions watch for “/local/sbin/libvirtd: /usr/lib/x86_64-linux-gnu/libvirt.so.0: version `LIBVIRT_PRIVATE_4.8.0′ not found (required by ./local/sbin/libvirtd)”
# This could come from 'virt-host-validate' utility or 'libvirtd' service not starting.
$ virt-host-validate
$ sudo systemctl status libvirtd
$ sudo journalctl -u libvirtd --no-pager


# this gives the error because it is the older version
$ /usr/local/sbin/libvirtd -V
# whereas this one print 6.0.0 as expected
$ /usr/sbin/libvirtd -V

# so we must get rid of references to this old libvirtd

# look at libvirt systemd service file
$ sudo grep ExecStart /lib/systemd/system/libvirtd.service
ExecStart=/usr/sbin/libvirtd $libvirtd_opts

# here is the problem, change it
$ sudo grep ExecStart /usr/local/lib/systemd/system/libvirtd.service
ExecStart=/usr/local/sbin/libvirtd $LIBVIRTD_ARGS

# get these old files out of PATH, clear path cache
$ cd /usr/local/bin
$ sudo mkdir bak
$ sudo mv *virt* bak/.
$ hash -r

$ sudo systemctl daemon-reload
$ sudo systemctl restart libvirtd
$ sudo systemctl status libvirtd
$ sudo journalctl -u libvirtd --no-pager

# ok, good now
Checking AppArmor status, setting to complain instead of enforce
sudo aa-status
sudo aa-status | grep virt

# set to 'complain' so it writes to log, but doesn't stop process
aa-complain /usr/sbin/libvirtd
aa-complain /usr/sbin/virtlogd
aa-complain /usr/lib/libvirt/virt-aa-helper

sudo systemctl restart libvirtd
sudo systemctl status libvirtd
KSM for sharing memory among virtualized hosts [1,2]
KSM does share memory pages among common guest VMs, but I have seen more nested ESXi errors when this is enabled. For example, k8s clusters and vcenter interfaces will error and become unavailable, requiring a restart of the nested esxi host.
# KSM enabled if set to 1
cat sys/kernel/mm/ksm/run
# monitor sharing
watch cat /sys/kernel/mm/ksm/pages_shared

# enable KSM
echo 1 > /sys/kernel/mm/ksm/run

# enable KSM ever after reboot
echo 'w /sys/kernel/mm/ksm/run - - - - 1' > /etc/tmpfiles.d/ksm.conf

# verify enabled
grep -H '' /sys/kernel/mm/ksm/*
LIBVIRT_DEFAULT_URI environment variable [1,2,3]
has value in /etc/profile.d/libvirt-uri.sh and /etc/libvirt/libvirt.conf. Needs to be set to qemu:///system or user will get qemu:///session and see a completely different set of domains, networks, disk pool.
Changes to qemu.conf that can help with disk permissions
echo 'group = "libvirt"' | sudo tee -a /etc/libvirt/qemu.conf
echo 'dynamic_ownership = 1' | sudo tee -a /etc/libvirt/qemu.conf

# restart service
sudo systemctl restart libvirtd