![]() Zabbix distributes Docker images for each component. Not only does this mean you can quickly standup the monitoring solution, but upgrades also become a simple matter of trading up images.
Zabbix distributes Docker images for each component. Not only does this mean you can quickly standup the monitoring solution, but upgrades also become a simple matter of trading up images.
In this article, I will show how to stand up and then upgrade a zabbix installation using docker-compose.
Prerequisite
If you don’t already have Docker and Docker Compose installed, then see my article here for installing on Ubuntu.
Also make sure you have a git client
sudo apt-get install git
Checkout an older 4.0.1 version
Although Zabbix has newer 4.2 images, we will start by standing up a 4.01 image so that we can later show the upgrade path to 4.0.13 and then the latest 4.2.
# get zabbix-docker repo
git clone https://github.com/zabbix/zabbix-docker.git
cd zabbix-docker

# show current branch
git branch
# show tags from 4.0 branch
git tag --list '4.0.*'

git checkout 4.0.1
# will now show 'detached at 4.0.1'
git branch

# make file that replaces reference to latest docker image with 4.0.1
cp docker-compose_v3_alpine_mysql_latest.yaml docker-compose_v3_alpine_mysql_401.yaml

# replace latest with 4.0.1
sed -i "s/-4.0-latest/-4.0.1/" docker-compose_v3_alpine_mysql_401.yaml
Deploy a 4.0.1 stack
Then deploy the full stack described in the yml using docker-compose:
docker-compose -f ./docker-compose_v3_alpine_mysql_401.yaml up -d
After a few minutes of pulling down the images and creating the containers, it is done. You should see multiple zabbix related containers now when you run:
docker ps

# if you have other images, this filters it down
docker ps -f "name=zabbix"
The status of each should show as “up”. And if you want to follow the tailed logs of all the components:
docker-compose -f ./docker-compose_v3_alpine_mysql_401.yaml logs -f
Validate the 4.0.1 stack
In order to validate, we need to know the IP address of the nginx container that is exposing the Zabbix Admin web interface, which can be done using:
# get all container names
docker ps --format "{{.Names}}"

# view container for front end
docker ps -f "name=zabbix-web-nginx"

# get container id using name
docker ps -f "name=zabbix-web-nginx" --format "{{.ID}}"

# gets IP address of nginx front end, specify network
docker inspect $(docker ps -f "name=zabbix-web-nginx" --format "{{.ID}}") --format='{{ (index .NetworkSettings.Networks "zabbix-docker_zbx_net_frontend").IPAddress }}'
The “zabbix-docker_zbx_net_frontend” used to pull the outside facing IP address is created by Docker Compose, and is the concatenation of the directory name “zabbix-docker” and “zbx_net_frontend” defined in the networks section of the original yaml.
The web front end should be available via HTTP on port 80, which means commands like below should be successful (substitute with your IP from above).
nc -vz 172.16.238.7 80
And from the browser, you should be able to login with the default credentials (Admin/zabbix).
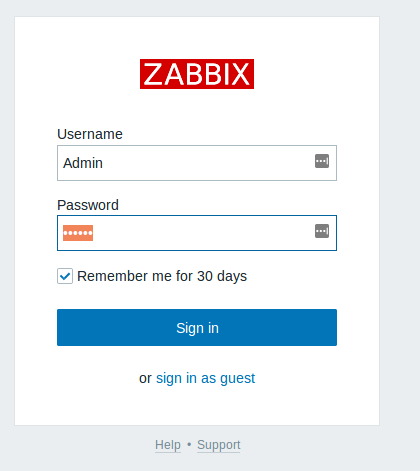
This will get you into the Zabbix Admin web interface.
If you scroll to the very bottom of that web page the version will be shown as “Zabbix 4.0.1”.
Enable Zabbix Agent reporting
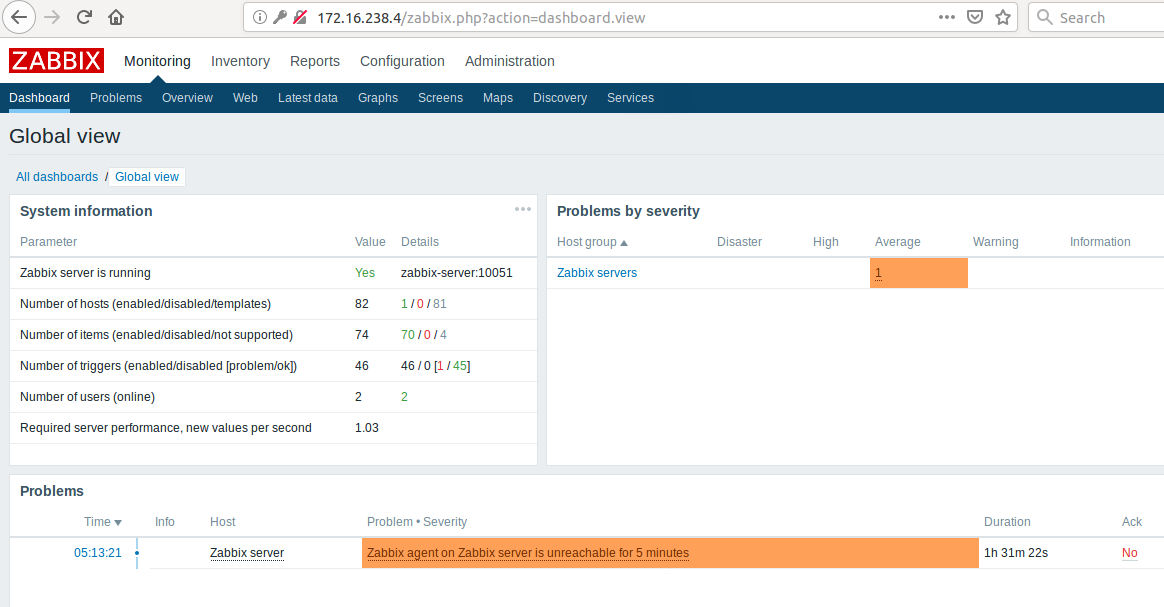
You may notice that the dashboard lists one problem ‘Zabbix agent on Zabbix server is unreachable for 5 minutes’. This is because unlike a standard installation where they would be processes on the same host, the zabbix agent is in a different container than the server.
To fix, this we need to get the IP address of the zabbix agent which is on the backend network.
docker inspect $(docker ps -f name="zabbix-agent" --format "{{.ID}}") --format='{{ (index .NetworkSettings.Networks "zabbix-docker_zbx_net_backend").IPAddress }}'
Go back to the Zabbix Admin web interface, and go to Configuration > Hosts, and click on the “Zabbix server” to update to the IP address we got above.
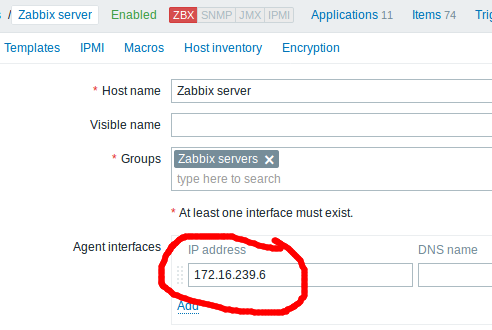
Then press the “Update” button. Go back to the zabbix main dashboard and within a couple of minutes, the problem originally seen will disappear.
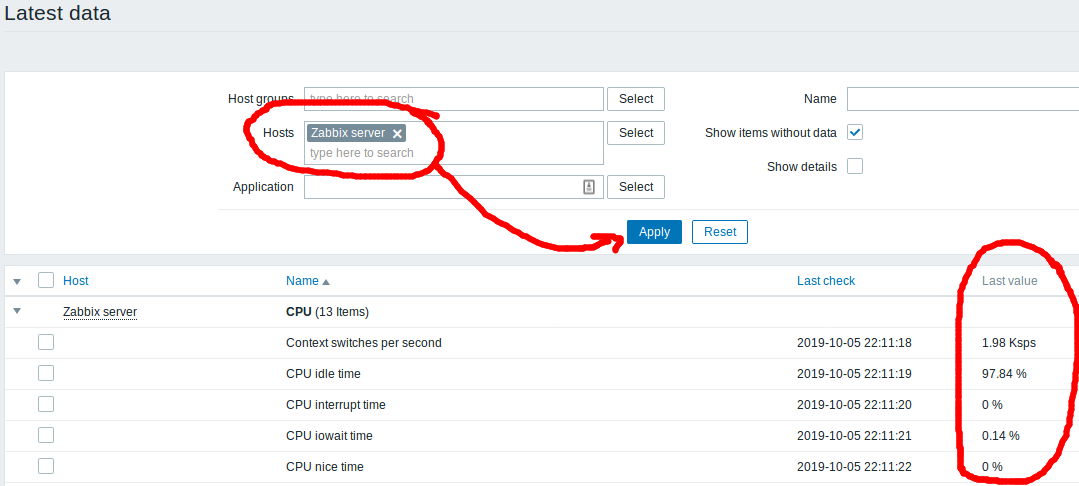
And if you go to Monitoring > Latest data, and select “Zabbix server” and apply it, you should see the latest values coming in as shown below.
Create a host definition
In order to validate that our definitions and data persist through the our planned upgrade from 4.0.1 -> 4.0-latest -> 4.2, we will now create a host definition with sample data.
This host will have a single trapper item named “mycount” that we will send manually using zabbix_sender (items of type “trapper” are sent by the agent, versus being queried for by the server).
First create a host definition by going to Configuration>Hosts and pressing the “Create Host” button. Then use “testhost1” as the hostname, “Linux servers” as the hostgroup, and press “Add”. This will create the host definition in the database.
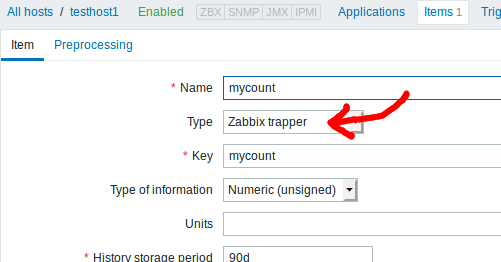
This will get you back to the main hosts page, click on “items” on the “testhost1” row to add a field that will accept our data. Press the “Create item” button. Use “mycount” as both the name and key, and use the type of “Zabbix trapper”. Press the “Add” button.
Now that the host and field are created on the zabbix side, we need to send data.
The zabbix-agent container has a “zabbix_sender” binary available. We wil use it to send values to mycount.
# send data using zabbix_sender utility on agent
docker exec -it $(docker ps -f name="zabbix-agent" --format "{{.ID}}") zabbix_sender -v -s testhost1 -z zabbix-server -p 10051 -k mycount -o 1
If there is a failure, give the host and item a couple of minutes to sync and then retry. When successful, you will see a message like below that says “failed: 0”:
info from server: "processed: 1; failed: 0; total: 1; seconds spent: 0.000220"
sent: 1; skipped: 0; total: 1
And if you go to Monitoring>Latest data and select the hostname of “testhost1” you should see the latest value sent. Pressing the “graph” link will show you a history of the values you have sent. Beware that you will not always see every value, because this in an aggregated metric fit into a time bucket.
Upgrading to Zabbix 4.0.13
The previous work with setting up hosts was to show that upgrades can be accomplished without losing data. The zabbix binaries are running in containers, but the ‘zbx_env’ directory is where the persistent volumes are kept for the MySql database, external scripts, etc. and will survive through upgrades.
# stop the containers gracefully using SIGTERM, important for database
docker-compose -f ./docker-compose_v3_alpine_mysql_401.yaml stop

docker ps -f "name=zabbix"
There are several signficant changes between 4.0.1 and 4.0.13 including mysql changing to mysql:8.0 in 4.0.7, and starting in 4.0.10 Docker secrets were introduced, but all these details will be hidden from you during the image upgrade including the required database schema changes.
Checkout the latest 4.0.13 tag from source control. The yml file by default references “4.0-latest” so there is no need to modify it like we did for 4.0.1. Then have Docker Compose bring it back up.
# checkout by tag
git checkout 4.0.13

# file already by default uses 4.0-latest
docker-compose -f ./docker-compose_v3_alpine_mysql_latest.yaml up -d
Give the operation a few minutes, and the database time to be updated.
Because the containers were rebuilt, the nginx container fronting the web interface may have changed. Check the IP address again using the command below, then go to the Zabbix Admin web interface using this IP address.
docker inspect $(docker ps -f name="zabbix-web-nginx-mysql" --format "{{.ID}}") --format='{{ (index .NetworkSettings.Networks "zabbix-docker_zbx_net_frontend").IPAddress }}'
If you scroll to the very bottom of the main Admin web page, you should see “Zabbix 4.0.13” reported. And looking at the latest data you should be able to see testhost1.mycount has the same historical values as before.
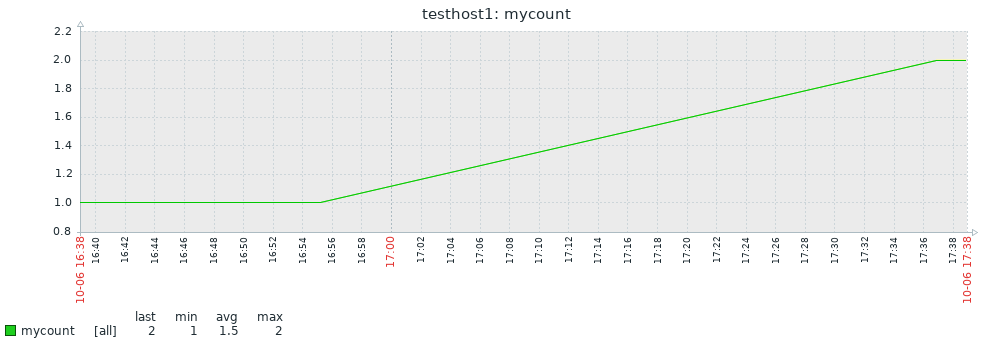
Let’s go ahead and send a value of “2” to the mycount item.
docker exec -it $(docker ps -f name="zabbix-agent" --format "{{.ID}}") zabbix_sender -v -s testhost1 -z zabbix-server -p 10051 -k mycount -o 2
And now if we look at the latest data graph for testhost1.mycount, the min/max=1/2, and we can see the graph visualize this change.
Upgrading to Zabbix 4.2-latest
The last step is to upgrade to the next major release, 4.2-latest. First stop the currently running 4.0-latest images, and verify they are gone.
docker-compose -f ./docker-compose_v3_alpine_mysql_latest.yaml stop

docker ps -f "name=zabbix"
Then checkout the 4.2 branch from source control . The yml file already references “4.2-latest” so there is no need to modify it. Then have Docker Compose bring it back up.
# checkout by branch
git checkout 4.2

docker-compose -f ./docker-compose_v3_alpine_mysql_latest.yaml up -d
Give the operation a few minutes, and the database time to be updated.
Then find the IP address of the fronting nginx again:
docker inspect $(docker ps -f name="zabbix-web-nginx-mysql" --format "{{.ID}}") --format='{{ (index .NetworkSettings.Networks "zabbix-docker_zbx_net_frontend").IPAddress }}'
And use this IP to open your browser to the Zabbix Admin web interface again. If you scroll to the very bottom of the main page, you should see “Zabbix 4.2.7” reported.
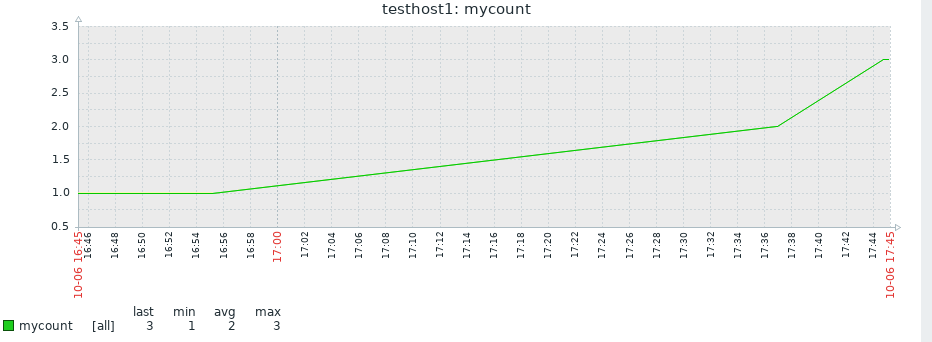
Now send a value of “3” to the mycount item.
docker exec -it $(docker ps -f name="zabbix-agent" --format "{{.ID}}") zabbix_sender -v -s testhost1 -z zabbix-server -p 10051 -k mycount -o 3
The latest data will reflect a min/max of 1/3 and visually you can see the growth from 1 (using zabbix 4.0.1) to 2 (using zabbix 4.1.13) to 3 (using the latest zabbix 4.2 branch).
REFERENCES
docker, official zabbix docker repo
zabbix, blog on Zabbix Docker Containers
docker hub, 4.0.1 images for zabbix-server-mysql
vsupalov, docker compose vs swarm
severalnines, purposely failing and corrupting mysql
NOTES
shell into container
docker exec −it <containerID> /bin/bash
view the differences between different git versions of file
git diff 4.0.13:docker-compose_v3_alpine_mysql_latest.yaml 4.2:docker-compose_v3_alpine_mysql_latest.yaml
Bring down just the mysql database, gracefully
docker-compose -f ./docker-compose_v3_alpine_mysql_401.yaml kill -s SIGTERM mysql-server
copying external volumes so it could be restored if necessary
sudo tar cvfz zbx_env_401.tgz zbx_env/.
Checking mysql version
docker exec <mysqlcontainerid> mysql --version
==went from using values to secrets between 4.0.1 and 4.0.13
git diff 4.0.1:docker-compose_v3_alpine_mysql_latest.yaml 4.0.13:docker-compose_v3_alpine_mysql_latest.yaml
test bringing up only single component
docker-compose -f ./docker-compose_v3_alpine_mysql_latest.yaml up mysql-server
If you do a “docker-compose kill” with default SIGKILL, the mysql database will register this as a crash next time you startup. Need to send SIGTERM instead (-s SIGTERM). This will recover for the same version, but for upgrades will fail and the image will have to be rolled back.
mysql-server_1 | 2019-10-06T14:07:41.175988Z 0 [Note] InnoDB: Log scan progressed past the checkpoint lsn 36877275
mysql-server_1 | 2019-10-06T14:07:41.176014Z 0 [Note] InnoDB: Doing recovery: scanned up to log sequence number 36877284
mysql-server_1 | 2019-10-06T14:07:41.176025Z 0 [Note] InnoDB: Database was not shutdown normally!
mysql-server_1 | 2019-10-06T14:07:41.176034Z 0 [Note] InnoDB: Starting crash recovery.
mysql-server_1 | 2019-10-06T14:07:41.355193Z 0 [Note] InnoDB: Removed temporary tablespace data file: "ibtmp1"
As a comparison, here are the logs when issuing a SIGTERM
mysql-server_1 | 2019-10-06T14:03:15.560854Z 0 [Note] InnoDB: Starting shutdown...
mysql-server_1 | 2019-10-06T14:03:15.661438Z 0 [Note] InnoDB: Dumping buffer pool(s) to /var/lib/mysql/ib_buffer_pool
mysql-server_1 | 2019-10-06T14:03:15.662016Z 0 [Note] InnoDB: Buffer pool(s) dump completed at 191006 14:03:15
mysql-server_1 | 2019-10-06T14:03:16.681298Z 0 [Note] InnoDB: Shutdown completed; log sequence number 36877256
mysql-server_1 | 2019-10-06T14:03:16.683826Z 0 [Note] InnoDB: Removed temporary tablespace data file: "ibtmp1"
mysql-server_1 | 2019-10-06T14:03:16.683859Z 0 [Note] Shutting down plugin 'MEMORY'
mysql-server_1 | 2019-10-06T14:03:16.683871Z 0 [Note] Shutting down plugin 'CSV'
mysql-server_1 | 2019-10-06T14:03:16.683881Z 0 [Note] Shutting down plugin 'sha256_password'
mysql-server_1 | 2019-10-06T14:03:16.683888Z 0 [Note] Shutting down plugin 'mysql_native_password'
mysql-server_1 | 2019-10-06T14:03:16.684059Z 0 [Note] Shutting down plugin 'binlog'
mysql-server_1 | 2019-10-06T14:03:16.685653Z 0 [Note] mysqld: Shutdown complete
docker-compose ‘kill’ can do graceful stop if you send custom signal
docker-compose ... kill -s SIGTERM
In addition to SIGTERM, you can also do a graceful shutdown with:
mysqladmin -u root --password=root_pwd -h 127.0.0.1 --protocol=tcp shutdown