![]() Flashing the firmware of the Linksys WRT1X00AC/S is well documented on the OpenWrt wiki. So I don’t feel the need to go over the architectural concepts in this article, but I did want to provide instructions for the Ubuntu specific tools you can use to flash the firmware.
Flashing the firmware of the Linksys WRT1X00AC/S is well documented on the OpenWrt wiki. So I don’t feel the need to go over the architectural concepts in this article, but I did want to provide instructions for the Ubuntu specific tools you can use to flash the firmware.
If you want to try flashing to OpenWrt using the factory LinkSys ‘Router Firmware Update’ feature, that is your choice, but it really is working blind and you have no ability to fix issues if something goes wrong. After bricking my router once, I now rely solely on the Serial to USB-TTL cable which is the highly recommended connectivity method from the OpenWrt page.
Step 1. Connect via USB-TTL cable
I wrote a detailed article about using the Adafruit USB TTL Serial cable to connect to the Linksys WRT1X00AC/S for an Ubuntu host.
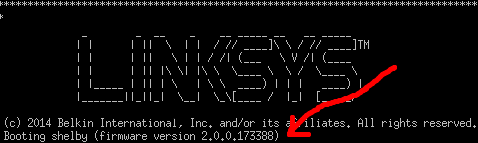
After powering off/on the router, you should be able to clearly the see the boot sequence of your Linksys firmware in your terminal program. Below is a snippet of the output showing the Linksys logo in ASCII art which scrolls by as the router brings up all its services.
Step 2. Determine your exact hardware
For the LinkSys WRT1X00AC/S series, there are several ways you can determine the exact hardware: look at the firmware version as shown during the boot process as highlighted in the image above, OR login to the LinkSys web interface and look under the Signout > About menu (http://192.168.1.1 default password is ‘admin’),

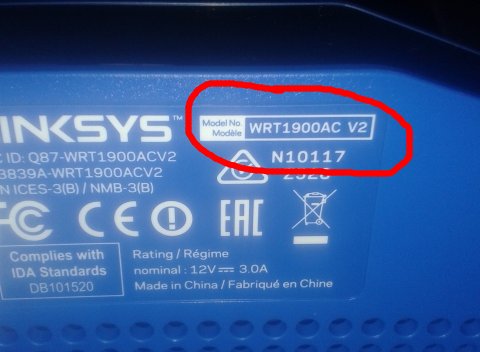
OR look at the bottom of the router case and it will list the exact model number (whether WRT1200AC, WRT1900AC V1/V2, or WRT1900ACS V1/V2). Note that the cardboard box shows the model, but is not sufficient because it does not list the exact version (V1 versus V2).
Step 3. Download OpenWrt image
Based on the hardware version discovered above, you will need to download the relevant binary image from the download page. The ‘-factory’ images are for first time deployments (for example going from LinkSys standard firmware to OpenWrt). The ‘-sysupgrade’ images are for subsequent patching where you want to preserve the older settings. You can read more here.
Using the browser on your Ubuntu host, download the binary to a local folder.
Step 4. Connect via Lan cable
You should still have the USB-TTL cable from step #1 plugged in and communicating to the terminal program on your Ubuntu host.
In order to avoid subnet and route conflicts, disconnect your Ubuntu host from any wireless networks by turning wireless off, or putting it into Airplane mode from the GUI. Or you can use console commands similar to below to disable a dynamic wireless connection.
ifconfig wlan0 down
Now connect wired Ethernet Port 1 on the back of the Linksys router (colored blue) to the wired Ethernet port of your Ubuntu host for a physical LAN connection.
The serial connection is the ‘command channel’ for us to control the router. The LAN channel will be used to transfer the binary image from your Ubuntu host to the router in a later step.
Now we are going to set a static IP address on the Ubuntu host so that we can guarantee that the router can reach it and there is no guesswork on the subsequent steps. The router is default to 192.168.1.1/24 and so we will force the Ubuntu host to the same subnet on 192.168.1.2
I tried modifying ‘/etc/network/interfaces’ and using ifdown/ifup from the console in order to force a static IP, but in the end I used the desktop because I was getting unstable results and disconnects from the wired interface (I was using a LiveCD boot, so I was attempting to make these network changes without rebooting). Feel free to set the static IP in the manner you are comfortable, I’ll provide desktop instructions.
From the desktop, open: System Settings > Network
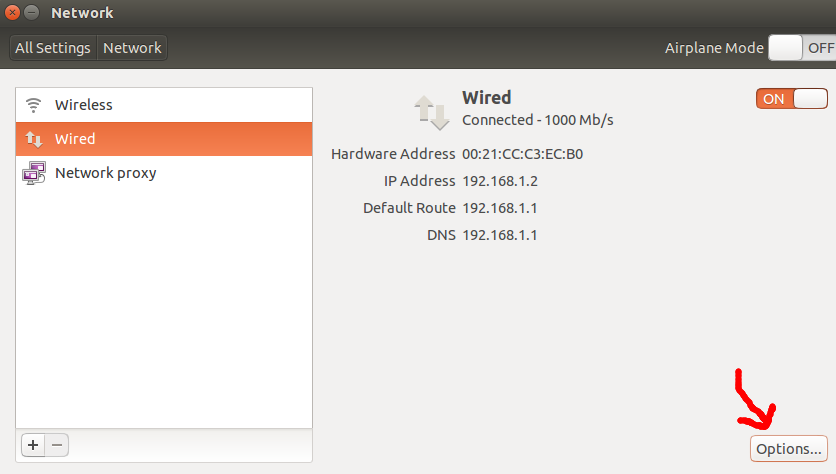
And select ‘Options’. This will open the wired connection dialog, go to the ‘IPv4 Settings’ tab and select the Manual method and set the static IP address to 192.168.1.2, netmask to 255.255.255.0, and gateway to 192.168.1.1
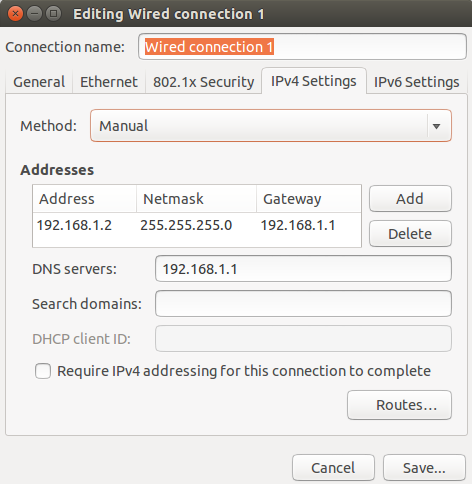
Then press the ‘Routes..’ button and add the router as a gateway to the 192.168.1.0 network.
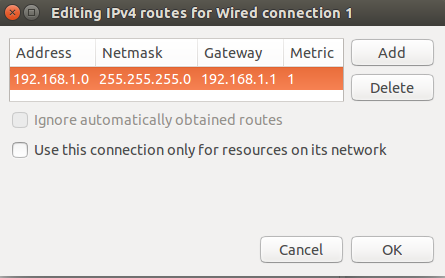
Press ‘OK’ on the routes dialog, and then ‘Save’ on the wired network dialog to save all settings.
And now issuing ‘ifconfig’ from the Ubuntu console should report back that local eth0 is set to 192.168.1.2. Issuing a ‘ping 192.168.1.1’ from the Ubuntu console should report packets coming back from the router.
Step 5: Configure TFTP to serve OpenWrt image
Install a TFTP server on the Ubuntu host as I describe here that can serve up the OpenWrt binary image to the router.
When testing, make sure the TFTP server is available at the static 192.168.1.2 IP address because this is how it will be accessed from the router.
tftp 192.168.1.2
Step 6: U-Boot and flashing the image
The terminal program from step #1 should still be communicating with the router. Power off/on the router, and in the first few seconds you will get a message at the terminal saying ‘Hit any key to stop autoboot:’. You have three seconds to press a key, go ahead and do it, and you will be immediately be given the ‘Marvel>>’ console prompt.
This is the U-Boot interface, and is where you will specify the IP address of the TFP server where the image will be retrieved, the name of that image, and then finally the command that flashes the image unto the router.
First, let’s print the default parameters, and we will override what is necessary. Issue the following commands at the terminal program.
Marvell>> printenv ipaddr
ipaddr=192.168.1.1
Marvell>> printenv netmask
netmask=255.255.255.0
Marvell>> printenv serverip
serverip=192.168.1.254
Marvell>> printenv firmwareName
firmwareName=cobra.img
The ‘ipaddr’ and ‘netmask’ are what we expected, which is the default IP of 192.168.1.1 for the router. The ‘serverip’ is where the TFTP server should be located and we need to change that to 192.168.1.2 (the Ubuntu host). And the .img file it expects to download is called ‘cobra.img’, but we know the file we put into the TFTP home directory for the ACS1900V2 is actually ‘openwrt-15.05.1-mvebu-armada-385-linksys-shelby-squashfs-factory.img’, so we will change that also with the following commands:
setenv serverip 192.168.1.2
setenv firmwareName openwrt-15.05.1-mvebu-armada-385-linksys-shelby-squashfs-factory.img
Note that in older versions of the WRT1xAC series, the environment variable is ‘firmware_name’ and not ‘firmwareName’.
Finally, we will flash both the primary and alternate partition with the command:
run update_both_images
At this point you will see the image being loaded via TFTP and loaded. If you get errors or timeouts from TFTP, try running ‘ping 192.168.1.2’ from the Marvell prompt to make sure it can reach the Ubuntu host at its static IP address.
<img>Marvell>> run update_both_images
Using egiga0 device
TFTP from server 192.168.1.2; our IP address is 192.168.1.1
Filename 'openwrt-15.05.1-mvebu-armada-385-linksys-shelby-squashfs-facto
Load address: 0x2000000
Loading: ###############################################################

###############################################################
         ###############################################################
         8 MiB/s
done
Bytes transferred = 9043968 (8a0000 hex)

NAND erase: device 0 offset 0xa00000, size 0x2800000
Erasing at 0x31e0000 -- 100% complete.
OK

NAND erase: device 0 offset 0x3200000, size 0x2800000
Erasing at 0x59e0000 -- 100% complete.
OK

NAND write: device 0 offset 0xa00000, size 0x8a0000
 9043968 bytes written: OK

NAND write: device 0 offset 0x3200000, size 0x8a0000
 9043968 bytes written: OK
And then you can reboot by cycling the power or typing ‘boot’.
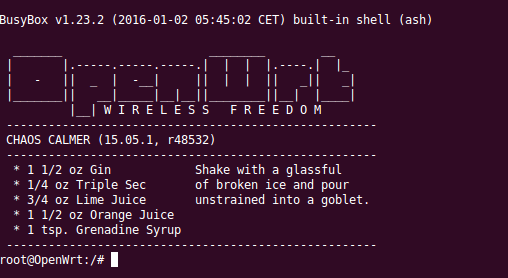
The terminal screen of the USB-TTL connection should show you OpenWrt loading its services. Give it a minute, and then press <ENTER> a couple of times and you should get the OpenWrt banner and a console prompt. If you do not, then hold down the red reset button next to the power switch for 10 seconds and release, and try letting it go through the OpenWrt service loading again, and then try pressing <ENTER> again.
The terminal program should now show the OpenWrt ASCII art banner as shown below.
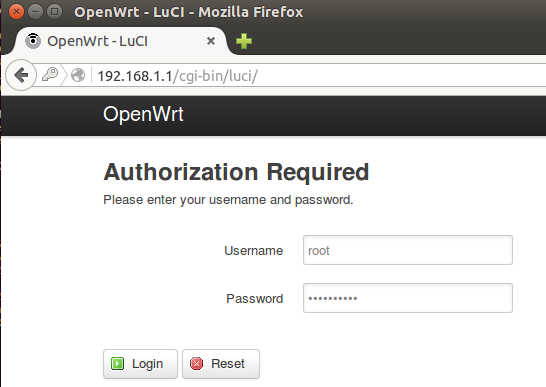
If you have installed a stable image as described in this article, then you should also be able to access LuCI, the web administration interface from your browser at http://192.168.1.1. The default user/password is root/admin.
If you went with one of the bleeding edge or trunk images, then you can install LuCI manually.
REFERENCES
https://wiki.openwrt.org/toh/linksys/wrt1x00ac_series
https://github.com/Chadster766/McWRT/wiki/Flashing-Firmware-using-a-USB-to-TTL-Cable
https://github.com/Chadster766/McWRT/wiki/WRT1900AC-corrupt-bootloader-recovery
https://github.com/Chadster766/McWRT/wiki/Manually-switch-to-previous-firmware
https://www.youtube.com/watch?v=mN7u79EupGQ
https://wiki.openwrt.org/toh/start
Experimenting with setting static IP from console without reboot
# force static IP on default Linksys network
iface eth0 inet static
address 192.168.1.2
network 192.168.1.0
netmask 255.255.255.0
gateway 192.168.1.1
refreshing the eth0 interface
ifdown eth0
ip addr flush dev eth0
ifup eth0