![]() If you are running KVM on a console-only host OS, you can still do a full Ubuntu installation on a KVM guest VM by using serial port output and the Ubuntu Server text-based installer.
If you are running KVM on a console-only host OS, you can still do a full Ubuntu installation on a KVM guest VM by using serial port output and the Ubuntu Server text-based installer.
Once deployed, this guest VM can be accessed by using ssh or ‘virsh console’, without the need for a graphics display.
In this article, I will show you how to install Ubuntu Xenial Server by using the Ubuntu text-based installer. Then we will get access to the guest OS using standard ssh and ‘virsh console’.
Prerequisite
If you have not installed KVM on Ubuntu, then read my article here.
Create VM
Now use virt-install to create a VM that has “graphics” set to none, “console” set to a pseudo terminal of type serial, “location” set to the Ubuntu installer on ubuntu.com, and sending “extra-args” to the kernel to indicate a serial console.
virt-install \
--name ctest1 \
--ram 1024 \
--disk pool=default,size=20,bus=virtio,format=qcow2 \
--vcpus 1 \
--os-type linux \
--os-variant ubuntu16.04 \
--network network:default \
--graphics none \
--console pty,target_type=serial \
--location 'http://gb.archive.ubuntu.com/ubuntu/dists/xenial/main/installer-amd64/' \
--extra-args 'console=ttyS0,115200n8 serial' \
 --force --debug
Notice that we used “–location” pointing to an Ubuntu installer on the internet. If we had instead used “–cdrom” pointing to an ISO, we could not have used the “–extra-args” to the kernel, which is mandatory.
Install/Configure OS
After running virt-install above, the console will be filled with the text based Ubuntu installer as shown below.
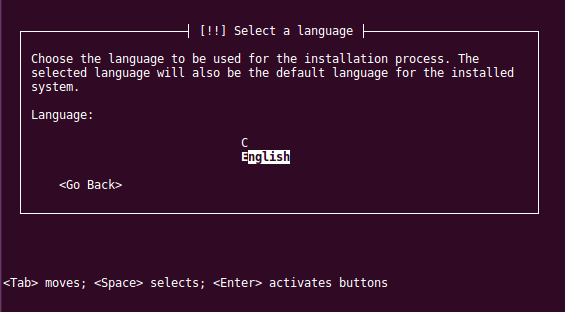
This will take you through the same OS installation steps as described in the Ubuntu documentation (picking language, keyboard, disk partitions, etc). Remember the username and password you specify in this process, because you will need it later.
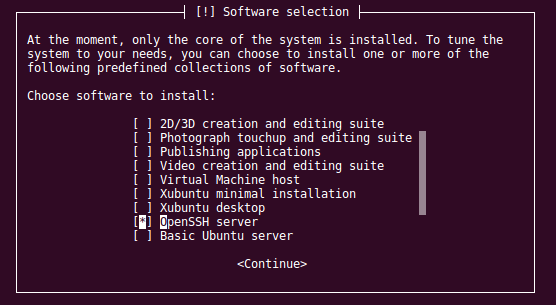
Be sure to select “OpenSSH Server” when the installer asks for which software packages you want. This is required for ssh access in the next section.
When the installer finishes it will show the installation complete screen like below.

Press CTRL+Shift+] to exit back to your host console. You are now back at your host console, and can restart the guest host using virsh.
virsh destroy ctest1
virsh start ctest1
SSH access
You first need to access the guest VM via ssh. This will allow us to set the kernel parameters required to use virsh console in the next step.
Get the MAC address of the guest VM using virsh.
virsh domiflist ctest1
Then use the MAC address to get the IP address using ARP
arp -an | grep <MAC>
Use this IP address and the user/password credentials you set during the Ubuntu installation process to ssh.
ssh <user>@<IP>
virsh console access
If you tried to use ‘virsh console’ at this point, you would not see any output. This is because ‘/etc/default/grub’ does not specify the console in the kernel boot parameters.
Edit ‘etc/default/grub’, and append ‘console=ttyS0’ to the default boot parameters.
GRUB_CMDLINE_LINUX_DEFAULT="quiet splash console=ttyS0"
Then upgrade grub, and restart the guest.
sudo update-grub
init 6
This will throw you back to the host console. Give the guest VM a couple of minutes to come back up, and then call up the guest console using:
virsh console ctest1
Press <ENTER> and you should get a login prompt. When you say ‘exit’ at the guest shell, it will take you back to the login console of the guest, so use CTRL+Shift+] to exit back to your host console.
REFERENCES
https://blog.alexellis.io/kvm-kubernetes-primer/ (example)
https://www.packet.net/developers/guides/kvm-and-libvirt/ (example)
https://blog.zencoffee.org/2016/06/easy-headless-kvm-deployment-virt-install/ (Ubuntu example, as well as Windows 10)
https://unix.stackexchange.com/questions/288344/accessing-console-of-ubuntu-16-04-kvm-guest (modifying /etc/default/grub on xenial so virsh console works)
https://askubuntu.com/questions/809062/error-couldnt-find-hvm-kernel-during-kvm-guest-install-of-ubuntu-server-16-04 (reason why iso not possible to use is bug, –debug)
https://github.com/virt-manager/virt-manager/commit/3f15a489cda87f8028828d567848193dd2640a43 (checkin that supposedly fixed –location bug for xenial ISO)
https://www.redhat.com/archives/virt-tools-list/2016-August/msg00074.html (thread for bug in –location for xenial)
https://askubuntu.com/questions/164227/how-to-mount-an-iso-file (ISO mount that can be used in –location)
http://releases.ubuntu.com/16.04.5/ (xenial ISO downloads)
http://gb.archive.ubuntu.com/ubuntu/dists/xenial/main/installer-amd64/ (online directories that do work for xenial)
https://www.cyberciti.biz/faq/howto-exit-virsh-console-connection-on-centos-ubuntu-debian-linux/ (shortcut to exit virsh console)
NOTES
Mounting ISO at a local folder path
sudo mkdir /media/iso
sudo mount -o ro,loop path/to/iso/file/YOUR_ISO_FILE.ISO /media/iso
sudo umount /media/iso