 It is common for a virtualized Guest OS base image to have a generic minimal storage capacity. But this capacity can easily be exceeded by production scenarios, performance testing, logging, or even the general cruft of running a machine 24×7.
For this reason, extending a virtualized disk can be extremely helpful. Here is a walk through for extending a disk using fdisk on an Ubuntu system that is using classic partitions. For performing this operation with LVM enabled, see my post here.
This type of change is typically made with a live CD to ensure exclusive disk access and gparted GUI for convenience. But we will use fdisk here so that it could be done from a remote terminal or by automation.
Important Note: Manipulating partitions can lead to a bricking of the virtualized guest OS. If you are not completely comfortable with this procedure in a DEV environment, do not even consider running it in PROD. Backup all critical data before executing this on a production system.
The first step is to extend the storage capacity of the disk in the specific virtualization engine being used. Using VirtualBox, that means using vboxmanage modifyhd. Using vSphere, you can use the vSphere GUI client. and using vCloud Director you have this ability at the web client. Note that having snapshots on this VM may keep you from performing this operation.
In this example, I have an Ubuntu 14.0.4 virtualized guest OS that I initially configured with 24Gb on /dev/sda (23GB ext4 + 1Gb swap). I then increased the size of disk to 30Gb, but this extra 6Gb is not recognized by the guest OS yet.
We are going to use fdisk in this walk-through and not gparted, but I think the screenshot from gparted shown below helps you understand the situation.
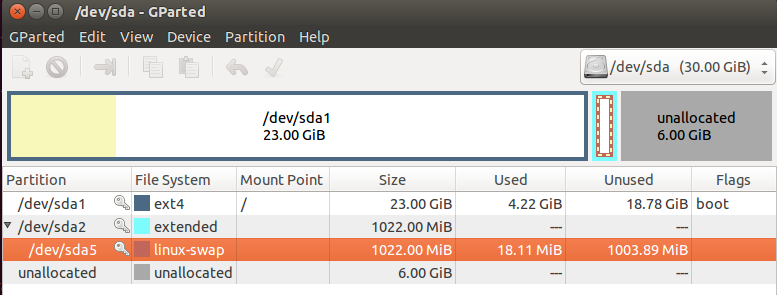
One consideration at this point….we could easily create a new partition for the 6Gb unallocated space, but that would give us an extra mount, and not necessarily do what we want (which is to extend sda1). Also, we could create soft links from data heavy directories in sda1 to the new space so the true location was transparent. And yes, those are both valid arguments, but going that route is pretty simple and so I want to continue with the assumption that you truly need to extend sda1.
Disable swap
swapoff -a
The fact that swap is now disabled can be validated with ‘free -m’ showing 0 for total and free swap.
 total used free shared buffers cached

Mem: 993 893 99 5 19 295 -/+ buffers/cache: 578 414

Swap: 0 0 0
Start fdisk
fdisk /dev/sda
Then type ‘p’ to print the available partitions. You should see output similar to the screenshot below.
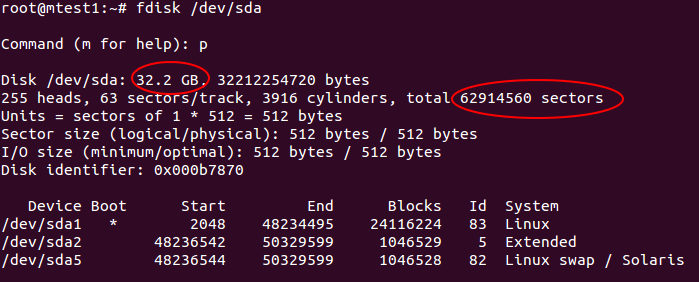
In addition to showing you the three partitions, you should also note that our true total disk size is shown, and the total number of sectors is 62,914,560 (62 million blocks of 512 byte size ~ 32Gb).
Delete the extended and linux-swap partitions
type the command ‘d’, then the linux swap partition ‘5’ (for /sda5)
type the command ‘d’, then the linux extended partition ‘2’ (for /sda2)
type ‘p’ and confirm that only the primary sda1 partition remains
Delete the sda1 partition
type the command ‘d’
type ‘p’ and confirm that there are no partitions
Recreate the sda1 partition
type the command ‘n’ to create a new partition, then ‘p’ for primary, and ‘1’ for the partition number.
Accept the default for the first sector (probably 2048), then for the last sector use ‘+28G’ for 28 Gigabytes.
Recreate the linux-swap partition
type the command ‘n’ to create a new partition, then ‘p’ for primary, and ‘2’ for the partition number.
Accept the default for the first sector and last sector, which will give you all the space left over from the primary partition, which is about 2Gb.
Mark the swap partition types
type ‘p’ and confirm there are now 2 partitions.
The sda1 partition should already be of type ’83’ (Linux), but the sda2 partition needs to be marked as type ‘Linux swap’.
type the command ‘t’, then ‘2’ (for /dev/sda2), and then the code ’82’.
type ‘p’ and confirm that sda2 is now of type ‘Linux swap / Solaris’
Mark the sda1 partition as boot
The sda1 partition is no longer marked as the bootable partition.
type the command ‘a’, then ‘1’ (for /dev/sda1).
type ‘p’ and confirm that sda1 now has an asterisk in the ‘Boot’ column.
Write the partition changes permanently
NOTE: That you have actually changed anything on your disk yet. Until we execute this next command, your current partitions are untouched. It’s not too late to back out if you have not tested this procedure on a DEV environment!
type ‘w’ to write the changes permanently.
Even if you get messages about the re-reading the partition failing because the device is busy, continue on.
Reboot the Guest OS
To ensure that these changes take, go ahead and restart the guest OS.
init 6
I have gotten some systems to work without the reboot, but if I’m building a general recipe, I think a reboot makes it reliable.
After the system comes back up, continue to the next step.
Run resize2fs to force OS to reflect size change
resize2fs /dev/sda1
Format new swap partition
mkswap /dev/sda2
Copy the value of the UUID shown for the next step. You can also get this value later by running ‘blkid’
Modify fstab for new swap UUID
vi /etc/fstab
change the UUID of the swap entry to the value shown from mkswap or blkid above.
Enable swap
swapon -a
‘free -m’ should also show non-zero values for total and free swap usage.
Validate
‘df -h’ should now reflect the larger storage size.
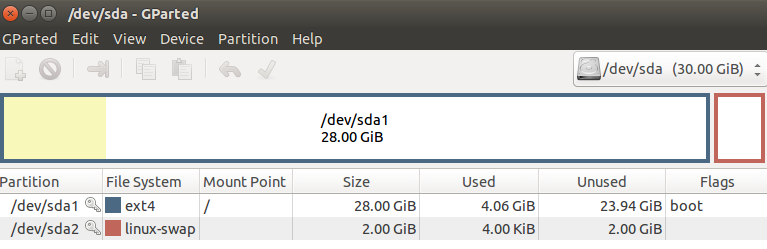
As an illustration of what the partitions look like now, here is a screenshot from gparted. You can see that sda1 has 28G and swap has 2Gb.
REFERENCES
http://askubuntu.com/questions/24027/how-can-i-resize-an-ext-root-partition-at-runtime
https://www.nonamehosts.com/blog/how-to-extend-ext4-root-partition-without-reboot/