![]()
Update Jan 2022: If you would rather have a mail server running in Kubernetes, see my article here.
There are many reasons you might want your own Postfix server: maybe you need to test various relay settings, or validate the ability of your mail script to use TLS, or maybe you are a developer that needs to test multiple accounts without involving the infrastructure group.
In this article, I will show how to use the docker-mailserver image created by Thomas Vial to stand up a quick SMTP relay that can be used to test emails coming from an application during development.
Prerequisites
First, install Docker and Docker compose on your Ubuntu host as described in my previous article.
Configure docker-mailserver
Thomas Vial created the docker-mailserver image we will use in this article. It includes a whole stack of services (antivirus, spam, security, DKIM, LetsEncrypt), but we will only use the most basic here.
Get the source
VERSION=11.3.1
git clone https://github.com/tomav/docker-mailserver.git -b v${VERSION}
cd docker-mailserver
Inspect configuration file
The mailserver.env contains the configuration values, take a quick look at the settings (full docs).
# is POP3 enabled?
grep ENABLE_POP3 mailserver.env

# is SSL enabled?
grep SSL_TYPE mailserver.env

# avoid errors where clients are rejected for coming from unknown network
# errors would look like 'NOQUEUE: reject: RCPT from unknown'
sed -i 's/PERMIT_DOCKER=.*/PERMIT_DOCKER=network/' mailserver.env
Start docker-mailserver
Now use Docker Compose to instantiate the container.
# use pinned version
sed -i "s/:latest/:$VERSION/" docker-compose.yml

# use set domain
sed -i 's/domainname:.*/domainname: domain.com/' docker-compose.yml

# bring up mail server in background
docker-compose up -d mailserver
And if you want to see the logs tailed as you perform other operations:
docker-compose logs -f mailserver
Create first users
Once the mail server image starts, you have two minutes to add a valid user account before the container stops.
# create mail account user/password
./setup.sh -i mailserver/docker-mailserver:$VERSION email add admin@domain.com admin123
./setup.sh -i mailserver/docker-mailserver:$VERSION email add flee@domain.com flee123

# list all email accounts
./setup.sh -i mailserver/docker-mailserver:$VERSION email list
Verify ports mapped to host
Make sure that the postfix container has mapped the postfix ports to local ports. Per the official docs and docker-compose.yml, here are the exposed ports we should see:
- 25 receiving email from other mailservers
- 587 TLS Client email submission
- 143 StartTLS IMAP client
- 993 TLS/SSL IMAP client
Verify this with netstat and netcat:
# check listening ports on host running docker
sudo netstat -tulnp | grep -E "25|143|587|993"

# use host IP address
ip a
hostIP=192.168.1.xx

# check port access
for port in 25 143 587; do nc -w 1 -vz $hostIP $port; done
The hostIP above is going to be the IP address of your Docker host. As we go through subsequent steps, we will continue to use this as the address of the Postfix services.
Verify basic email functionality
Send a test email using the swaks CLI utility:
sudo apt install -y swaks

# send test email to flee@domain.com
swaks --from no-reply@domain.com --to flee@domain.com --server $hostIP:25 -au flee@domain.com -ap flee123 --header "Subject: test" --body "testing 123"

# send test email to admin@domain.com
swaks --from no-reply@domain.com --to admin@domain.com --server $hostIP:25 -au admin@domain.com -ap admin123 --header "Subject: test" --body "testing 456"
You should see output similar to below when sending these emails.
<- 220 mail.example.com ESMTP
-> EHLO bigboy
<- 250-mail.example.com
<- 250-PIPELINING
<- 250-SIZE 10240000
<- 250-ETRN
<- 250-AUTH PLAIN LOGIN
<- 250-AUTH=PLAIN LOGIN
<- 250-ENHANCEDSTATUSCODES
<- 250-8BITMIME
<- 250-DSN
<- 250 CHUNKING
-> AUTH LOGIN
<- 334 VXNlcm5hbWU6
-> YWRtaW5AZG9tYWluLmNvbQ==
<- 334 UGFzc3dvcmQ6
-> YWRtaW4xMjM=
<- 235 2.7.0 Authentication successful
-> MAIL FROM:<flee@domain.com>
<- 250 2.1.0 Ok
-> RCPT TO:<admin@domain.com>
<- 250 2.1.5 Ok
-> DATA
<- 354 End data with <CR><LF>.<CR><LF>
-> Date: Thu, 02 Feb 2023 13:17:21 -0500
-> To: admin@domain.com
-> From: flee@domain.com
-> Subject: test from flee
-> Message-Id: <20230202131721.1503248@bigboy>
-> X-Mailer: swaks v20201014.0 jetmore.org/john/code/swaks/
->
-> testing 456
->
->
-> .
<- 250 2.0.0 Ok: queued as 369DB5217D9
-> QUIT
<- 221 2.0.0 Bye
=== Connection closed with remote host.
Validating with desktop mail client
Any modern desktop mail client installed on the host should be able to connect to this Postfix server, in this example we will use Mozilla Thunderbird.
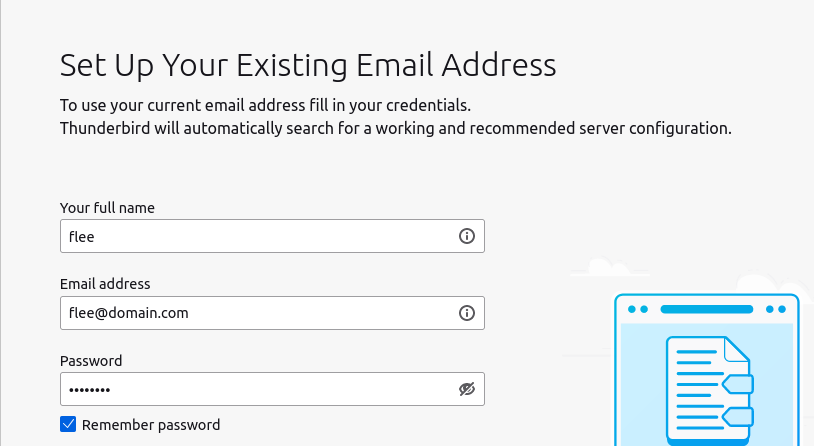
From Account Settings > Add Mail Account, you will get a name, email, and password. Use the information from setup.sh earlier:
- name = flee
- email = flee@domain.com
- password = flee123
Or for the admin user:
- name = admin
- email = admin@domain.com
- password = admin123
And then press “Configure manually” to get advanced options. Use the $hostIP value from earlier as the incoming IMAP server on port 143, and for the outgoing hostname on port 25.
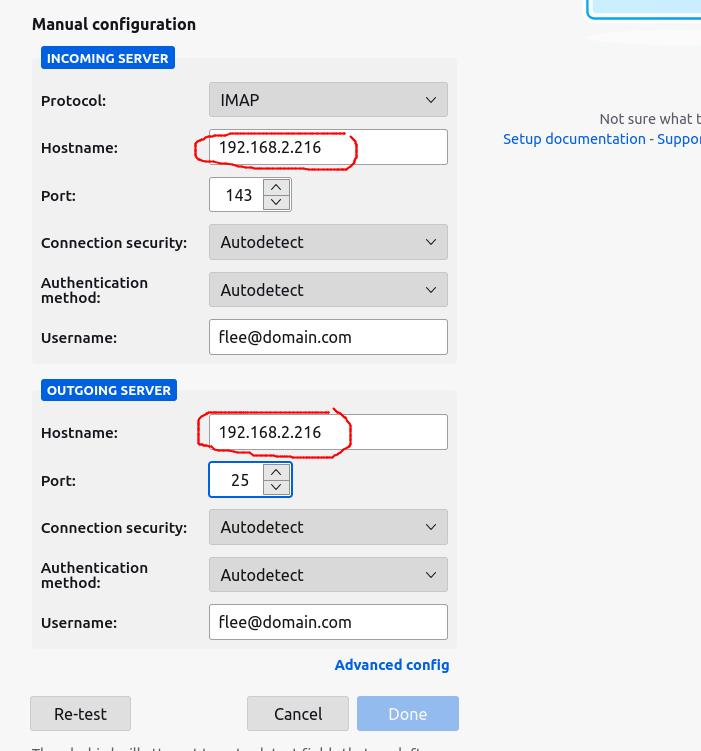
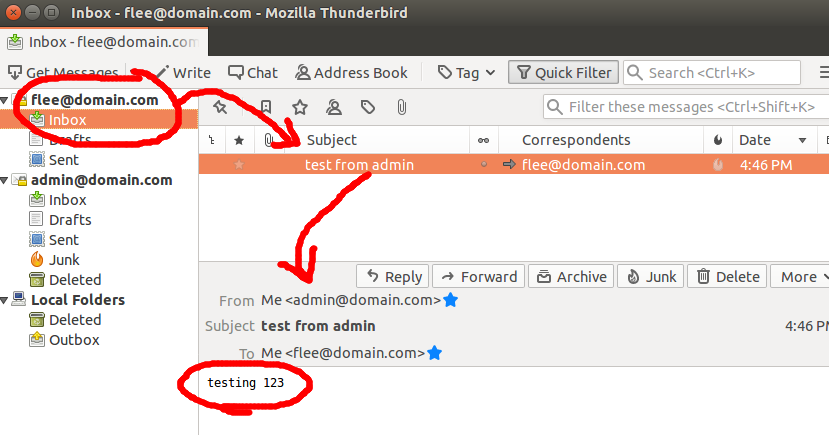
Press “Re-test” and then “Done”. Click on the email tab and you should see the email sent from swaks earlier.
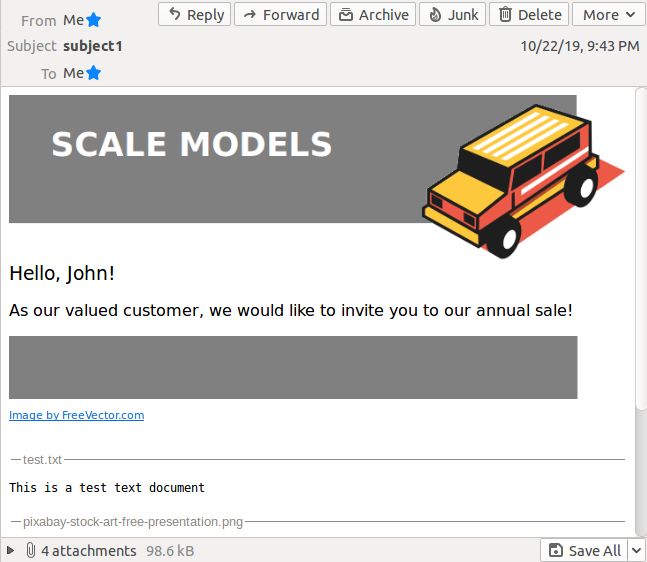
If you followed my previous article on sending rich HTML email from Python, then invoking this script:
./send_html_email.py admin@domain.com flee@domain.com thesubject John $hostIP --port=25 --user=flee@domain.com --password=flee123 --attach attachments/test.txt attachments/testdocument.pdf
Should send a message like below to your flee@domain.com Inbox in Thunderbird.
Stopping mail server
docker-compose stop
docker-compose rm
REFERENCES
Thomas Vial, postfix image page
github tomav, postfix docker image source
github tomav, generating self-signed certificate
sefnet, sending mail using swaks
NOTES
View all docker container id and names
docker ps -a --format "{{.ID}} {{.Names}}"
Generate the self-signed certs
docker run -ti --rm -v "$(pwd)"/config/ssl:/tmp/docker-mailserver/ssl -h mail.domain.com -t tvial/docker-mailserver generate-ssl-certificate
This will have you first create a CA certificate, then issue a certificate based on that CA. The CA common name MUST be “my-domain.com” and the leaf certificate common name MUST be “mail.my-domain.com”.
I used “passphrase” when asked for the passphrase. On the “extras” sections, simply press <ENTER>.
Per the instructions in the docs:
Press enter
Enter a password when needed
Fill information like Country, Organisation name
Fill "my-domain.com" as FQDN for CA, and "mail.my-domain.com" for the certificate.
They HAVE to be different, otherwise you'll get a `TXT_DB error number 2`
Don't fill extras
Enter same password when needed

Sign the certificate? [y/n]:y
1 out of 1 certificate requests certified, commit? [y/n]y
The certificates will be placed into the “config/ssl” directory. I have pasted the output I got when filling these values out at the very bottom of this article in case you need to compare.