![]() If you are in the development lifecycle and need to quickly test email functionality, you can deploy the codecentric/mailhog image directly within Kubernetes. It will receive all email regardless of address, and from its web interface show you all the email that has been received.
If you are in the development lifecycle and need to quickly test email functionality, you can deploy the codecentric/mailhog image directly within Kubernetes. It will receive all email regardless of address, and from its web interface show you all the email that has been received.
In this article, I will show you how to deploy the MailHog image to Kubernetes, expose it on a NodePort, then validate by sending email from the Host as well as a container inside the Kubernetes cluster.
Prerequisite, install helm3
Install helm as described in the official documentation, or read my full article on installing on Debian/Ubuntu.
Install MailHog using Helm3
Add the Helm repo.
helm repo add codecentric https://codecentric.github.io/helm-charts
helm repo update
Install the MailHog Helm chart.
helm install mailhog codecentric/mailhog -n email --create-namespace --set service.type=NodePort
Validate the deployment and service were created in ’email’ namespace.
$ kubectl get deployment -n email
NAME      READY   UP-TO-DATE   AVAILABLE   AGE
mailhog   1/1     1            1           10h

$ kubectl get services -n email
NAME      TYPE       CLUSTER-IP     EXTERNAL-IP   PORT(S)                         AGE
mailhog   NodePort   10.43.196.75           8025:31418/TCP,1025:31524/TCP   10h
Get the node IP and port information we will use in sections below.
node_ip=$(kubectl get nodes -o=jsonpath='{.items[0].status.addresses[0].address}')

web_port=$(kubectl --namespace email get svc mailhog -o=jsonpath="{.spec.ports[?(@.name=='http')].nodePort}")

smtp_port=$(kubectl --namespace email get svc mailhog -o=jsonpath="{.spec.ports[?(@.name=='tcp-smtp')].nodePort}")

echo "MailHog Web UI at http://$node_ip:$web_port"
echo "MailHog SMTP port at $node_ip:$smtp_port"
MailHog Web UI
You can now use the browser on your host to pull up the $node_ip:$web_port value displayed in the previous section.
You will see a web interface similar to below, with no emails listed. Keep this open, in the sections below it will almost immediately reflect our sent validation emails.
![]()
Validate from host using swaks
First, we will send an email from our host machine using the swaks utility.
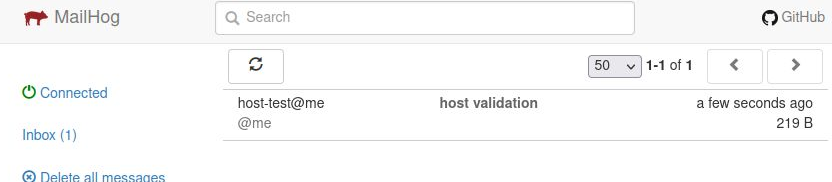
# install swaks utility
sudo apt install swaks -y

# send email using swaks
swaks -f host-test@me -t local@me -s $node_ip -p $smtp_port --body "this is a test" --header "Subject: host validation"

=== Trying 192.168.122.213:31524...
=== Connected to 192.168.122.213.
<- 220 mailhog-78fdcdcc6b-mzs6b ESMTP MailHog -> EHLO localhost
<-  250-Hello localhost
<-  250-PIPELINING
<- 250 AUTH PLAIN -> MAIL FROM:<host-test@me>
<- 250 Sender host-test@me ok -> RCPT TO:<@me>
<- 250 Recipient local@me ok -> DATA
<-  354 End data with .
 -> Date: Sun, 16 Jan 2022 06:57:55 -0500
 -> To: @me
 -> From: host-test@me
 -> Subject: host validation
 -> Message-Id: <20220116065755.615265@localhost>
 -> X-Mailer: swaks v20190914.0 jetmore.org/john/code/swaks/
 ->
 -> this is a test
 ->
 ->
 -> .
<- 250 Ok: queued as scaqGZfLN8lPpvMdohDZdzU5XlbANyAqvFNo11p7T-w=@mailhog-78fdcdcc6b-mzs6b -> QUIT
<-  221 Bye
=== Connection closed with remote host.
You will almost immediately notice this new email has shown up in the MailHost web UI like below.
Validate from container inside K8S cluster using swaks
Finally, let’s validate from a container inside the Kubernetes cluster itself. I created a small alpine based image that includes the swaks utility.
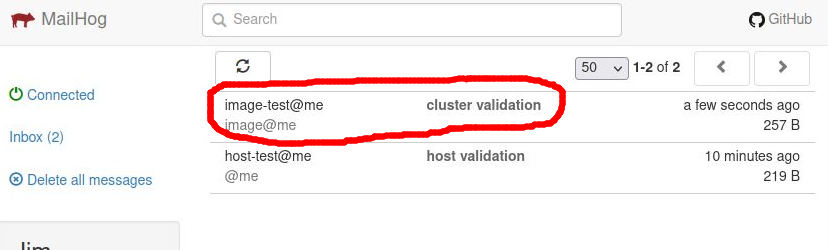
# deploy small alpine-based image
kubectl apply -f https://raw.githubusercontent.com/fabianlee/tiny-tools-with-swaks/main/k8s-tiny-tools-with-swaks.yaml

$ kubectl exec -it deployment/tiny-tools-with-swaks -- /usr/bin/swaks -f image-test@me -t image@me -s $node_ip -p $smtp_port --body "this is a test" --header "Subject: cluster validation"

=== Trying 192.168.122.213:31524...
=== Connected to 192.168.122.213.
<- 220 mailhog-78fdcdcc6b-mzs6b ESMTP MailHog -> EHLO tiny-tools-with-swaks-57c4777c54-gxl8q
<-  250-Hello tiny-tools-with-swaks-57c4777c54-gxl8q
<-  250-PIPELINING
<- 250 AUTH PLAIN -> MAIL FROM:<image-test@me>
<- 250 Sender image-test@me ok -> RCPT TO:<image@me>
<- 250 Recipient image@me ok -> DATA
<-  354 End data with .
 -> Date: Sun, 16 Jan 2022 12:08:07 +0000
 -> To: image@me
 -> From: image-test@me
 -> Subject: cluster validation
 -> Message-Id: <20220116120807.097277@tiny-tools-with-swaks-57c4777c54-gxl8q>
 -> X-Mailer: swaks v20201014.0 jetmore.org/john/code/swaks/
 ->
 -> this is a test
 ->
 ->
 -> .
<- 250 Ok: queued as Y263ccMaaqszJZ4D4rdvCBrZO4RkPVyvMr7rmSri2pw=@mailhog-78fdcdcc6b-mzs6b -> QUIT
<-  221 Bye
=== Connection closed with remote host.
The Web UI will display this new email almost immediately.
Teardown
To delete the in-cluster deployment of the pod that has the swaks tester.
kubectl delete -f https://raw.githubusercontent.com/fabianlee/tiny-tools-with-swaks/main/k8s-tiny-tools-with-swaks.yaml
To delete the MailHog helm deployment
helm uninstall mailhog -n email
kubectl delete ns email
REFERENCES
matuszeman.dev, installing MailHog and testing
NOTES
showing helm chart values
helm show values codecentric/mailhog > mailhog-values.yaml
helm install mailhog codecentric/mailhog -n email --create-namespace -f mailhog-values.yaml