![]() Out-of-the-box, microk8s has add-ons that make it easy to enable MetalLB as a network load balancer as well as an NGINX ingress controller.
Out-of-the-box, microk8s has add-ons that make it easy to enable MetalLB as a network load balancer as well as an NGINX ingress controller.
But a single ingress controller is often not sufficient. For example, the primary ingress may be serving up all public traffic to your customers. But a secondary ingress might be necessary to only serve administrative services from a private internal network.
In this article, we will use two MetalLB IP addresses on the primary microk8s host and then project different deployments to the primary versus the secondary NGINX ingress controller to mimic public end-user versus private administrative access.
And if you would rather run all the steps in this article using an Ansible playbook (instead of manually), see the section at the bottom “Ansible Playbook“.
Prerequisites
This article builds off my previous article where we built a microk8s cluster using Ansible. If you used Terraform as described to create the microk8s-1 host, you already have an additional 2 network interfaces on the master microk8-1 host (ens4=192.168.1.141 and ens5=192.168.1.142).
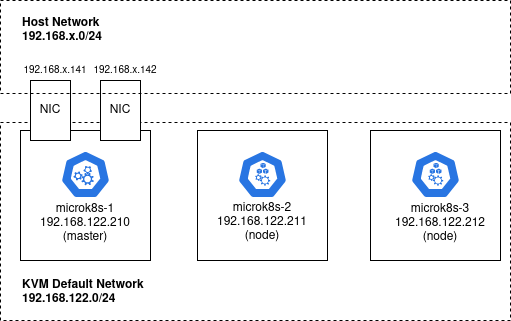
However, a microk8s cluster is not required. You can run the steps in this article on a single microk8s node. But you MUST have an additional two network interfaces and IP addresses on the same network as your host (e.g. 192.168.1.0/24) for the MetalLB endpoints.
Login to microk8s guest
All the steps in this article will be performed while logged in to the microk8s guest. If you are using the microk8s cluster we created in the previous article, then you can login using:
ssh -i id_rsa ubuntu@192.168.122.210
microk8s comes with its own kubectl folded in, and that is why you will see the kubectl commands all start with “microk8s kubectl”. You are free to install the standard kubectl utility, this is just a convenience.
Configure MetalLB to use additional NIC
To enable MetalLB to use the additional NIC on your microk8s host, tell it the range of IP addresses that it can allocate.
# get list of guest network interfaces
# should list two additional NIC
$ ip a

# enable MetalLB to use IP range, then allow settle
$ microk8s enable metallb 192.168.1.141-192.168.1.142
$ sleep 15

# wait for microk8s to be ready, metallb now enabled
$ microk8s status --wait-ready | head -n8

microk8s is running
high-availability: no
  datastore master nodes: 127.0.0.1:19001
  datastore standby nodes: none
addons:
  enabled:
    ha-cluster # Configure high availability on the current node
    metallb # Loadbalancer for your Kubernetes cluster

# view MetalLB objects
$ microk8s kubectl get all -n metallb-system

# show MetalLB configmap with IP used
microk8s kubectl get configmap/config -n metallb-system -o yaml
Enable primary ingress
The ingress microk8s add-on provides a convenient way to setup a primary NGINX ingress controller.
# enables primary NGINX ingress controller
$ microk8s enable ingress
# wait for microk8s to be ready, ingress now enabled
$ microk8s status --wait-ready | head -n9

microk8s is running
high-availability: no
  datastore master nodes: 127.0.0.1:19001
  datastore standby nodes: none
addons:
  enabled:
    ha-cluster # Configure high availability on the current node
    ingress # Ingress controller for external access
    metallb # Loadbalancer for your Kubernetes cluster

# view NGINX ingress objects created by 'ingress' add-on
$ microk8s kubectl get all --namespace ingress
Enable Secondary Ingress
To create a secondary ingress, we must go beyond using the microk8s ‘ingress’ add-on. I have put a DaemonSet definition into github as nginx-ingress-secondary-micro8s-controller.yaml.j2, which you can apply like below.
# apply DaemonSet that creates secondary ingress
wget https://raw.githubusercontent.com/fabianlee/microk8s-nginx-istio/main/roles/add_secondary_ingress/templates/nginx-ingress-secondary-microk8s-controller.yaml.j2

microk8s kubectl apply -f nginx-ingress-secondary-microk8s-controller.yaml.j2

# you should now see both:
# 'nginx-ingress-microk8s-controller' and
# 'nginx-ingress-private-microk8s-controller'
microk8s kubectl get all --namespace ingress
While kubectl does fetch any remote manifest URL provided, I like to download these manifest so they can be referenced later or changed if necessary.
Create Ingress Services
Then you need to create two Services, one for the primary ingress using the first MetalLB IP address and another for the secondary using the second MetalLB IP address.
Download the nginx-ingress-service-primary-and-secondary.yaml.j2 template, and do a couple of replacements before applying with kubectl.
# download template
wget https://raw.githubusercontent.com/fabianlee/microk8s-nginx-istio/main/roles/add_secondary_nginx_ingress/templates/nginx-ingress-service-primary-and-secondary.yaml.j2

# edit file
# replace first 'loadBalancerIP' value with first MetalLB IP
# replace second 'loadBalancerIP' value with second MetalLB IP
vi nginx-ingress-service-primary-and-secondary.yaml.j2

# apply to cluster
microk8s kubectl apply -f nginx-ingress-service-primary-and-secondary.yaml.j2

# shows 'ingress' and 'ingress-secondary' Services
# both ClusterIP as well as MetalLB IP addresses
microk8s kubectl get services --namespace ingress
Deploy test Services
To facilitate testing, we will deploy two independent Service+Deployment.
- Service=golang-hello-world-web-service, Deployment=golang-hello-world-web
- Service=golang-hello-world-web-service2, Deployment=golang-hello-world-web2
These both use the same image fabianlee/docker-golang-hello-world-web:1.0.0, however they are completely independent deployments and pods.
# get definition of first service/deployment
wget https://raw.githubusercontent.com/fabianlee/microk8s-nginx-istio/main/roles/golang-hello-world-web/templates/golang-hello-world-web.yaml.j2

# apply first one
microk8s kubectl apply -f golang-hello-world-web.yaml.j2

# get definition of second service/deployment
wget https://raw.githubusercontent.com/fabianlee/microk8s-nginx-istio/main/roles/golang-hello-world-web/templates/golang-hello-world-web2.yaml.j2

# apply second one
microk8s kubectl apply -f golang-hello-world-web2.yaml.j2

# show both deployments and then pods
microk8s kubectl get deployments
microk8s kubectl get pods
These apps are now available at their internal pod IP address.
# check ClusterIP and port of first and second service
microk8s kubectl get services

# internal ip of primary pod
primaryPodIP=$(microk8s kubectl get pods -l app=golang-hello-world-web -o=jsonpath="{.items[0].status.podIPs[0].ip}")

# internal IP of secondary pod
secondaryPodIP=$(microk8s kubectl get pods -l app=golang-hello-world-web2 -o=jsonpath="{.items[0].status.podIPs[0].ip}")

# check pod using internal IP
curl http://${primaryPodIP}:8080/myhello/

# check pod using internal IP
curl http://${secondaryPodIP}:8080/myhello2/
With internal pod IP proven out, move up to the IP at the Service level.
# IP of primary service
primaryServiceIP=$(microk8s kubectl get service/golang-hello-world-web-service -o=jsonpath="{.spec.clusterIP}")

# IP of secondary service
secondaryServiceIP=$(microk8s kubectl get service/golang-hello-world-web-service2 -o=jsonpath="{.spec.clusterIP}")

# check primary service
curl http://${primaryServiceIP}:8080/myhello/

# check secondary service
curl http://${secondaryServiceIP}:8080/myhello2/
These validations proved out the pod and service independent of the NGINX ingress controller. Notice all these were using insecure HTTP on port 8080, because the Ingress controller step in the following step is where TLS is layered on.
Create TLS key and certificate
Before we expose these services via Ingress, we must create the TLS keys and certificates that will be used when serving traffic.
- Primary ingress will use TLS with CN=microk8s.local
- Secondary ingress will use TLS with CN=microk8s-secondary.local
The best way to do this is with either a commercial certificate, or creating your own custom CA and SAN certificates. But this article is striving for simplicity, so we will simply generate self-signed certificates using a simple script I wrote.
# download and change script to executable
wget https://raw.githubusercontent.com/fabianlee/microk8s-nginx-istio/main/roles/cert-with-ca/files/microk8s-self-signed.sh

chmod +x microk8s-self-signed.sh

# run openssl commands that generate our key + certs in /tmp
./microk8s-self-signed.sh

# change permissions so they can be read by normal user
sudo chmod go+r /tmp/*.{key,crt}

# show key and certs created
ls -l /tmp/microk8s*


# create primary tls secret for 'microk8s.local'
microk8s kubectl create -n default secret tls tls-credential --key=/tmp/microk8s.local.key --cert=/tmp/microk8s.local.crt

# create secondary tls secret for 'microk8s-secondary.local'
microk8s kubectl create -n default secret tls tls-secondary-credential --key=/tmp/microk8s-secondary.local.key --cert=/tmp/microk8s-secondary.local.crt

# shows both tls secrets
microk8s kubectl get secrets --namespace default
Deploy via Ingress
Finally, to make these services available to the outside world, we need to expose them via the NGINX Ingress and MetalLB addresses.
# create primary ingress
wget https://raw.githubusercontent.com/fabianlee/microk8s-nginx-istio/main/roles/golang-hello-world-web/templates/golang-hello-world-web-on-nginx.yaml.j2

microk8s kubectl apply -f golang-hello-world-web-on-nginx.yaml.j2

# create secondary ingress
wget https://raw.githubusercontent.com/fabianlee/microk8s-nginx-istio/main/roles/golang-hello-world-web/templates/golang-hello-world-web-on-nginx2.yaml.j2

microk8s kubectl apply -f golang-hello-world-web-on-nginx2.yaml.j2

# show primary and secondary Ingress objects
# primary available at 'microk8s.local'
# secondary available at 'microk8s-secondary.local'
microk8s kubectl get ingress --namespace default

# shows primary and secondary ingress objects tied to MetalLB IP
microk8s kubectl get services --namespace ingress
Validate URL endpoints
The Ingress requires that the proper FQDN headers be sent by your browser, so it is not sufficient to do a GET against the MetalLB IP addresses. You have two options:
- add the ‘microk8s.local’ and ‘microk8s-secondary.local’ entries to your local /etc/hosts file
- OR use the curl ‘–resolve’ flag to specify the FQDN to IP mapping which will send the host header correctly
Here is an example of pulling from the primary and secondary Ingress using entries in the /etc/hosts file.
# validate you have entries to 192.168.1.141 and .142
grep microk8s /etc/hosts

# check primary ingress
curl -k https://microk8s.local/myhello/

# check secondary ingress
curl -k https://microk8s-secondary.local/myhello2/
Conclusion
Using this concept of multiple ingress, you can isolate traffic to different source networks, customers, and services.
Ansible playbook
If you would rather run all the steps from this article using Ansible, you would setup the microk8s cluster using my article here. And then you would run:
ansible-playbook playbook_metallb_primary_secondary_nginx.yml
Then validate:
./test-nginx-endpoints.sh
REFERENCES
ubuntu.com, install microk8s manually
microk8s.io, documentation on ports, add-ons, etc
microk8s.io, command reference
kubernetes.github.io, nginx ingress considerations with bare metal and MetalLB
fabianlee github, microk8s-nginx-istio repo
my ansible-role for creating custom ca and its cert cert-with-ca