![]() microk8s is a lightweight Kubernetes deployment by Canonical that is enterprise-grade, yet also compact enough to run on development boxes and edge devices.
microk8s is a lightweight Kubernetes deployment by Canonical that is enterprise-grade, yet also compact enough to run on development boxes and edge devices.
In this article, I will show you how to deploy a three-node microk8s cluster on Ubuntu nodes that are created using Terraform and a local KVM libvirt provider. Ansible is used for installation of the cluster.
Creating node VMs
We will deploy this microk8s cluster on three independent guests running Ubuntu.
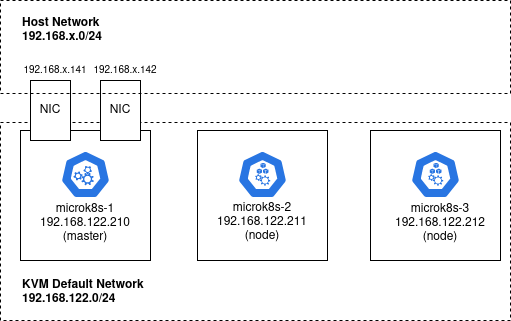
These Ubuntu VMs could actually be created using any hypervisor or hyperscaler, but for this article we will use Terraform and the local KVM libvirt provider to create guests named: microk8s-1, microk8s-2, microk8s-3.
Install Terraform, its libvirt provider, and KVM as described in a previous article. Also create a ‘br0’ host bridge and KVM ‘host-bridge’ so that the two additional NIC on k3s-1 can be assigned as explained in a previous article.
Then use my github project to create the three Ubuntu guest OS.
# required packages
sudo apt install make git curl -y

# github project with terraform to create guest OS
git clone https://github.com/fabianlee/microk8s-nginx-istio.git
cd microk8s-nginx-istio

# set first 3 octets of your host br0 network
# this is where MetalLB endpoints .141, .142 will be created
sed -i 's/metal_lb_prefix: .*/metal_lb_prefix: 192.168.1/' group_vars/all

# download dependencies and modules
ansible-playbook install_dependencies.yml

# invoke terraform apply from tf-libvirt directory
ansible-playbook playbook_terraform_kvm.yml
The KVM guests can be listed using virsh. I have embedded the IP address in the libvirt domain name to make the address obvious.
# should show three running microk8s VMs
$ export LIBVIRT_DEFAULT_URI=qemu:///system
$ virsh list
Id Name State
--------------------------------------------
...
10 microk8s-2-192.168.122.211 running
11 microk8s-3-192.168.122.212 running
12 microk8s-1-192.168.122.210 running
cloud-init has been used to give the ‘ubuntu’ user an ssh keypair for login, which allows us to validate the login for each host using the command below.
# accept key as known_hosts
for octet in $(seq 210 212); do ssh-keyscan -H 192.168.122.$octet >> ~/.ssh/known_hosts; done

# test ssh into remote host
for octet in $(seq 210 212); do ssh -i tf-libvirt/id_rsa ubuntu@192.168.122.$octet "hostname -f; uptime"; done
microk8s cluster installation overview
As discussed in detail in my other article where the microk8s cluster is deployed manually, microk8s is first installed on all the guest VMs. Then ‘microk8s add-node’ is run on the master, while ‘microk8s join’ is run on all other nodes making up the cluster.
The first guest ‘microk8s-1’ will serve as the master, with microk8s-2 and microk8-3 joining the Kubernetes cluster.
Ansible configuration
In order for Ansible to do its work, we need to inform it of the inventory of guest VMs available and their group variables. Then we use an Ansible playbook to run the specific tasks and roles.
Ansible inventory
The available hosts as well as their group memberships are defined in ‘ansible_inventory’.
$ cat ansible_inventory
...
# microk8s 'master'
[microk8s]
microk8s-1

# all hosts participating in microk8s cluster
[microk8s_HA]
microk8s-1
microk8s-2
microk8s-3

...
Ansible group variables
The group variables are found in the ‘group_vars’ directory. There are variables just for the main ‘microk8s’ node. And then variables that should be applied to all the nodes with ‘microk8s_HA’.
# list of group variables
$ ls group_vars
all microk8s microk8s_HA

# show variables applying to every host in cluster
cat group_vars/microk8s_HA

# show variables applying just to master
cat group_vars/microk8s

# show variables applying to all nodes
cat group_vars/microk8s_HA
Ansible playbook
The playbook we use for microk8s cluster execution executes a set of roles against the ‘microk8s_HA’ group defined in the ansible_inventory.
$ cat playbook_microk8s.yml

...
- hosts: microk8s_HA
  gather_facts: yes
  become: yes
  vars:
    microk8s_enable_HA: true

  roles:
    - microk8s-prereq
    - ansible_role_microk8s
    - k9s

...
It has three roles, first preparing each guest with ‘microk8s-prereq’. Then executing the cluster installation with ‘ansible_role_microk8s’, and finally installing ‘k9s’ as a graphical utility for Kubernetes management.
Ansible external dependencies
We still have dependencies to fulfill before installing the microk8s cluster using Ansible.
- The ‘ansible_role_microk8s’ is found on github written by istvano
- Multiple collections found on Ansible galaxy
I have written a playbook that can fetch all dependencies automatically, simply run the command below.
# pulls external dependencies
ansible-playbook install_dependencies.yml
Install microk8s cluster using Ansible
We can now have Ansible install the microk8s cluster on our three guest VMs by invoking the playbook.
ansible-playbook playbook_microk8s.yml
Validate Kubernetes deployment to cluster
As a quick test of the Kubernetes cluster, create a test deployment of nginx. Then check the pod status from each of the cluster nodes.
# deploy from microk8s-2, deploys to entire cluster
$ ssh -i tf-libvirt/id_rsa ubuntu@192.168.122.212 "sudo microk8s kubectl create deployment nginx --image=nginx"

deployment.apps/nginx created

# same pod is deployed no matter which node checked
$ for octet in $(seq 210 212); do ssh -i tf-libvirt/id_rsa ubuntu@192.168.122.$octet "sudo microk8s kubectl get pods"; done

NAME READY STATUS RESTARTS AGE
nginx-6799fc88d8-txcnh 1/1 Running 0 2m58s
NAME READY STATUS RESTARTS AGE
nginx-6799fc88d8-txcnh 1/1 Running 0 3m
NAME READY STATUS RESTARTS AGE
nginx-6799fc88d8-txcnh 1/1 Running 0 3m23s
Notice that pod ‘nginx-6799fc88d8-txcnh’ is deployed no matter which host is checked.
Validate remotely using kubectl
The playbook_microk8s.yml contains a role named ‘microk8s-get-kubeconfig-local’ that copies the remote kubeconfig to a local file named ‘/tmp/microk8s-kubeconfig’.
So if you have kubectl installed on your host VM, you can also query the Kubernetes cluster remotely.
$ kubectl --kubeconfig /tmp/microk8s-kubeconfig get pods

NAME READY STATUS RESTARTS AGE
nginx-6799fc88d8-txcnh 1/1 Running 0 4m24s
REFERENCES
github istvano, ansible role for installing microk8s
ubuntu.com, install microk8s manually
microk8s.io, documentation on ports, add-ons, etc
microk8s.io, command reference
igy.cx blog, microk8s with persistent volume storage
ubuntu.com, flavors available: microk8s, charmed, kubeadm
willbar.com, adding self-signed certificate to microk8s trust store
dev.to madalinignsisca, cert-manager on microk8s
logz.io, modifying kubernetes-dashboard to skip login token and getting to kibana
NOTES
Enable verbosity for Ansible playbook
ANSIBLE_DEBUG=true ANSIBLE_VERBOSITY=4 ansible-playbook playbook_microk8s.yml
List available versions of snap microk8s
# all snaps with name 'microk8s'
snap find microk8s

# all versions of microk8s available
snap info microk8s
To route traffic to VM
# show current routes
$ route -n
...
192.168.122.0 0.0.0.0 255.255.255.0 U 0 0 0 virbr0
...

# traffic to private microk8s goes through VM
sudo ip route add 10.152.183.0/24 via 192.168.122.210 dev virbr0

# show updated routes
$ route -n