![]() microk8s is a lightweight Kubernetes deployment by Canonical that is enterprise-grade, yet also compact enough to run on development boxes and edge devices.
microk8s is a lightweight Kubernetes deployment by Canonical that is enterprise-grade, yet also compact enough to run on development boxes and edge devices.
In this article, I will show you how to deploy a three-node microk8s cluster on Ubuntu nodes that are created using Terraform and a local KVM libvirt provider.
This article focuses on the minimal manual steps for a microk8s cluster. I have an automated example using Ansible in another article.
Creating node VMs
We will deploy this microk8s cluster on three independent guests running Ubuntu.
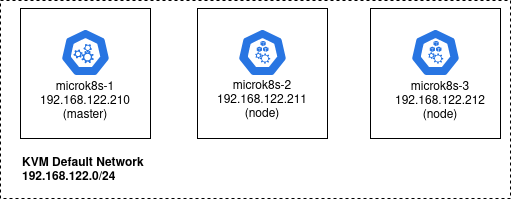
These Ubuntu VMs could actually be created using any hypervisor or hyperscaler, but for this article we will use Terraform and the local KVM libvirt provider to create guests named: microk8s-1, microk8s-2, microk8s-3. We will place them on the standard KVM default network, 192.168.122.0/24.
Install Terraform, its libvirt provider, and KVM as described in a previous article. Then use my github project to create the three Ubuntu guest OS.
# required packages
sudo apt install make git curl -y

# github project with terraform to create guest OS
git clone https://github.com/fabianlee/microk8s-nginx-istio.git
cd microk8s-nginx-istio

# run terraform init and apply
cd tf-libvirt

# make ssh keypair for login as 'ubuntu'
ssh-keygen -t rsa -b 4096 -f id_rsa -C tf-libvirt -N "" -q

# initialize terraform and its plugins
terraform init

# do creation
terraform apply -auto-approve
The KVM guests can now be listed using virsh. I have embedded the IP address in the libvirt domain name to make the address obvious.
# should show three running microk8s VMs
$ virsh list
Id Name State
--------------------------------------------
...
10 microk8s-2-192.168.122.211 running
11 microk8s-3-192.168.122.212 running
12 microk8s-1-192.168.122.210 running
cloud-init has been used to give the ‘ubuntu’ user an ssh keypair for login, which allows us to validate the login for each host using the command below.
for octet in $(seq 210 212); do ssh -i id_rsa ubuntu@192.168.122.$octet "hostname -f"; done
Accept the host fingerprint when prompted, which saves it in ~/.ssh/known_hosts.
Install microk8s on each guest VM
First, find the latest stable version of microk8s available from snap.
ssh -i id_rsa ubuntu@192.168.122.210 "snap info microk8s | grep stable | head -n1"
Which should return something like “1.21/stable”.
Now login to the each guest VM and install microk8s using snap, then call ‘status’ with the flag that waits for readiness before returning.
# login to 210, 211, then 212
ssh -i id_rsa ubuntu@192.168.122.xxx

$ sudo snap install microk8s --classic --channel=1.21/stable
microk8s (1.21/stable) v1.21.1 from Canonical✓ installed

# needs to say 'is running', notice datastore is localhost
$ sudo microk8s status --wait-ready | head -n4
microk8s is running
high-availability: no
  datastore master nodes: 127.0.0.1:19001
  datastore standby nodes: none

# add user to micro8s group so sudo not required
sudo usermod -a -G microk8s $USER
sudo chown -f -R $USER ~/.kube

# add alias for microk8s embedded kubectl
# that way we can simply call 'kubectl'
sudo snap alias microk8s.kubectl kubectl

# add hosts entries for each node in cluster
echo "192.168.122.210 microk8s-1" | sudo tee -a /etc/hosts
echo "192.168.122.211 microk8s-2" | sudo tee -a /etc/hosts
echo "192.168.122.212 microk8s-3" | sudo tee -a /etc/hosts

# leave ssh session
exit
Do this for each of the three guests VMs (.210, .211, and .212). Now microk8s is installed on each guest independently, and the next step is to join them together as a cluster.
Join microk8s instance to the cluster
To create a cluster run the ‘add-node’ command from the one you want to designate as the master. We will choose microk8s-1 (.21o) as the master.
# using microk8s-1 at .210 as the master
ssh -i id_rsa ubuntu@192.168.122.210

# outputs message with joining instructions
$ sudo microk8s add-node

From the node you wish to join to this cluster, run the following:
microk8s join 192.168.122.210:25000/b30e39b64e782acd1f25c82245befd6c/c30ab1f8221e
Now use this exact ‘microk8s join’ comnand while logged into microk8s-2 (.211).
# issue join command against microk8s-2
$ ssh -i id_rsa ubuntu@192.168.122.211 "sudo microk8s join 192.168.122.210:25000/b30e39b64e782acd1f25c82245befd6c/c30ab1f8221e"

Contacting cluster at 192.168.122.210
Waiting for this node to finish joining the cluster. ..

# datastore on microk8s-2 now points to master .210
$ ssh -i id_rsa ubuntu@192.168.122.211 "sudo microk8s status | head -n4"

microk8s is running
high-availability: no
  datastore master nodes: 192.168.122.210:19001
  datastore standby nodes: none
Follow the same process to join microk8s-3 to the cluster.
# generate exact join command from master .210
$ ssh -i id_rsa ubuntu@192.168.122.210 "sudo microk8s add-node"

From the node you wish to join to this cluster, run the following:
microk8s join 192.168.122.210:25000/8c5a0176dd3a56a7eb568b5c0ae1ca9b/c30ab1f8221e

# use join command on microk8s-3 .212
$ ssh -i id_rsa ubuntu@192.168.122.212 "sudo microk8s join 192.168.122.210:25000/8c5a0176dd3a56a7eb568b5c0ae1ca9b/c30ab1f8221e"

Contacting cluster at 192.168.122.210
Waiting for this node to finish joining the cluster. ..

# high availability now reports as 'yes'
# and datastore on microk8s-3 now points all nodes in cluster
$ ssh -i id_rsa ubuntu@192.168.122.212 "sudo microk8s status | head -n4"

microk8s is running
high-availability: yes
datastore master nodes: 192.168.122.210:19001 192.168.122.211:19001 192.168.122.212:19001
datastore standby nodes: none
Notice that adding the 3rd node to the cluster now has microk8-3 reporting back as ‘high-availability: yes’ and the datastore master nodes list has all the nodes in the cluster.
Verify this same result against the master microk8-1 at .210, which now understands this is an HA cluster.
$ ssh -i id_rsa ubuntu@192.168.122.210 "sudo microk8s status | head -n4"

microk8s is running
high-availability: yes
datastore master nodes: 192.168.122.210:19001 192.168.122.211:19001 192.168.122.212:19001
datastore standby nodes: none
Validate Kubernetes deployment to cluster
As a quick test of the Kubernetes cluster, create a test deployment of nginx. Then check the pod status from each of the cluster nodes.
# deploy from microk8s-2, deploys to entire cluster
$ ssh -i id_rsa ubuntu@192.168.122.212 "sudo microk8s kubectl create deployment nginx --image=nginx"

deployment.apps/nginx created

# same pod is deployed no matter which node checked
$ for octet in $(seq 210 212); do ssh -i id_rsa ubuntu@192.168.122.$octet "sudo microk8s kubectl get pods"; done

NAME READY STATUS RESTARTS AGE
nginx-6799fc88d8-txcnh 1/1 Running 0 2m58s
NAME READY STATUS RESTARTS AGE
nginx-6799fc88d8-txcnh 1/1 Running 0 3m
NAME READY STATUS RESTARTS AGE
nginx-6799fc88d8-txcnh 1/1 Running 0 3m23s
Notice that pod ‘nginx-6799fc88d8-txcnh’ is shown as deployed no matter which microk8s host is checked. Which is what we expect, given this is a single Kubernetes cluster.
REFERENCES
ubuntu, microk8s cluster installation and join
ubuntu, basic microk8s installation
ubuntu, microk8s channels and versions
dmacvicar, terraform local libvirt provider
NOTES
remove previously added host fingerprint
ssh-keygen -f ~/.ssh/known_hosts -R 192.168.122.xxx