![]() Remote debugging of Java applications from an IDE can be essential when debugging difficult issues. There is no reason to give this functionality up just because you are deploying to a container in Cloud Foundry.
Remote debugging of Java applications from an IDE can be essential when debugging difficult issues. There is no reason to give this functionality up just because you are deploying to a container in Cloud Foundry.
In this article we’ll go over how to enable remote debugging from a local Eclipse IDE to a public CF provider like Pivotal CloudFoundry.
Prerequisites
There are a few requirements that have to be met in order to use Java remote debugging with Cloud Foundry.
- Need to be using Diego containers (v1.6.x+)
- Need to have “cf ssh” access enabled to application
- Need Java buildpack v3.4+
- Unbind any javaagent instrumenting your code (New Relic, AppDynamics)
- Must have the Java source for the application
Sample Application
In order to test, we will use my slight variant of the spring-music project, a simple Spring Boot application.
You can use my article, “CloudFoundry: Deploying the spring-music webapp, Part 1“, for instructions on grabbing the source, building the app, then deploying to Pivotal CF.
Once deployed, verify that you can ssh into the remote container:
$ cf ssh spring-music

vcap@@fa8ffc3-6f18-4e50-6b6e-a951:~$ whoami
vcap

vcap@@fa8ffc3-6f18-4e50-6b6e-a951:~$ pwd
/home/vcap

vcap@@fa8ffc3-6f18-4e50-6b6e-a951:~$ exit
If you have issues with “cf ssh”, go through the troubleshooting page here. One thing is to make sure your user has the SpaceDeveloper role, which can be verified using:
$ cf orgs
$ cf spaces
$ cf space-users <org> <space>
Finally, open Eclipse and File>Import the project as a “Existing Gradle Project”.
Enable debugging of CF app
If you are familiar with remote debugging, then you know that typically you start the JVM with the following values to allow communication from the IDE to the JVM container using the jdwp protocol.
-Xdebug -agentlib:jdwp=transport=dt_socket,address=9999,server=y,suspend=n
This works great when dealing with a local environment where access to port 9999 is available and firewall access is lax, but will be an issue in a public CF container.
Luckily the Java Buildpack gives us an easy way to enable remote debugging, and it leverages a secure tunnel to the container to expose a local port that you can use for jdwp communication.
The following commands will enable debugging flags for the Java buildpack, restages the application, then creates a tunnel to the container and exposes it as a local port on 8000.
$ cf set-env spring-music JBP_CONFIG_DEBUG '{enabled: true}'

$ cf restage spring-music

$ cf ssh -N -T -L 8000:localhost:8000 spring-music
Configure Eclipse for remote debugging
From Eclipse open in Java view, open “src/main/java/org.cloudfoundry.samples.music.web.AlbumController”. At around line 25 you should see:
logger.info("Getting all albums at INFO level");
Click on that line, and then from the Eclipse menu select Run>Toggle Breakpoint and a blue dot icon should show up to the left of the line. The remote container has now been told to “pause” when it reaches this line in our source code.
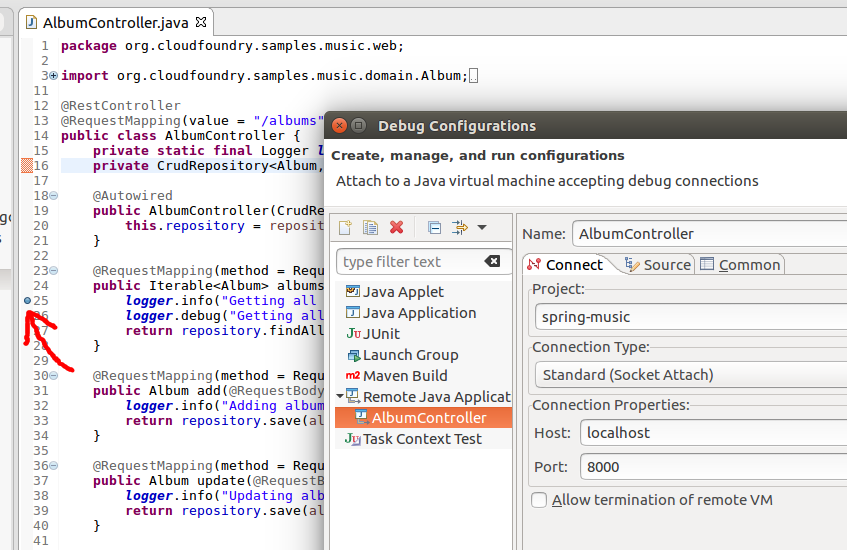
From the Eclipse menu, select Run>Debug Configurations, and click on “Remote Java Applications”. Press the new icon at the top left, and you will now have a new remote configuration where the defaults should match to exactly what we want, name=”AlbumController”, project=”spring-music”, connection type=”socket attach”, host=”localhost”, port=”8000″.
Press the “Debug” button, and now the IDE will connect to the local 8000 port (which tunnels communication to the remote container).
But notice that nothing has happened within the IDE. That is because the breakpoint has not been triggered yet. Go to a browser and pull up the URL to the application. The browser should render only the header of the application and pause, and now the IDE will go into debug mode with the breakpoint line highlighted.
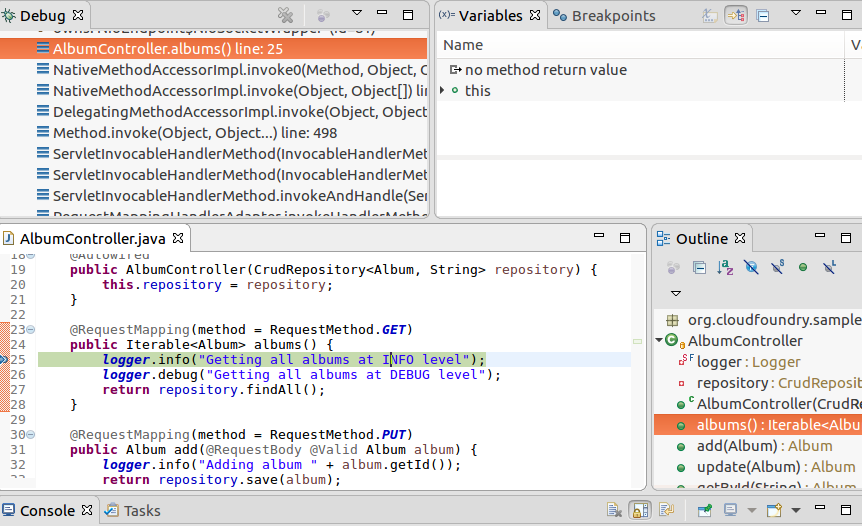
From here, we use the standard Eclipse commands to debug (F6 to step over, F8 to resume, etc). If you press F8 in the IDE to resume, the entirety of the page is now rendered and you will see all the albums listed.
REFERENCES
https://discuss.pivotal.io/hc/en-us/articles/221317307-How-to-remotely-debug-Java-applications-on-PCF- (for local PCF dev)
https://content.pivotal.io/blog/new-cloud-foundry-java-buildpack-improves-developer-diagnostic-tools (enable JMX, Debug, Profiling)
https://docs.oracle.com/javase/8/docs/technotes/guides/troubleshoot/introclientissues005.html
https://blog.altoros.com/how-to-remotely-debug-cloud-foundry-apps.html
http://mikusa.blogspot.com/2014/08/debugging-java-applications-on.html
https://docs.cloudfoundry.org/buildpacks/java/java-tips.html
http://sykesm.mybluemix.net/posts/jmx-in-diego/ (debugging JMX access through CF)
https://stackoverflow.com/questions/20884353/why-java-opens-3-ports-when-jmx-is-configured#answer-21552812 (setting com.sun.management.jmxremote.port and com.sun.management.jmxremote.rmi.port to same value)
NOTES
JMX
$ cf set-env java-main-application JBP_CONFIG_JMX ‘{enabled: true}’
$ cf ssh -N -T -L 5000:localhost:5000 java-main-application
jconsole should connect to localhost:5000