![]() If you are running KVM on an Ubuntu server, you already have an excellent Type 1 virtualization engine. Luckily, if you need to test something specific to VMware you can always run ESXi 7.0 nested inside a KVM virtual machine.
If you are running KVM on an Ubuntu server, you already have an excellent Type 1 virtualization engine. Luckily, if you need to test something specific to VMware you can always run ESXi 7.0 nested inside a KVM virtual machine.
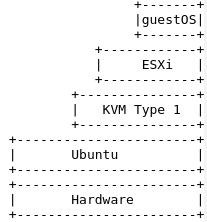
In this article, I’ll be using a bare metal server running Ubuntu and KVM as a type 1 hypervisor. On top of that I will create a KVM virtual machine that runs VMware ESXi.
Finally, we will run a smoke test by deploying a guest OS in the nested ESXi.
Download vSphere Hypervisor
VMware vSphere Hypervisor ESXi is a commercial product, but when you create an account and start an evaluation period, you can download a 60 day trial.
https://customerconnect.vmware.com/en/group/vmware/evalcenter?p=vsphere-eval-7
Click on the section “Download the hypervisor (vSphere ESXi Installable)” and then download the “VMWare vSphere Hypervisor (ESXI ISO) Image”. It is about ~400Mb.
# should match sha on download page
cd ~/Downloads
sha256sum VMware-VMvisor-Installer-7.0U3-18644231.x86_64.iso
Install KVM
I am assuming you are running Ubuntu and have already installed and smoke tested KVM as described in my previous article.
Enable VT-x
You need to make sure your CPU is capable of VT-x (virtualization acceleration), and then that your BIOS has VT-x enabled. Many computers have it disabled by default in the BIOS.
The easiest way to check is kmv-ok.
$ sudo apt-get install cpu-checker
$ kvm-ok
INFO: /dev/kvm exists
KVM acceleration can be used
Then check using virt-host-validate.
$ virt-host-validate

 QEMU: Checking for hardware virtualization : PASS
  QEMU: Checking if device /dev/kvm exists : PASS
  QEMU: Checking if device /dev/kvm is accessible : PASS
  QEMU: Checking if device /dev/vhost-net exists : PASS
  QEMU: Checking if device /dev/net/tun exists : PASS
  QEMU: Checking for cgroup 'cpu' controller support : PASS
  QEMU: Checking for cgroup 'cpuacct' controller support : PASS
  QEMU: Checking for cgroup 'cpuset' controller support : PASS
  QEMU: Checking for cgroup 'memory' controller support : PASS
  QEMU: Checking for cgroup 'devices' controller support : PASS
  QEMU: Checking for cgroup 'blkio' controller support : PASS
  QEMU: Checking for device assignment IOMMU support  : PASS
  QEMU: Checking if IOMMU is enabled by kernel : PASS
  QEMU: Checking for secure guest support : WARN (Unknown if this platform has Secure Guest support)
   LXC: Checking for Linux >= 2.6.26 : PASS
   LXC: Checking for namespace ipc : PASS
   LXC: Checking for namespace mnt : PASS
   LXC: Checking for namespace pid : PASS
   LXC: Checking for namespace uts : PASS
   LXC: Checking for namespace net : PASS
   LXC: Checking for namespace user : PASS
   LXC: Checking for cgroup 'cpu' controller support : PASS
   LXC: Checking for cgroup 'cpuacct' controller support : PASS
   LXC: Checking for cgroup 'cpuset' controller support : PASS
   LXC: Checking for cgroup 'memory' controller support : PASS
   LXC: Checking for cgroup 'devices' controller support : PASS
   LXC: Checking for cgroup 'freezer' controller support : PASS
   LXC: Checking for cgroup 'blkio' controller support : PASS
   LXC: Checking if device /sys/fs/fuse/connections exists : PASS
And lastly, you should see a number greater than 0 coming back from cpuinfo.
egrep -c '(vmx|svm|ept)' /proc/cpuinfo
If you do not have this enabled, reboot your machine and press the special function key (F1|F2|F10|DEL|ESC|alt-S) that takes you into the BIOS. Each BIOS is different but look for “Virtualization Technology” or “VT-x”.
We cannot created a nested virtualization solution without this support.
Configure VT-x in OS
In addition to enabling VT-x at the BIOS level, you will also need to configure it at the Ubuntu OS level. In the file “/etc/modprobe.d/qemu-system-x86.conf”, set the following lines.
options kvm ignore_msrs=1 report_ignored_msrs=0
options kvm_intel nested=1 enable_apicv=0 ept=1
Then in order to workaround an issue with Ubuntu, force the value for ignore_msrs
echo 1 | sudo tee /sys/module/kvm/parameters/ignore_msrs
Reboot the host, then login and run the following commands.
# want Y to be returned
cat /sys/module/kvm/parameters/ignore_msrs

# want N to be returned
cat /sys/module/kvm_intel/parameters/enable_apicv

# want Y to be returned
cat /sys/module/kvm_intel/parameters/nested

# want Y to be returned
cat /sys/module/kvm_intel/parameters/ept
Create KVM Virtual Machine for ESXi
Now we are ready to create a KVM virtual machine capable of running ESXi. Run the ‘virt-install’ command below, tailoring it to any specific cpu/disk/ram requirements and use a virsh pool capable of handling a 900Gb sparse drive.
# ESXi 7 has a stricter compatibility list
# verify that 'vmxnet3' is valid NIC type
$ qemu-system-x86_64 -net nic,model=? | grep vmxnet3

# ISO for esxi7 installer
iso=~/Downloads/VMware-VMvisor-Installer-7.0U3-18644231.x86_64.iso

# use pool that has enough capacity for sparse 900Gb
virsh pool-list
disk_pool=default
virsh pool-info $disk_pool

# even though disk is sparse, takes a couple of minutes to create
virt-install --virt-type=kvm --name=esxi1
--cpu host-passthrough
--ram 73728 --vcpus=24
--virt-type=kvm --hvm
--cdrom $iso
--network network:default,model=vmxnet3
--graphics vnc --video qxl
--disk pool=$disk_pool,size=900,sparse=true,bus=ide,format=qcow2
--boot cdrom,hd,menu=on --noautoconsole --force
The parameters I used in the virt-install command above are intentional, and I tried to steer you around several issues that you could run into. The video type of qxl is used because cirrus made the initial setup screen loop, the disk is IDE to avoid errors during the install, and the network is using a vmxnet3 model because in ESXi7 the generic e1000 and rtl8139 are no longer recognized by the ESXi host (6.5/6.7 worked with e1000).
The supported hardware list of ESXi 7 is even narrower than 6.7, so if you can get installation to work properly using other driver types, that is fine. Just know that it took me a while to get the combination above to work.
Set host CPU virtualization
Validate this virtualized guest will inherit the host cpu virtualization enablement.
# need host passthrough of cpu virtualization features
$ virsh dumpxml esxi1 | grep '<cpu'

<cpu mode='host-passthrough' check='none'/>
Insert vCenter ISO as CDROM
You need to have the CDROM connected after power up. Depending on the domain xml, you may have to attach it as device “hdb” or “hdc” so look at the <target dev=”hd?“> label of the cdrom device.
cdrom=$(virsh domblklist esxi1 --details | grep cdrom | awk {'print $3'})
echo "cdrom device is $cdrom"

virsh attach-disk esxi1 $iso $cdrom --type cdrom --mode readonly
UEFI instead of BIOS
To increase stability, use the latest OVMF which is an open-source implementation of UEFI instead of BIOS as your guest firmware. Build the latest OVMF per my article.
Then set the alternative firmware of the guest VM. The quick instructions are that you provide the full path in the <loader> element of parent <os> element as shown below.
$ virsh edit esxi1

<os>
...
<loader>/home/fabian/uuefi/edk2/Build/OvmfX64/RELEASE_GCC5/FV/OVMF.fd</loader>
...
</os>
Power on
Finally, reboot the guest VM which should start the ESXi 7 installer.
# power down, then start
virsh reset esxi1
Installing ESXi
The UEFI briefly shows you the Tiano splashscreen then goes straight to the ESXi installer being loaded. Then the instructions proceed just like a normal ESXi 7 install as detailed in many places on the web [1,2,3].
At the welcome screen, press <ENTER>
<F11> to accept the license
<ENTER> to select the single disk as the default install drive
<ENTER> on the default US keyboard
input the initial password for root (my subsequent vCenter article assume ‘ExamplePass@456’)
<ENTER> if you receive CPU future support warning
<F11> to validate install on disk
…installing…
message to disconnect the CDROM before rebooting
# eject CD before doing reboot
virsh change-media esxi1 $iso --eject
<ENTER> to reboot
After rebooting, you should see the screen below giving you the 192.168.122.x address of the ESXi server (192.168.122.0/24 is the default NAT network used by KVM).
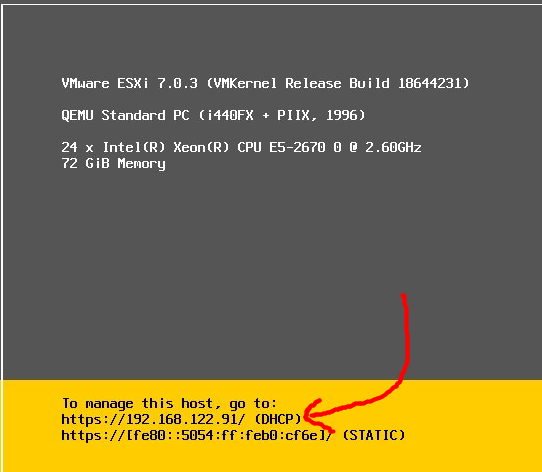
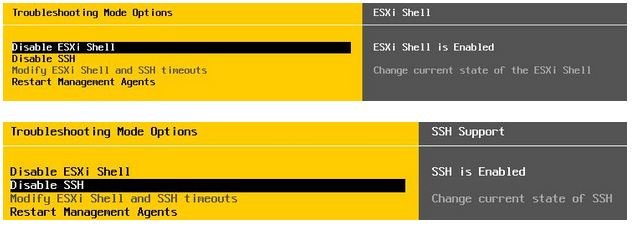
Press <F2> and then enter in the root password you typed during the install. You will want to go to “Troubleshooting Options”, and enable the ESXi shell and SSH before pressing <ESC> twice to go back to the main screen.
ESXi Embedded Host Client
Using a web browser, go to the URL specified in the ESXi startup screen (https://<server>/ui/).
You should get the login page, use your “root” credentials to login and you should see a screen similar to below which is the Embedded Host Client.
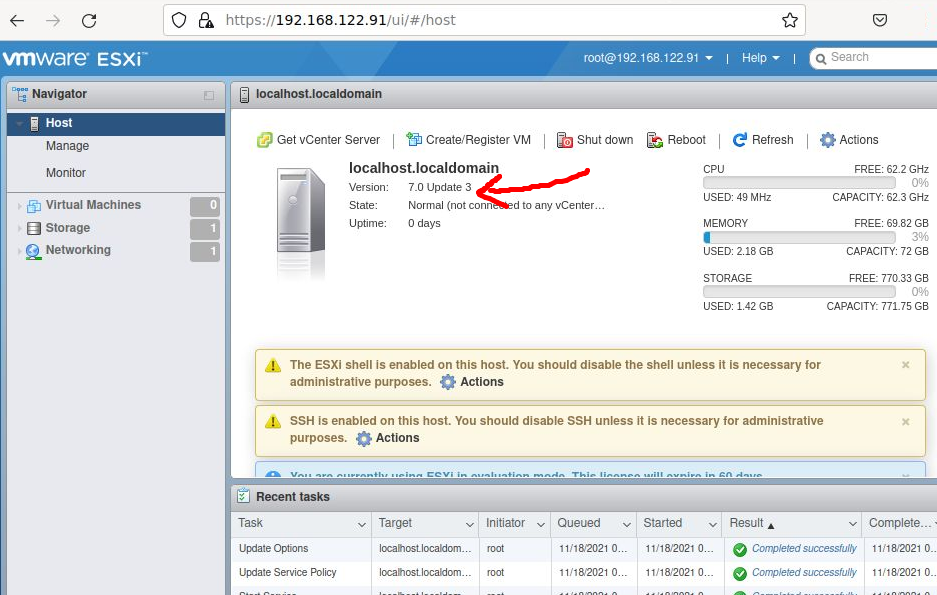
This HTML/Javascript application is a lightweight management interface served directly from the ESXi host. Note that it cannot be used to manage vCenter.
Creating a Virtual Machine
Remember at this point, that we are multiple layers down in virtualization engines. ESXi is running nested inside KVM. So now let’s create a guest VM inside ESXi to ensure this works.
First download the mini.iso for the network installer of Ubuntu Focal. This file is only 75Mb, so it is perfect for testing. When complete, you should have a local file named “~/Downloads/mini.iso”.
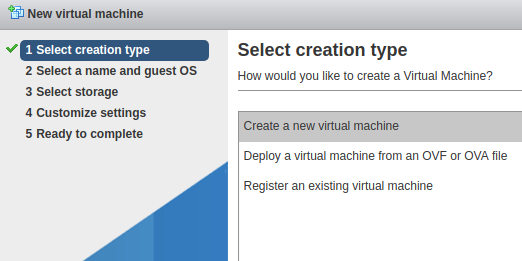
From the vSphere UI, press “Create/Register VM”.

Then choose to “Create a new virtual machine” and press Next.
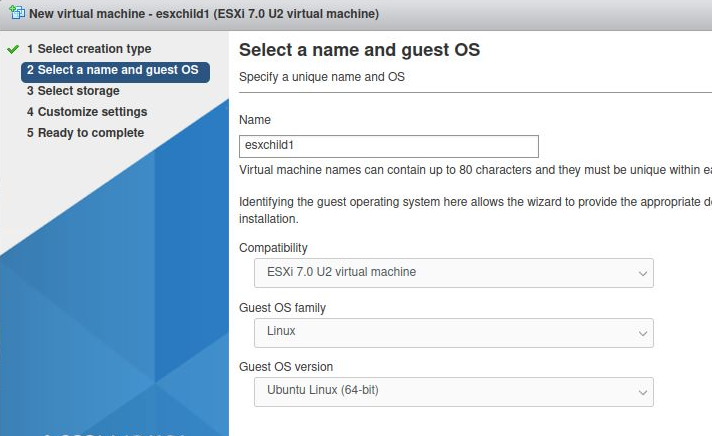
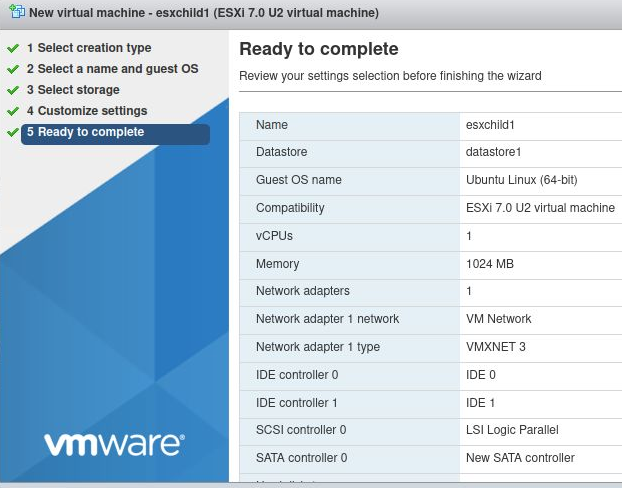
Type a name of “esxchild1” for the guest OS and select a Linux host, Ubuntu Linux (64-bit).
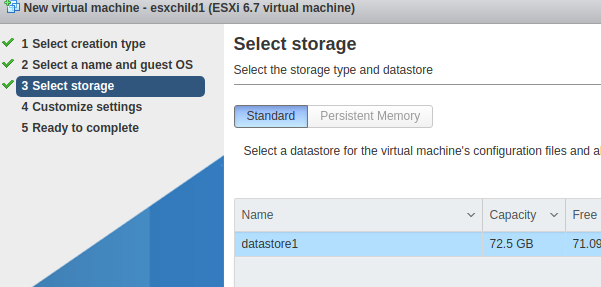
Allow the default datastore1 and press Next
Then the customize settings come up, and you can leave the default 1 vcpu and 1024M memory.
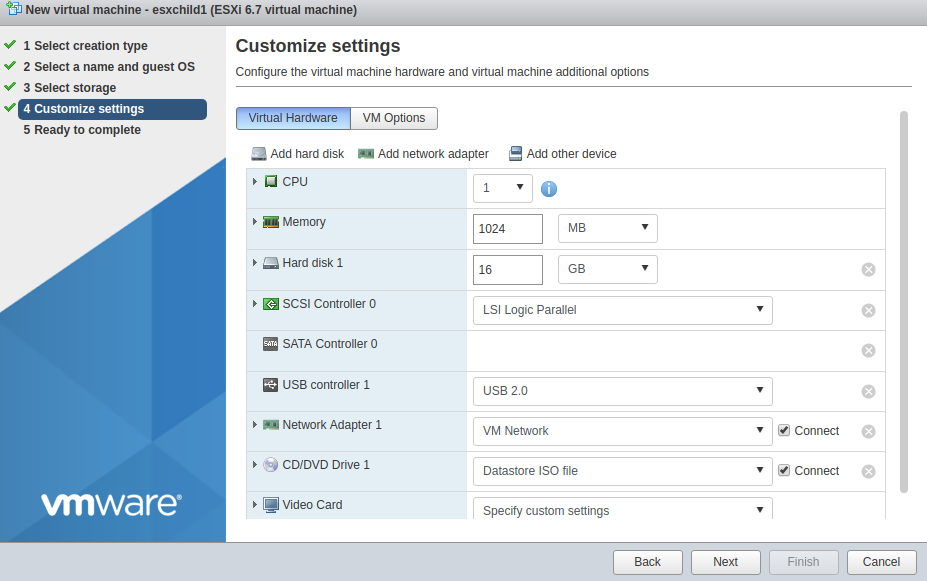
But the one thing you must change is the CD/DVD drive. We want to use the Ubuntu network installer ISO on your local system at “~/Downloads/mini.iso”. Select “Datastore ISO file” from the pulldown instead of “Host device” and a datastore browser will show.
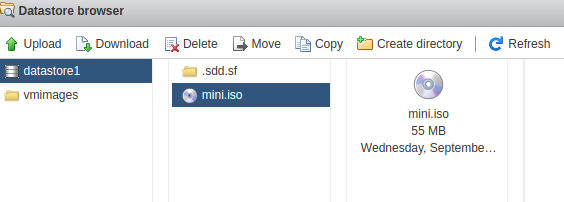
Press “Upload” and select the mini.iso file from your local drive. Then click on the file in the middle column, and press “Select”. This will take you back to the main settings window and just make sure “Connect” is checked beside the CDROM.
You are now at the finish screen, review your choices and press Finish.
Now navigate using the tree on the left to “esxchild1” and notice the power is still off. Go ahead and press the power button.
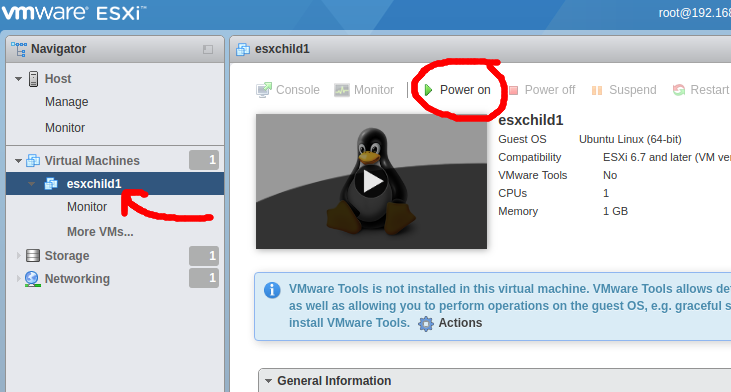
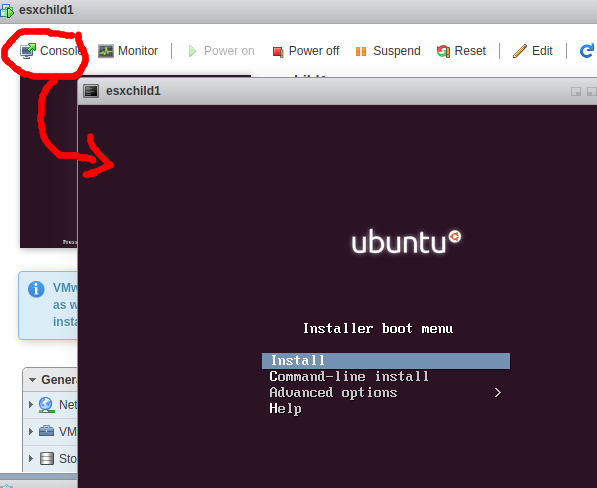
You should see the preview screen change and the Ubuntu logo will be visible. Press “Console” and then “Open browser console” to get an interactive screen.
We will stop this exercise here, but this OS could be installed and this host could be used exactly the same as a guest OS created under KVM.
Stability Issues
If you find that your ESXi host often experiences the VMware “Purple Screen of Death”, remember the supported hardware list for VMware is narrow, and you are probably experiencing incompatibility with host hardware or drivers.
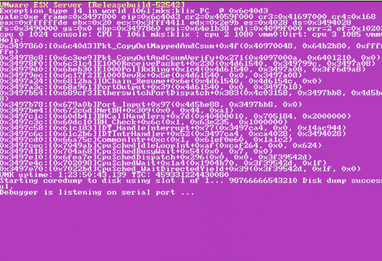
I saw a great deal of improvement by having KVM use the newest OVMF UEFI firmware for the virtual machine instead. The version of SeaBIOS distributed with KVM is very old, if you insist on using BIOS then make sure you are using the latest SeaBIOS as described in my other article.
Further ESXi configuration steps
Here are a few more optional steps that can help in managing this ESXi host.
If you are going to install vCenter next, you need to consider the static IP and hostname change mandatory – full DNS and reverse IP resolution is mandatory during the vCenter installation.
Setting a static IP is easier especially when manually managing DNS entries. This can be done from an ssh session and web GUI as well, but let’s do it directly from the ESX host console.
Choose “Configure Management Network>IPv4 Configuration” and set the IP, subnet, and default gateway as shown below.

Then Select IPv6 Configuration, and “Disable IPv6” since we will not be using it.
The default name is “localhost”, so that is something you must change if you are going to address this server by DNS or from vCenter. Choose “Configure Management Network>DNS Configuration” and set the full hostname and primary DNS server.
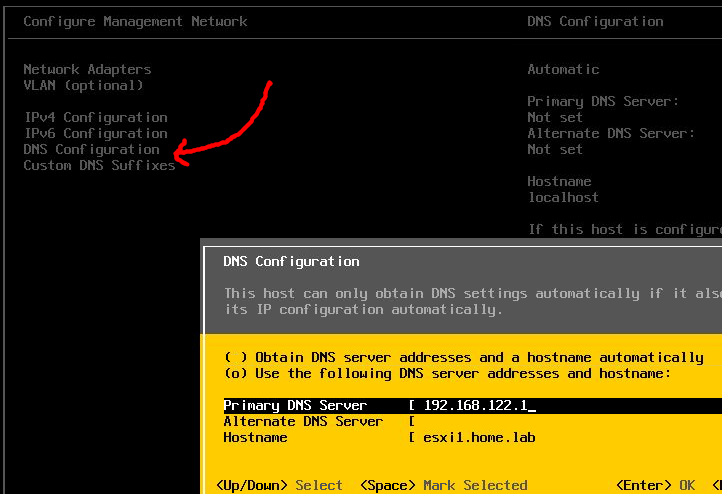
You should provide the fully qualified domain name so that the certificate generation done in the following steps works properly.
If you are using fully qualified hostname, choose Choose “Configure Management Network>Custom DNS Suffixes” and enter in the domain name that should be appended on searches.
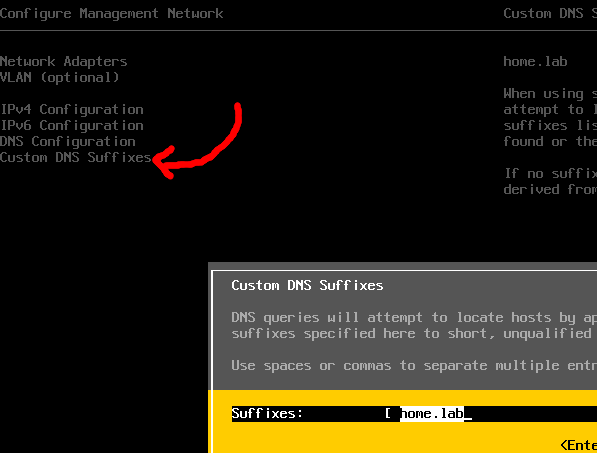
Press <ESC> then “Y” if asked if you want to apply changes and reboot.
Certificate Regeneration [1,2,3,4]
To get to the ESXi console, you can either ssh in as root OR press <ALT>-<F11> at the virt-viewer. But it’s probably easier to type these commands if you use standard ssh.
The initial certificate delivered on the ESXi is CN=localhost.localdomain. To change this to a self-signed cert that reflects the true name use the ‘generate-certificates’ utility from an ssh session to the ESXi host.
# login to esxi host
ssh root@<IP>

# check current cert
cd /etc/vmware/ssl

hostname
# full host should reflect FQDN for cert generation
hostname -f

openssl x509 -in rui.crt -text -noout | grep Subject

# backup certs
tar cvfz /etc-vmware-ssl.tgz *

# generate new certs
/sbin/generate-certificates
openssl x509 -in rui.crt -text -noout | grep Subject

# restart services
/etc/init.d/hostd restart
/etc/init.d/vpxa restart
If you now refresh your browser on the ESXi Embedded Host Client and look at the certificate, it will show your hostname for the CN. Note that it is still a self-signed certificate (and therefore untrusted by default).
SSH/SCP access
Enabling ssh access earlier at the console did enable ssh when ESXi is the target host, but ssh/scp initiated from the ESXi host to another host is still not enabled. All you will see is “FIPS mode initialized” and a timeout.
To make this work, you need to disable a firewall rule. Run the following commands to check the firewall rule, then disable it.
esxcli network firewall ruleset list --ruleset-id sshClient
esxcli network firewall ruleset set --ruleset-id sshClient --enabled=true
At that point, scp initiated from the ESXi host will work.
MOB enablement
Although it is disabled by default for security reasons, on a lab or non-production system you may need to use the MOB (Managed Object Browser). For example, to view the VT-x and EPT features passed through to your nested ESXi server using a URL like below:
https://esxi1.home.lab/mob/?moid=ha-host&doPath=capability
But first it must be enabled (you will get a 503 error until it is), and this can be done via vCenter or from the console of the ESX server using ‘vim-cmd’:
# set value
vim-cmd hostsvc/advopt/update Config.HostAgent.plugins.solo.enableMob bool true

# check value
vim-cmd hostsvc/advopt/settings | grep -A1 Mob
Next steps
The next logical step is to install vCenter 7.0, which I describe in this article.
REFERENCES
VMware HW support list for 7.0
altaro.com, installing esxi7u1
sysadmintutorials.com, video on esxi7 install
mustbegeek.com, esxi7 install with screenshots
https://rwmj.wordpress.com/2014/05/19/notes-on-getting-vmware-esxi-to-run-under-kvm/
boxofcables.dev, kvm intel ept parameter for EPT and list of qemu cpu flags
ahelpme.com, Ubuntu get cpu flags for qemu
kernel.org, nested kernel kvm support
kernel.org, running nested guests with KVM
golinuxhub, check guest Hyperthreading using dmidecode, lscpu, /proc/cpuinfo
virtualizationhowto, cpu mem bios on esxi host
codyatips.com, booting ESXi on legacy unsupported cpu
NOTES
If ESXi complaining about not supporting virtualization [1], from esxi host
cat /etc/vmware/config, add two keys:
vhv.enable = "TRUE"
vmx.allowNested = "TRUE"
esx config info, HV Support enabled if value is 3 ; number of core/threads
esxcfg-info | grep "HV Support" -C10

vim-cmd hostsvc/hostsummary | grep cpuModel
get cpu and core results
esxcli hardware cpu global get
dmesg | grep -E “vmx|iommu”
Checking host VT-d virtualization for IO, IOMMU (different from cpu VT-x)
dmesg | grep -iE “dmar|iommu|aspm”
cat /var/log/kern.log | grep IOMMU
# another way for checking using Ubuntu 'compgen' utility
if compgen -G "/sys/kernel/iommu_groups/*/devices/*" > /dev/null; then echo "IOMMU is enabled"; else echo "IOMMU is NOT enabled!"; fi
==add to /etc/default/grub (for VT-d) bug in 18.04
GRUB_CMDLINE_LINUX_DEFAULT=”intel_iommu=on”
$ grub-install –version
$ sudo update-grub (equiv to grub2-mkconfig)
list of esxi software components [1]
esxcli software vib list
Direct ESXi host modes
<ALT>-<F1> goes to shell
<ALT>-<F11> goes to status
<ALT>-<F2> back to GUI
maintenance mode [1],
vim-cmd hostsvc/maintenance_mode_enter
vim-cmd hostsvc/maintenance_mode_exit
mount cdrom from inside esxi [1,2]
vmkload_mod iso9660
esxcfg-mpath -b | grep "CD-ROM"
cd /vmfs/volumes
ls (should see mpx.*)
vsish -e set /vmkModules/iso9660/mount $(esxcfg-mpath -b | grep "CD-ROM" | awk '{print $1}')
vsish -e set /vmkModules/iso9660/umount $(esxcfg-mpath -b | grep "CD-ROM" | awk '{print $1}')
ESXi software repository and installs
Add-EsxSoftwareDepot, Get-EsxSoftwarePackage, Add-EsxSoftwarePackage
Get list of valid cpu flags for qemu
qemu-system-x86_64 -cpu help

# used like
qemu-system-x86_64 -enable-kvm \
-cpu qemu64,+sse3,+ss34.1,-sse4.2,+x2apic \
...

# if you want to emulate host
qemu-system-x86_64 -enable-kvm \
-cpu host \
...
List cpu model feature flag capabilities
virsh capabilities | grep -i sandy -C40
View qemu details for vm guest startup
ls -latr /var/log/libvirt/qemu
change cdrom
virsh change-media esxi1 $cdrom $iso --insert
Exact KVM Host versions used for this article
$ uname -a
Linux hpz820 5.4.0-89-generic #100-Ubuntu SMP Fri Sep 24 14:50:10 UTC 2021 x86_64 x86_64 x86_64 GNU/Linux

$ lsb_release -a
No LSB modules are available.
Distributor ID: Ubuntu
Description: Ubuntu 20.04.3 LTS
Release: 20.04
Codename: focal

# same output
$ kvm --version
$ qemu-system-x86_64 --version
QEMU emulator version 4.2.1 (Debian 1:4.2-3ubuntu6.18)
Copyright (c) 2003-2019 Fabrice Bellard and the QEMU Project developers

$ virsh --version
6.0.0
esxi iso: VMware-VMvisor-Installer-7.0U3-18644231.x86_64.iso (7.0U3a)
vcenter iso: VMware-VCSA-all-7.0.3-18700403.iso (7.0U3a)
OVMF: latest head (but edk2-stable202108 was latest stable release)