 WireGuard aims to be the successor to IPsec and more performant than OpenVPN. It is a general purpose VPN that is secure enough for servers, yet light enough to run on embedded devices.
In this article, I will show how to install WireGuard on two Ubuntu servers in completely different hyperscalers that are linked by a WireGuard site-to-site VPN tunnel. Below is a logical diagram.
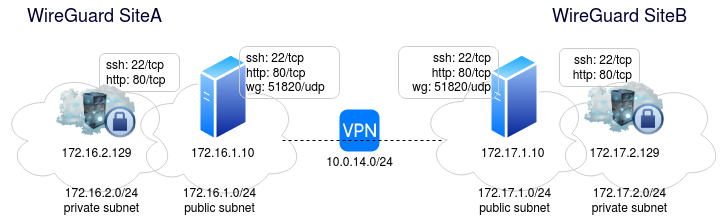
There is a single host in each of the fronting public subnet. This is the server that hosts WireGuard for the site, and it has an Apache web server and public ssh endpoint.
The hosts in the private subnet have ssh and an Apache web server, but these services are unavailable to the public. They are only reachable from the host in the public subnet.
Once the VPN is established between these two sites, communication will be allowed between all hosts. For example, the public host on SiteB will be able to communicate with the private subnet on SiteA.
In this example, SiteA happens to be on AWS, while SiteB is on GCP. Your first reaction might be that I should simply use the native VPN capabilities of AWS’s virtual private gateway and GCP’s Cloud VPN Gateway for this private tunnel connection ([1,2,3]). That would be correct, but please take this for the example that it is, where you might not have compatible solutions built into both sides.
Build Overview
This build will first start with Terraform building the infrastructure. When that is complete, we will pull specifics from that build such as public IP addresses into the Ansible inventory and group variables.
Then we will apply an Ansible playbook that installs and configures WireGuard on each public site server. This will establish a VPN tunnel across both sites and give Apache a customized index.html.
Prerequisite: Install Terraform
See my previous article on installing Terraform.
Prerequisite: Install Ansible
See my previous article on installing Ansible using a ppa.
Pull project
Pull the project from github.
# required packages
sudo apt-get install make git -y

# pull project
git clone https://github.com/fabianlee/wireguard-test-gcp-aws-roaming.git
cd wireguard-test-gcp-aws-roaming
Provide AWS Credentials
Based on how the Terraform AWS script are written, it is expecting an IAM user’s credentials at ~/.aws/credentials that looks like below.
[default]
aws_access_key_id = xxxxxxxxxxxxxxxxxxxx
aws_secret_access_key = xxxxxxxxxxxxxxxxxxxx
In a previous article I describe how to login to the AWS console and manually create a user named ‘awsuser’. You can follow these instructions and manually create this file OR you can follow the entire article and install the aws CLI. Running ‘aws configure’ will ask for the key and secret and create this file for you.
It is important to note that the Terraform AWS provider does not require the aws CLI tool.
Provide GCP Credentials
Based on how the Terraform GCP scripts are written, it is expecting a Service Account’s credentials at “gcp-infra/tf-creator.json”.
So you can either create this service account manually from the Google console and download the json file credentials, or you can install the gcloud CLI and then run my create-tf-service-account.sh script.
# login as self
gcloud auth login

# use self to create service account for terraform
# downloads credentials as 'tf-creator.json'
cd gcp-infra
./create-tf-service-account.sh
cd ..
It is important to note that the Terraform google provider does not require the gcloud CLI tool.
Provision infrastructure using Terraform
Start the build using the following commands.
# make ssh auth key for VMs that will be built
make create-keypair

# validate that AWS credentials and GCP credentials exists
make serviceaccount-prereq
Build the AWS infrastructure WARNING: AWS will bill you for this usage!
$ cd aws-infra
$ terraform init
$ terraform apply -auto-approve

...
Apply complete! Resources: 19 added, 0 changed, 0 destroyed.

Outputs:

aws-ubuntu-priv-web-private_ip = "172.16.2.129"
aws-ubuntu-pub-wg_private_ip = "172.16.1.10"
aws-ubuntu-pub-wg_public_ip = "13.59.237.21"


# go back to main directory
$ cd ..
Build the GCP infrastructure WARNING: GCP will bill you for this usage!
$ cd gcp-infra
$ terraform init
$ terraform apply -auto-approve

...
Apply complete! Resources: 12 added, 0 changed, 0 destroyed.

Outputs:

gcp-ubuntu-priv-web-private_ip = "172.17.2.129"
gcp-ubuntu-pub-wg_private_ip = "172.17.1.10"
gcp-ubuntu-pub-wg_public_ip = "34.74.10.134"


# go back to main directory
$ cd ..
Now that the infrastructure has been built, parse the specific IP addresses and populate the Ansible inventory and group variables.
make get-ansible-ready
Smoke test infrastructure
At this point, all you have are the basic networks, security/firewall groups, and compute instances. What we can test right now is the ability to ssh into the public instances, reach the public internet via gateway, as well as use the public instance as a bastion/jumpbox to reach the private instance.
There is currently no VPN connection between sites, so we will not test across sites. Run the make target ‘test-ssh’ to get a menu similar to below.
$ make test-ssh
...
== SSH TO ==

1) aws bastion instance 13.59.237.21
2) aws private instance 172.16.2.129

3) gcp bastion instance 34.74.10.134
4) gcp private instance 172.17.2.129

Which action (q to quit) ? q
Test #1: AWS public instance
- Select ‘1’ from the menu to ssh into the public IP address
- sudo apt-get update (internet via igw)
- nc -vz 172.16.2.129 22 (ssh access to private instance)
- exit
Test #2: AWS private instance
- Select ‘2’ from the menu to ssh into the private host using the public host as a bastion/jumpbox
- sudo apt-get update (internet via NAT gateway)
- exit
Test #3: GCP public instance
- Select ‘3’ from the menu to ssh into the public IP address
- sudo apt-get update (internet via igw)
- nc -vz 172.17.2.129 22 (ssh access to private instance)
- exit
Test #4: GCP private instance
- Select ‘4’ from the menu to ssh into the private host using the public host as a bastion/jumpbox
- sudo apt-get update (internet via NAT gateway)
- exit
End tests
- press ‘q’ to quit
This shell script populated the ~/.ssh/config that informs ssh what private key to use for which ultimate destination. It uses the ‘-J’ flag of ssh to use the public instances as bastion/jumphosts to reach the private instances.
Application deployment with Ansible
With the infrastructure in place, now we can use Ansible to install and configure the applications.
$ ansible-playbook playbook-wireguard.yml

...

PLAY RECAP *************************************
aws-ubuntu-priv-web : ok=12 changed=10 unreachable=0 failed=0 skipped=33 rescued=0 ignored=0
aws-ubuntu-pub-wg : ok=40 changed=27 unreachable=0 failed=0 skipped=6 rescued=0 ignored=0
gcp-ubuntu-priv-web : ok=12 changed=10 unreachable=0 failed=0 skipped=33 rescued=0 ignored=0
gcp-ubuntu-pub-wg : ok=40 changed=27 unreachable=0 failed=0 skipped=6 rescued=0 ignored=0
localhost : ok=1 changed=1 unreachable=0 failed=0 skipped=0 rescued=0 ignored=0
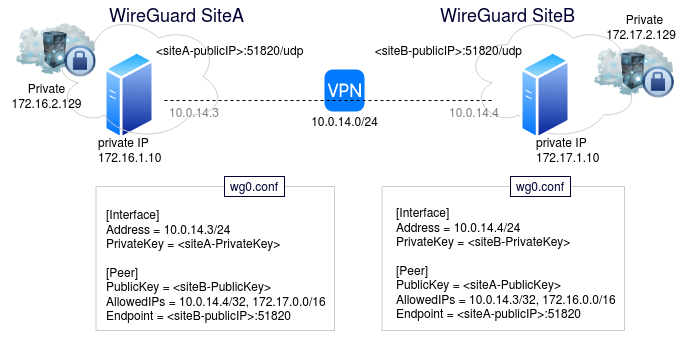
When complete, you will have WireGuard endpoints on both sides, and the VPN site-to-site tunnel will be established. Per the diagram below, you can see that each ‘/etc/wireguard/wg0.conf’ has the other listed as its peer.
Validate VPN site-to-site connectivity
With the application deployments and VPN now in place, we can run a smoke test of the full cross-site connectivity.
$ make test-site-to-site
...
== SITE TEST ==

1) aws bastion instance 13.59.237.21
2) aws private instance 172.16.2.129

3) gcp bastion instance 34.74.10.134
4) gcp private instance 172.17.2.129

Which action (q to quit) ? q
Select each menu item (1-4) which will run four curl commands from each host. It will run a curl against the Apache instance at port 80 against all other hosts (both public and private).
The four lines will look something like below where each line starts with ‘Hello from …’.
Hello from public IP 34.74.10.134 on gcp with private IP 172.17.1.10 with wireguard public key VSOaKbnDV6Z98FzADwhiMh6IPXVY3oPv1QmnT9T7s0g=
Hello from private IP 172.17.2.129 on gcp
Hello from public IP 13.59.237.21 on aws with private IP 172.16.1.10 with wireguard public key ZBphN9G+rgoNGoMuDWaqvB/bXo1cWQZ01epaCn4v7yA=
Hello from private IP 172.16.2.129 on aws
With each host showing success, you now have a site-to-site VPN.
Destroy
To tear down all the AWS and GCP components, run the “destroy” target from the base directory.
make destroy
REFERENCES
fabianlee.org, WireGuard installation on Ubuntu
github fabianlee, github project ‘wireguard-test-gcp-aws-roaming’