![]() Amazon EC2 provides a web interface for managing IaaS, but for repeatable infrastructure deployment what you really want is the ability to deploy and manage this infrastructure using an API or command line tool.
Amazon EC2 provides a web interface for managing IaaS, but for repeatable infrastructure deployment what you really want is the ability to deploy and manage this infrastructure using an API or command line tool.
In this article we want to focus on the CLI (command line interface), which shields us from the API innards and allows us to focus on the managed entities and their relationships.
Prerequisites
Before trying to connect to Amazon Web Services with the AWS CLI from our Ubuntu host, we need to create an IAM User (Identity and Access Management).
This IAM user will have an ID and secret key (credentials), and gets assigned a policy that defines what services the user is able to manipulate. These are the credentials that will be used by the AWS CLI to make the connection to AWS.
Start by logging into your AWS console as the account owner, https://console.aws.amazon.com/console/home
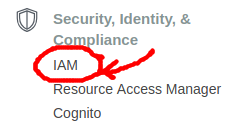
Then select “Services” from the top pull down menu, and search or click on “IAM”.
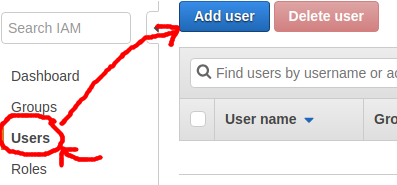
This takes you to the IAM dashboard, click on the “Users” section on the left bar.
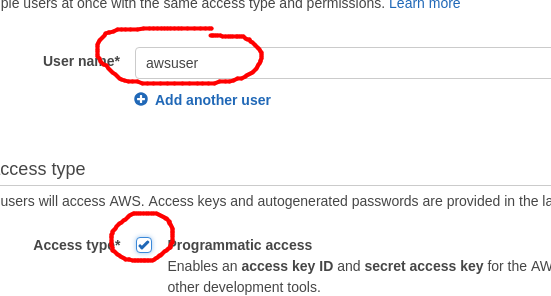
Create a new user with the name “awsuser”, and check the box for “programmatic access”, then click “Next” to go the permissions page.
Now you will asked to provide a set of permissions for this user, for this article we will just attach one of the policies predefined by Amazon.

Select “Attach existing policies directly”, then do a search for “EC2Full”, and click the checkbox for the policy named “AmazonEC2FullAccess” which will give the user access to EC2, CloudWatch, ELB, etc. You can be more discriminating later, and create policy groups that match your business needs.
Click “Next: Tags”, and leave it blank, just click “Next: Review” to get a summary of your choices.
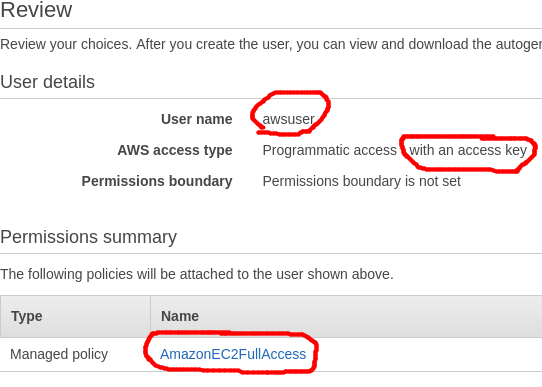
Click “Create User” and the success page will be shown with the Access key ID starting with AKIA, and then a secret access key.

This key ID and secret are the credentials used by the AWS CLI to connect and manipulate AWS services, so treat them as secure credentials and be sure not to expose them via public code repositories.
Installing the CLI on Ubuntu
First, note that you can simply run the script I have provided on github, or follow the steps below which walk you through it.
Start with a package update and installing build-essential.
sudo apt-get update -y
sudo apt-get install build-essential -y
Because Ubuntu 14.04 trusty uses Python2 and Ubuntu 16.04 xenial uses Python3, we will use a variable to account for those differences, so for Ubuntu trusty:
PVER=""
While for xenial:
PVER="3"
Then run the following commands:
# install python and check version
sudo apt-get install python${PVER} python${PVER}-dev python${PVER}-pip -y
python${PVER} --version

# install pip and check version
pip${PVER} --version
sudo -H pip${PVER} install --upgrade pip
pip --version

# install virtualenv so our libraries are independent
# ignore InsecurePlatformWarning from urllib3 on Ubuntu trusty
sudo -H pip install virtualenv
virtualenv --version
pip install virtualenv --upgrade
virtualenv --version

# create virtual environment for awscli
virtualenv awscli
source awscli/bin/activate

# install awscli inside virtualenv
pip install --upgrade awscli
aws --version
We run aws inside a virtualenv so that it does not conflict with any other Python libraries or application that may be running on this host. Note that you MUST be inside this virtualenv every time you run the aws CLI.
awscli/bin/activate

# run from virtualenv
(awscli) $ aws --version
You can verify that you have a current version by checking the latest here.
Configuring the aws CLI
Now that the AWS cli is installed, you still need to provide the access key and secret generated earlier for the IAM user.
(awscli) $ aws configure
You will be prompted for the AWS Access Key ID, AWS Secret Access Key, default region name (e.g. ‘us-east-1’), and default output format (e.g. ‘json’).
Test the aws CLI
Now comes the moment of truth, you want to test a call against AWS using the CLI tool. One of the easiest queries is to show all the available regions.
(awscli) $ aws ec2 describe-regions
Which should show you a list of EC2 regions (e.g. ec2-us-east-1, ec2-us-west-1, etc.).
If you are on Python2.x you will see an SNIMissingWarning coming from urllib3, this can be ignored. Upgrade to Python3 if you want to avoid this message.
Exit VirtualEnv
(awscli) $ deactivate
IAM Permissions
When we created the IAM user policy earlier, we only set “AmazonEC2FullAccess”. If you are going to manage other resources such as S3 using the AWS CLI, make sure you add permissions to the user policy.
REFERENCES
NOTES
view EC2 instances
(awscli) $ aws ec2 describe-instances