![]() BOSH is a project that unifies release, deployment, and lifecycle management of cloud based software. It also serves as the underlying infrastructure for deploying the CloudFoundry PaaS.
BOSH is a project that unifies release, deployment, and lifecycle management of cloud based software. It also serves as the underlying infrastructure for deploying the CloudFoundry PaaS.
In this article, I will lead you through deploying the BOSH Director to Amazon EC2 which is the first step in deploying both CloudFoundry CFAR as well as CFCR (Kubernetes).
Overview
In this article, we will deploy a BOSH Director to Amazon EC2.
We will create a jumpbox inside EC2 which will serve as the secure entry point to the installation. This allows the Director and its deployments to be located in more secure private networks.
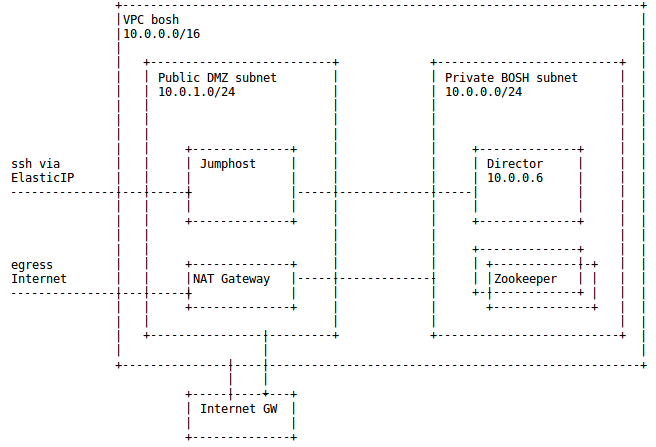
The DMZ public subnet also has an internet gateway as well as a NAT gateway (so instances in the private subnet can reach the internet).
As a smoke test, we will then use the BOSH Director to deploy Apache ZooKeeper in the same private subnet.
Prerequisite IAM User
As a prerequisite, first create an Amazon IAM User (Identity and Access Management) that is capable of manipulating EC2 and related services. The access key ID and secret of this user will be the ones by BOSH to manage the infrastructure.
Start by logging into your AWS console as the account owner, https://console.aws.amazon.com/console/home
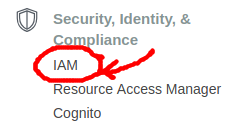 Then select “Services” from the top pull down menu, and search or click on “IAM”.
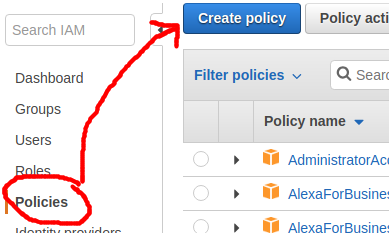 This takes you to the IAM dashboard, click on the “Policies” section on the left bar, and then click the “Create policy” button.
Instead of using the visual editor, click on the “JSON” tab and paste in the content from the policy file in my github project into the text box shown below.
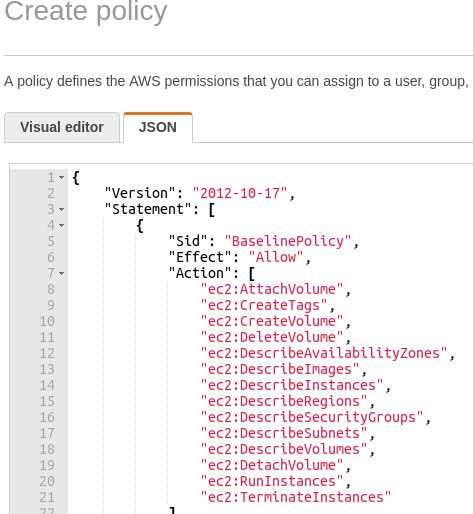
Click “Review Policy” and provide both name and description of “aws-cpi” and press “Create Policy”.
With the policy created, you can now move on to creating a user that has this policy assigned.
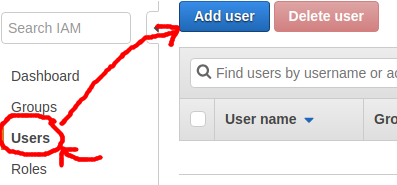
Click on the “Users” section on the left bar and press the “Add user” button.
Create a new user with the name “aws-cpi”, and check the box for “programmatic access”, then click “Next” to go the permissions page.
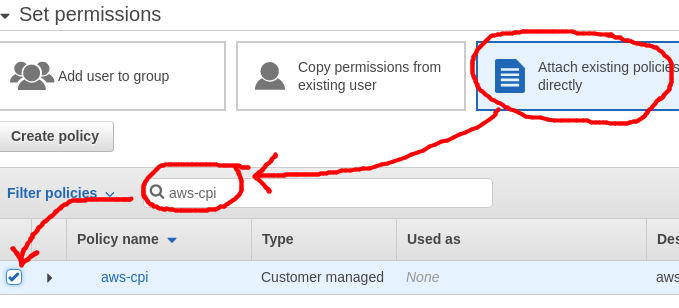
Select “Attach existing policies directly”, and then do a search for the “aws-cpi” policy and click the checkbox to select it. Then press “Next: Tags”.
There is no need to populate any tags, press “Next: Review”.
At the summary page you should see a user named “aws-cpi” with the “aws-cpi” managed policy attached. Go ahead and press “Create user” and you will be presented with a success page.
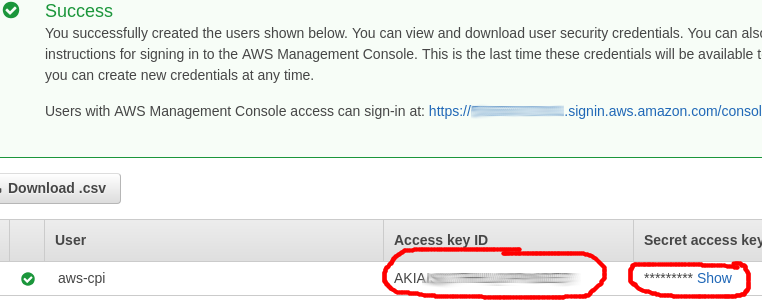
Copy these values and securely store them.
This key ID and secret are the credentials used by the AWS CLI to connect and manipulate AWS services, so treat them as secure credentials and be sure not to expose them via public code repositories.
Prerequisite AWS CLI
Follow the instructions in my article here on installing the AWS CLI for Ubuntu. If you can execute the command below and receive a collection of regions, you are ready to move on:
aws ec2 describe-regions
Build AWS Network Infrastructure
We could manually create the AWS VPC, subnets, elastic IP, key pair, and security groups required for the initial BOSH deployment. But I want to use automation as much as possible so that this entire process can be scripted and capable of reuse across production as well as development environments.
Use my github repository which contains Bash scripts to make the appropriate AWS CLI calls.
sudo apt-get install git -y

# get scripts
git clone https://github.com/fabianlee/bosh-director-on-aws.git
cd bosh-director-on-aws

# create EC2 vpc, subnets, gateways, instances
./aws-create-both-env.sh bosh
This script will create a VPC, 2 subnets, 2 ElasticIP, 1 internet gateway, 1 NAT gateway, one t2.micro Ubuntu instance for the jumpbox, and 1 t4.xlarge instance for the BOSH Director. This will incur charges on your Amazon bill, do not forget to delete these resources when done.
If the script finishes successfully, then your initial EC2 infrastructure has been built.
Create Director from the EC2 jumpbox
When the script above is complete, the last lines it will show output will be similar to below (IP address will be different).
=== DONE =============
for jumpbox access: ssh -i bosh.pem ubuntu@34.205.55.122
Go ahead and run that command in order to ssh into your EC2 Ubuntu jumpbox. As part of the jumpbox creation script, it will be prepopulated with several files:
- jumpbox-startup.sh – script that was automatically run by EC2 at startup
- bosh.pem – private key that will be used for Director ssh access
- do-bosh.sh – creates BOSH Director
- bosh-alias.sh – loads context and credentials for BOSH env
- update-cloud-config.sh – sets BOSH cloud config
- upload-ubuntu-stemcell.sh – uploads Ubuntu stemcell used for Zookeeper
- deploy-zookeeper.sh – deploys Zookeeper service cluster
- bosh-deployment/ – directory containing standard BOSH deployment files
After ssh’ing into the jumpbox, create the BOSH Director and check basic connectivity using the following commands:
# ssh into jumpbox
ssh -i bosh.pem ubuntu@34.205.55.122

# run 'create-env'
./do-bosh.sh create-env

# loads BOSH context
source bosh-alias.sh

# show current env
bosh env

# set basic cloud config
./update-cloud-config.sh

# show deployments (should be empty)
bosh deployments

# show vms (should be empty)
bosh vms
Test Deployment from EC2 jumpbox
The next step is to validate the BOSH Director functionality by having it deploy Apache Zookeeper.
# upload stemcell required by ZooKeeper
bosh upload-stemcell https://bosh.io/d/stemcells/bosh-aws-xen-hvm-ubuntu-trusty-go_agent?v=3586.60

# get ZooKeeper manifest
wget https://raw.githubusercontent.com/fabianlee/bosh-director-on-aws/master/zookeeper.yml -O zookeeper.yml
# deploy 3 cluster instance of Apache zookeeper
bosh -d zookeeper deploy -v zookeeper_instances=3 zookeeper.yml

# show avail deployments (zookeeper should exist now)
bosh deployments

# show instantiated VM (should be 3)
bosh -d zookeeper vms
If all the VMs are in a “running” state that is a good indication that all worked. For a smoke test, run the following BOSH errand:
bosh -d zookeeper run-errand smoke-tests
If you want another deep test, ssh into one of the ZooKeeper nodes and run commands using the ZooKeeper CLI client.
# use BOSH to ssh into the node
bosh -d zookeeper ssh zookeeper/0

# now inside first zookeeper node
# change directory and make JAVA_HOME available
cd /var/vcap/packages/zookeeper
export JAVA_HOME=/var/vcap/packages/openjdk-8/jre

# run CLI client
bin/zkCli.sh

# issue the following commands
ls /
create /zk_test my_data
ls /
get /zk_test
delete /zk_test
ls /
quit
Deleting the EC2/VPC resources
If you don’t want to incur more hourly charges, you need to delete all the EC2 and VPC entities created for this test.
From the jumphost use the BOSH client to delete the ZooKeeper deployment and the BOSH director.
# delete ZooKeeper cluster
bosh -d zookeeper delete-deployment

# should not show ZooKeeper anymore
bosh deployments

# delete stemcell ZooKeeper required
bosh stemcells
bosh delete-stemcell bosh-warden-boshlite-ubuntu-trusty-go_agent/3586.60


# delete BOSH Director
./do-bosh delete-env
Then exit the jumphost.
EC2 Dashboard
First terminate the “bosh-jumpbox” jumphost (Instance State > Terminate).
Then delete the delete the NAT gateway, and give it a few minutes to be deleted and release the Elastic IP it is associated with. It is done when you can disassociate the “bosh-nat” Elastic IP without an error.
Then detach the internet gateway “bosh” from the VPC.
Finally, delete the “bosh” VPC and it will delete all the other referenced objects.
REFERENCES
Preparing AWS for BOSH deployment (creds, vpc, elastic IP, key pair, sec group)
How to create AWS IAM user for BOSH
Example BOSH policy for IAM user
BOSH exposing a public IP (not recommended)
AWS CLI – create security group and key pair
AWS CLI – vpc, subnet, instance examples
AWS CLI Shell script on github showing usage of vpc, subnets
AWS CLI Filter does not have AND OR
Sort Ubuntu images by date to find latest
JMESPath specification sort_by reverse
Image from docs showing how NAT gateway needs to be in public subnet
Generate CloudFormation diagram and template from existing infrastructure
Ascii diagram of public/private subnets
public private, ig, nat gateway
overview vpc with public and private
Original zookeeper.yml that does not have variable number of instances
NOTES
testing mbus, should get 401 auth error
curl -k -vv https://mbus:mbus-password@10.0.0.6:6868/agent/
pull all VPC, show tag ‘Name’
aws ec2 describe-vpcs --query "Vpcs[].Tags[?Key=='Name'].Value[]" --output text
bosh alias-env with fully specified Director at prot 25555
bosh alias-env vbox \
    --environment https://192.168.50.6:25555 \
    --ca-cert "$(bosh int path/to/vbox/creds.yml --path /director_ssl/ca)"