 WireGuard aims to be the successor to IPsec and more performant than OpenVPN. It is a general purpose VPN that is secure enough for servers, yet light enough to run on embedded devices.
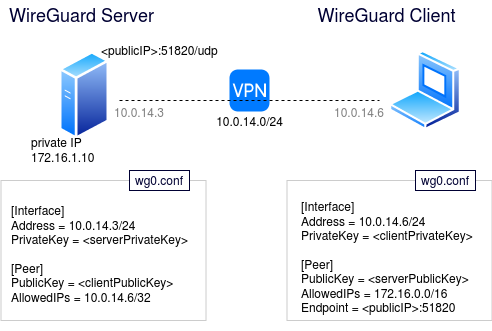
In this article, I will show how to install WireGuard on an Ubuntu server and then access it using a Windows client. Below is a diagram that shows the logical deployment.
Install WireGuard package on server
For Ubuntu 20+ the WireGuard package is added to the Universe respository, so you can simply use:
sudo apt update
sudo apt-get install -y iptables resolvconf linux-headers-generic wireguard
Then check if the wireguard kernel module is loaded.
# see if modprobe can load kernel module, if not then reboot
sudo modprobe wireguard && lsmod | grep wireguard
sudo reboot -h now

# after reboot, should be able to load and list
sudo modprobe wireguard && lsmod | grep wireguard
Generate public/private keypair on server
Then generate the public and private keypair that will be used on the WireGuard server.
cd ~
umask 077
wg genkey | tee privatekey | wg pubkey > publickey
Create WireGuard server configuration
Create the directory for the WireGuard configuration file.
sudo mkdir -p /etc/wireguard
sudo chmod 755 /etc/wireguard
sudo touch /etc/wireguard/wg0.conf
Use the contents below for “/etc/wireguard/wg0.conf”, replacing <PrivateKey> with the contents of the ‘privatekey’ file and ‘<localInterface>’ for the name of the local interface (e.g. br0, eth0, or enX0).
[Interface]
# synthetic wg network, should NOT overlap your existing networks!!!
Address = 10.0.14.3/24

# for NAT
PostUp = iptables -A FORWARD -i %i -j ACCEPT; iptables -A FORWARD -o %i -j ACCEPT; iptables -t nat -A POSTROUTING -o <localInterface> -j MASQUERADE; ip6tables -A FORWARD -i %i -j ACCEPT; ip6tables -t nat -A POSTROUTING -o <localInterface> -j MASQUERADE
PostDown = iptables -D FORWARD -i %i -j ACCEPT; iptables -D FORWARD -o %i -j ACCEPT; iptables -t nat -D POSTROUTING -o <localInterface> -j MASQUERADE; ip6tables -D FORWARD -i %i -j ACCEPT; ip6tables -t nat -D POSTROUTING -o <localInterface> -j MASQUERADE

# UDP port for bind
ListenPort = 51820
PrivateKey = <PrivateKeyOfServer>

# do not auto-save config on exit
SaveConfig = false
The Address CIDR “10.0.14.3/24” should be completely distinct from your local networks and specifies the network space where the WireGuard interfaces (both server and client) will operate.
Add Server Firewall rules for server
Ensure that the UPD port on 51820 can receive incoming connections.
# check if ufw enabled
sudo ufw status

# if so, create rule to allow udp port
sudo ufw allow 51820/udp
Enable IP v4/v6 forwarding for server
grep forward /etc/sysctl.conf

# edit file if needed, these two lines need to be uncommented
net.ipv4.ip_forward=1
net.ipv6.conf.all.forwarding=1
Then make these changes permanent.
sudo sysctl -p /etc/sysctl.conf
sudo /etc/init.d/procps restart
Test wg0 interface building on server
# create wg0 network interface
# if RTNETLINK op not supported, try reboot so kernel module loads
sudo wg-quick up wg0

# should be extra interface now 'wg0'
ip a

# tear down wg0
sudo wg-quick down wg0
Start service on server
# start wireguard service, it creates 'wg0'
sudo systemctl start wg-quick@wg0

# there will now be a new wg0 network interface
ip a | grep wg0

# show WireGuard config status
# copy down public key, which is required on the client side!
sudo wg show

interface: wg0
  public key: MS.....uwTws=
  private key: (hidden)
  listening port: 51820

# show logs
sudo journalctl -u wg-quick@wg0
And finally, enable this service upon boot
sudo systemctl enable wg-quick@wg0
Apache server for smoke testing
For validation purposes later in this document, let’s install the Apache2 web server with a custom page that can help us prove out the client tunnel.
sudo apt-get install net-tools curl -y
# make sure there is not another process already at port 80
# want this to be empty result
sudo netstat -tulnp | grep ':80'

# install apache at default http/80
sudo apt-get install apache2 -y

# local firewall status
sudo ufw status
sudo ufw allow 80/tcp

# create custom index page
echo '<h1>Hello, VPN client!</h1>' | sudo tee /var/www/html/index.html

# should return message above
curl http://localhost
Enable port-forwarding on public facing router
If the WireGuard server is behind a router, then you need to configure port forwarding to this server that has WireGuard installed.
This is not a difficult task, but every router has a different user interface so you must consult your specific documentation. The main idea is that you want to port forward from the upstream router to the internal WireGuard server on port 51820/udp.
These routers are typically stateful, meaning that you do not have to explicitly define a connection back out to the client. If you have multiple routers in between, you will have to forward the port through each.
Windows VPN client
Open Windows firewall
Create rules for incoming WireGuard traffic via port 51820/udp. Open a Command Prompt, and “Run As Administrator” then run the following commands.
# enable ping on client side (for troubleshooting)
netsh advfirewall firewall add rule name="ICMP Allow incoming V4 echo request" protocol=icmpv4:8,any dir=in action=allow
netsh advfirewall firewall add rule name="ICMP Allow incoming V6 echo request" protocol=icmpv6:8,any dir=in action=allow

# add wireguard udp port: incoming/outgoing
netsh advfirewall firewall add rule name="Wireguard allow 51820 udp" protocol=udp localport=51820 dir=in action=allow
netsh advfirewall firewall add rule name="Wireguard allow 51820 udp" protocol=udp localport=51820 dir=out action=allow
Install binaries
Download the latest WireGuard Windows client. Install with all defaults, then run WireGuard.
Create new tunnel
Open the WireGuard GUI and click on Add Tunnel > Add Empty Tunnel. Use any name you want, the certificate is what truly ties this peer back to the server.
The public key for this client tunnel will be populated and shown. Copy the public key to be used later on server side when adding peer.
Press the “Edit” button to add the “Address” of this client within the 10.0.14.0/24 private WireGuard network. The server is assigned 10.0.14.3, and we will assign this client 10.0.14.6
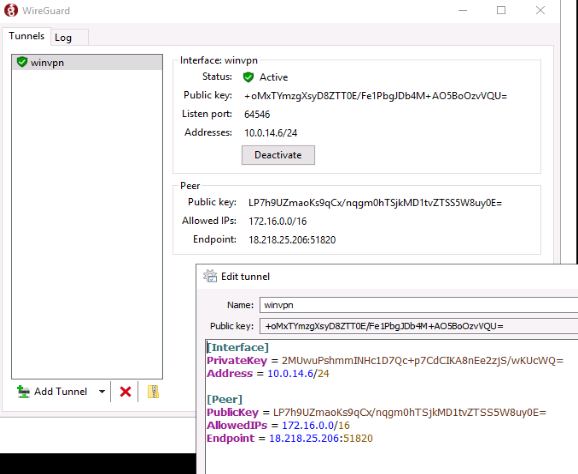
Then add a “[Peer]” section where we need to specify the public key of the WireGuard server, the true public endpoint of the WireGuard server, and then the allowed IPs.
The ‘AllowedIPs’ are the list of CIDR blocks that are destined for the VPN tunnel and should be the internal CIDR block of the WireGuard server that you want to expose to the client. For example, if your WireGuard server’s private IP is 172.16.2.10 and you want to allow VPN clients to reach both the server and its backing networks, then you could use 172.16.2.0/24.
[Interface]
PrivateKey = ...
ListenPort = 51820
# address in synthetic Wireguard network space
Address = 10.0.14.6/24

[Peer]
# public key of wireguard server
PublicKey = <PublicKeyOfWireGuardServer>
# public IP address of wg server or port-forwarding router
Endpoint = <WireGuardServerPublicIP>:51820
# true CIDR of Wireguard server network (not 10.0.14.0)
AllowedIPs = 172.16.0.0/16

# connect periodically to maintain stateful connection into server
PersistentKeepalive = 15
Set the ‘PersistentKeepalive’ somewhere between 15 and 30 seconds to maintain the stateful firewall connection and press ‘Save’.
Do not press the ‘Activate’ button just yet. Wait until after we add the peer to the server side.
Add peer from WireGuard Server
Now head back to the server to add the client peer. You will need the WireGuard Windows client public key and the client’s exact WireGuard network address (10.0.14.6/32). Add the peer dynamically for testing, which does not require a service restart.
# add Windows VPN client peer
# leave endpoint empty to allow roaming
sudo wg set wg0 peer '+oMxTYmzgXsyD8ZTT0E/Fe1PbgJDb4M+AO5BoOzvVQU=' allowed-ips 10.0.14.6/32

# show runtime config, should now have additional peer
sudo wg show
You can make this change permanent by adding it to the WireGuard configuration.
sudo vi /etc/wireguard/wg0.conf

[Peer]
# Public key from client
PublicKey = +oMxTYmzgXsyD8ZTT0E/Fe1PbgJDb4M+AO5BoOzvVQU=
# no need to specify Endpoint, allow client to be roaming
# wg synthetic address of client
AllowedIPs = 10.0.14.6/32

# make peer modification permanent with restart
sudo systemctl stop wg-quick@wg0
sudo systemctl start wg-quick@wg0

# a service restart is not necessary, you can also use 'syncconf'
wg syncconf wg0 <(wg-quick strip wg0)
Test VPN client connection from Windows
Now press the ‘Activate’ button on the WireGuard client. This will create the network interface and add routing rules for the WireGuard tunnel.
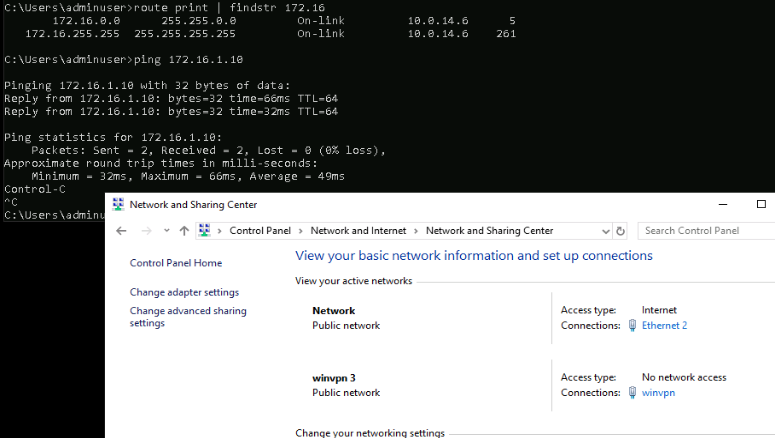
If you go to the “Log” tab, you should see a “Startup complete” message if successful. You can smoke test this connection using a standard ping back to the private IP address of the Wireguard server.
ping 172.16.1.10

# show routes added by wireguard
route print | findstr 172.16
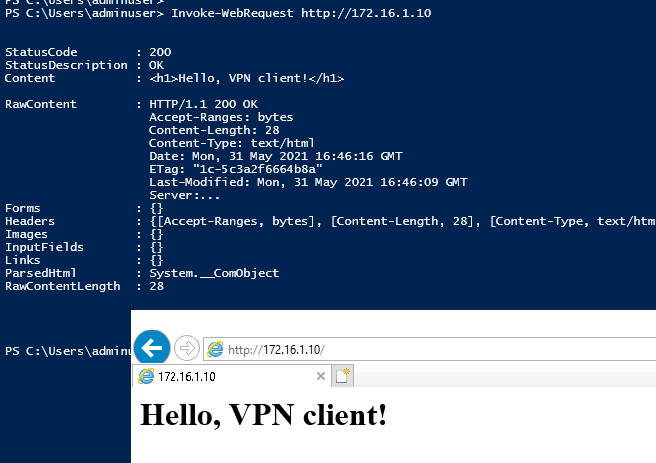
Because we installed Apache on port 80 of the WireGuard server, we can also use PowerShell’s Invoke-WebRequest or a browser to pull open http://172.16.1.10
Press the “Deactivate” button on the WireGuard GUI to temporarily disable the VPN client connection and you can validate that ping no longer works and the routes to this private CIDR block are gone.
Remember, we did not open firewall settings or port forwarding for HTTP between the VPN client and WireGuard server. This communication is enabled by the network interface and routing of the WireGuard client.
Because of the “AllowedIPs = 172.16.0.0/16” on the client side configuration, we can actually reach beyond the WireGuard server into other hosts in its network (if the WireGuard server is configured to forward and route these requests).
REFERENCES
linode.com, Set Up WireGuard VPN on Ubuntu
git.zx2c4.com, man page wg-quick
naut.ca, setting up wireguard vpn on Debian, shows iOS settings
phoronix, Ubuntu 20.04 LTS has WireGuard support
digitalocean, wg for point-to-point on Ubuntu xenial
davidfield, wg using Ubuntu 18 and Android client
engineerworkshop, WireGuard on Raspberry Pi
golb.hplar.ch, wireguard vps with arrows cris-crossing to show server/client key relationship
karmacomputing.co.uk, use wireguard to create vpn tunnel
askubuntu, sysctl changes made permanent
golb.hplar.ch, WireGuard client on Windows
github, angristan wireguard bash install script
ivpn.net, RTNETLINK error operation not supported
stanislas, Wireguard and IPv6, qrcode
stackexchange, issue with iptablesv6 for wg
openwrt, wireguard with openwrt
atechtown.com, wireguard on ubuntu 20
xalitech.com, setup wireguard on azure
Tangram Visions, what they don’t tell you about wireguard vpn
procustodibus, ways to troubleshoot wireguard
NOTES
need to validate udp connection both ways (prove A->B, then B->A)
For Linux side, use ‘nc’
# act as server, listen on 51820/udp
nc -ul 0.0.0.0 51820

# act as client, initiate message to server
# stateful firewall should allow server to second message back
nc -u <server> 51820
<enter message>

# then swap roles and validate communication again
For Windows side, use ‘ncat.exe’ from command line zip file at nmap.org
# act as server, listen on 51820/udp
ncat.exe -ul 0.0.0.0 51820

# act as client, initiate message to server
# stateful firewall should allow server to second message back
ncat.exe -u <server> 51820
<enter message>

# then swap roles and validate communication again
Forcing to keep old conf without needing prompt
apt-get install -o Dpkg::Options::="--force-confold" --force-yes -y wireguard iptables resolvconf
Internet Router > Firewall > Port Forwarding
source: openWRT wan IP
custom ports: tcp+udp 51820
OpenWRT > network > firewall > Port forwards
name: wireguard-51820
protocol: tcp + udp
source zone: wan,wan6
external port: 51820
destination zone: lan
internal IP address: <InternalWireGuardServerIP>
internal port: 51820
Installing Wireguard on Windows Server
Create Windows 2012 server with t2.medium with 2Gb ram, auto-assign public IP when creating. no elastic IP needed, but can be added on top of this auto-assign public IP and Wireguard still works.
Get Administrator password, use Remmina desktop client to connect as Administrator. Create new windows admin user, login as new user.
Search “Manager”. Open Server manager, turn off IE Enhanced Security.
search “Internet Options”. Security > Internet > disaable protected mode. Download Firefox. Get Wireguard. Get windows nmap from nmap.org if you want ncat