 With so many critical projects available in public git repositories like github, it is important to be able to contribute back additional functionality, tests, and documentation to the original project. While most projects do not allow a direct commit, contributions can be made by submitting a pull request to original repository.
Often times, repositories are simply forked and then commits made on that local fork without ever being committed back. This is a “lose-lose” on both sides because that bug fix or enhancement will never be integrated back into the main project, and on the other side that person who took the time to contribute has now locked their contribution into a specific moment in time – to a specific version of the main repository that they now have to maintain themselves in perpetuity.
The “win-win” scenario is that the user created a fork of the main project, and then submits that back as a pull request to the main project for approval. This means that the entire user base will receive this enhancement, and the contributor can move on with to other projects knowing that their change is now maintained in the original repository.
Fork the repository
For this example, we are going to use my github repository named ‘test-git-pull-request’ as the original repository:
https://github.com/fabianlee/test-git-pull-request
A user named ‘alice-flee999-test-group-repo’ wants to contribute back to this repository, but does not have contributor rights, so needs to submit a pull request for review.
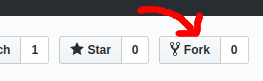
The first step is to fork the repository, go to the github project web page and click on the “Fork” button at the top.
Alice has full commit permissions to this fork, which is under her id at the following location.
https://github.com/alice-flee999-test-group-repo/test-git-pull-request
The changes made to this personal repository/branch are what will be ultimately submitted back to the main repository as a pull request.
Clone forked repository
Now clone the forked repository down to the development environment. Typically you would take a branch of the original repository (e.g. ‘develop’) and not the ‘master’ branch but this just depends on the project.
git clone -b develop https://github.com/alice-flee999-test-group-repo/test-git-pull-request.git

cd test-git-pull-request

# shows current branch as 'develop'
git branch
And you can always do a plain git clone and then switch to the branch you want to work on.
git clone https://github.com/alice-flee999-test-group-repo/test-git-pull-request.git

cd test-git-pull-request

# show all branches available
git branch -a
git checkout develop

# shows current branch as 'develop'
git branch
We are now on the ‘develop’ branch.
Create a new branch
Whatever branch you are on at this point (e.g. ‘master’ or ‘develop’) is one that you inherited from the main repository and is your “upstream”. But what you really want to do at this point is create your own branch that can be modified.
git branch my-change-1
git checkout my-change-1

OR

git checkout -b my-change-1
Go ahead and push this branch remotely and set the upstream origin so that future commits do not have to prompt you.
git push --set-upstream origin my-change-1
Set the upstream
In the last step we created our own branch where we will make the changes. But we can’t forget that the parent branch we came from will continue to move forward without us.
Main contributors to the project will be adding features, other contributors will be submitting pull requests, etc. In the days it might take us to create our modifications, and then the days it might take to get our pull request reviewed, it is important that we are able to retrieve the latest from our upstream origin.
If we look at our fetch and push URL, we can see that our personal forked repository is listed.
git remote show origin | grep URL

Fetch URL: https://github.com/alice-flee999-test-group-repo/test-git-pull-request.git
Push URL: https://github.com/alice-flee999-test-group-repo/test-git-pull-request.git
Note that a “git pull” would only grab changes made to our personal forked repository. By adding an upstream source we can grab the latest developments of our parent branch.
git remote add upstream https://github.com/fabianlee/test-git-pull-request

# show remotes
git remote -v

# fetches latest upstream changes, and merges
git fetch upstream
git merge upstream/develop
This is especially useful if our pull request ends up not merging cleanly by the time it is reviewed by the contributors.
Make your changes
Here is where the real work happens. Create your new addition, making sure that you follow the guidelines of the project including documentation and testing.
echo "  * The pull request is requesting this line be added (my-change-1)" >> changes.txt

git commit -a -m "first commit to support feature of my-change-1"
And because for anything non-trivial you will have more that one commit against your personal branch, go ahead and make a second commit that is also part of this single pull request.
echo "  * I almost forgot this last line! (my-change-1)" >> changes.txt

git commit -a -m "second commit to support feature of my-change-1"
As you can imagine, for a feature of any substantial effort, you are going to have many commits against your own branch. You will have files modified, tests added, documentation tweaked, etc. Push these commits to your remote repository.
git push
Squash your changes (optional)
As stated above, you are more than likely going to have multiple commits related to the work you have done. Most repository owners will not care about your working commits and fixes, and would rather think of your contribution as a kind of unified diff with single commit message.
In the past, this mindset would require that you (as the contributor) “squash” your changes into a single commit. But newer features in github provide admins with automatic “commit squashing”, and so this is usually unnecessary.
So go ahead and move to the next section on “Opening a pull request” unless you are explicitly asked to squash or rebase your contribution. Either of these words simply means they want to take your changes as a single commit and not import your historical record of every commit.
There are multiple ways to rewrite history, and rebasing has subtleties so I would instead recommend squashing your history. First fetch the latest upstream changes and have it merged into your branch.
# fetches latest upstream changes, and merges
git fetch upstream
git merge upstream/develop
Then look at the git log and identify how many commits were made as part of this feature development.
git log | grep alice -A 3

Author: alice <alice-flee999-test-group-repo>
Date:   Sun Dec 9 12:44:29 2018 -0500

    second commit to support feature of my-change-1
--
Author: alice <alice-flee999-test-group-repo>
Date:   Sun Dec 9 12:44:16 2018 -0500

    first commit to support feature of my-change-1
These are listed as newest to oldest, and you can see that we have 2 entries made on this branch. We are just looking for the most recent commits since the ‘my-change-1’ branch was created.
Then do a soft reset (which keeps any changes in place) and rewind the HEAD by 2 entries. Then do a commit and push, this time providing the single commit message that will be represent your pull request.
# soft will keep all your changes in place, rewinds by 2 entries
git reset --soft HEAD~2

# you should see that the 2 entries at the top previously are gone
git log

# will show that 'changes.txt' is an uncommitted change
git status

# will show difference between local file and remote
git diff origin/develop -- changes.txt

# commits all changes in single squashed entry
git commit -a -m "squashed changes for my-change-1"

# do not use force against a repo not exclusively owned
# but we have full control here
git push --force
Now our commit is squashed into a single change and message:
git log | grep alice -A 4

Author: alice <alice-flee999-test-group-repo>
Date: Sun Dec 9 14:23:10 2018 -0500

 squashed changes for my-change-1
Open a pull request
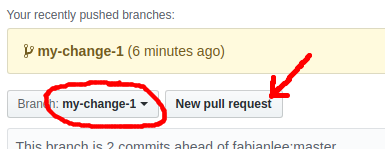
To open a pull request go into the forked github project and make sure you have selected the “my-change-1” branch, then press the “New pull request” button.
This will bring up a new page where you can confirm the details and the file differences. Be sure that the base fork is set to the parent project’s “develop” branch, and the target is set to the forked repository’s “my-change-1” branch.

Leave a comment that describes the changes you are submitting at a high-level, review the differences shown, and press the “Create pull request” button.
At this point, the pull request is out of your hands, the owner of the main repository will look over and assess whether your pull request needs rework or is merged into the main repository.
Take note that the pull request is not frozen in time at this moment. If you make a change in this branch tomorrow, that change will be seen as part of the pull request if it is reviewed next week.
Project owner merges your pull request
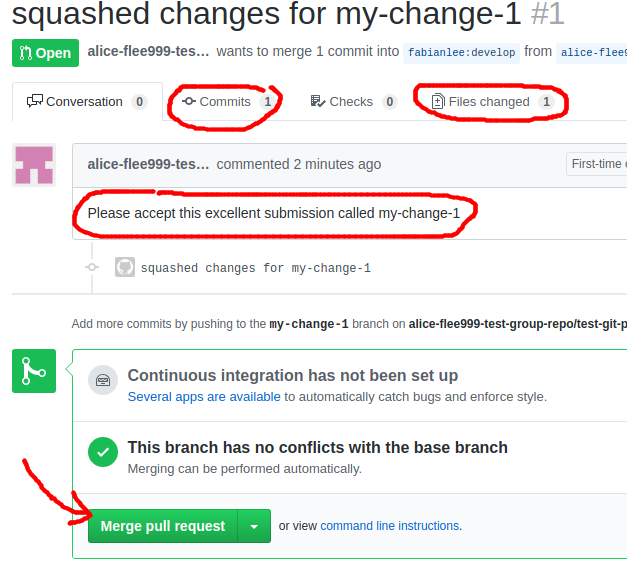
Now looking at it from the main repository side, the pull request will show up in the “Pull Requests” tab at the top, and when clicked on for details will show a page similar to the listing below showing who has submitted the request, to what branch, how many commits, and how many files, along with the high-level description provided.
The administrator will review the request and will close it (denied), comment on further work or improvement, or merge it into the code base. As mentioned earlier, one of the reasons squashing/rebase is no longer necessary is because admins on github have the ability to squash and merge without needing the contributor to take this action.
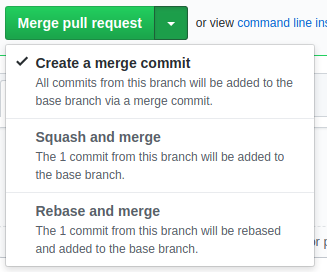
If everything is in order, hopefully the administrator chooses their preferred method of merge and your pull request is now part of the main repository.
CLOSING
If an administrator prematurely closes a pull request, you can always do the necessary rework, and then submit a new pull request against that same branch to resubmit.
MERGE CONFLICTS
The parent branch you choose is a moving target, and if you do not merge the upstream code, or your pull request is not reviewed quickly, it may reach the point where there are merge conflicts.
A conflict looks like below in the pull request details, which can be seen by either the repository administrator or from your forked personal repository.
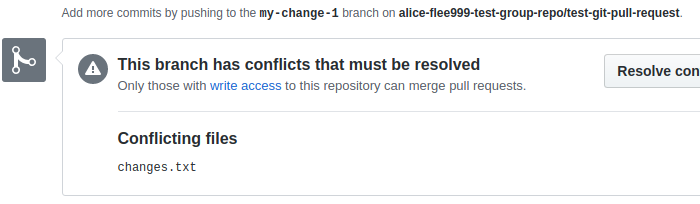
To correct this, take the latest pull of the upstream branch and correct the conflicts manually.
# get latest
git fetch upstream
git merge upstream/develop

# fix conflicts manually
vi changes.txt

git commit -a -m "fixed conflicts manually"
Right after the commit, if you look at the details of your pull request, you should see it go green again and the message “This branch has no conflict with the base branch”.
REFERENCES
http://qpleple.com/how-to-contribute-to-a-project-on-github/ (pull request on github)
https://git-scm.com/book/en/v2/GitHub-Contributing-to-a-Project
https://github.com/mozilla/shumway/wiki/Submitting-a-Patch
https://gist.github.com/MarcDiethelm/7303312
https://codeburst.io/a-step-by-step-guide-to-making-your-first-github-contribution-5302260a2940
https://guides.github.com/activities/forking/
https://stackoverflow.com/questions/47807414/whats-the-difference-between-git-checkout-b-branch-and-git-checkout-b-branc (checkout vs branch)
https://stackoverflow.com/questions/25356810/git-how-to-squash-all-commits-on-branch (If you have multipe commits on the feature branch and want to squash them into a single commit)
https://git-scm.com/book/en/v2/Git-Branching-Rebasing#_rebase_peril (rebase versus merge: record of what actually happened versus story of how your project was made)
https://github.com/mockito/mockito/wiki/Using-git-to-prepare-your-PR-to-have-a-clean-history (3 ways to rewrite history: amending, rebase interactively, squashing)
https://git-scm.com/book/en/v2/Git-Tools-Reset-Demystified (the three trees: HEAD, index, working)
NOTES
show branch and origin
git branch (shows branch we are on)
git remote show origin (shows fetch/push URL, HEAD)
If you forget to set user before commit, you can amend
git config --global --edit
git commit --amend --reset-author
git log | less
git config for alice
git config --global core.sharedRepository group
git config --global user.email alice-flee999-test-group-repo
git config --global user.name "alice"
git config --global push.default simple
git config --global credential.helper 'cache --timeout=3600'
force revert of last commit (do not do in multi-user environment, very drastic)
git reset --hard HEAD~1
git push --force