![]() GCP Cloud Functions have taken a step forward with the 2nd generation release. One of the biggest architectural differences is that now multiple request can run concurrently on a single instance, enabling large traffic loads.
GCP Cloud Functions have taken a step forward with the 2nd generation release. One of the biggest architectural differences is that now multiple request can run concurrently on a single instance, enabling large traffic loads.
In this article, I will show you how to deploy a simple Python Flask web server as a 2nd gen GCP Cloud Function. This function will immediately be available via HTTPS on Google’s “run.app” domain.
We will take it a step further and create a serverless NEG (network endpoint group) that allows us to expose this same function from a GCP external HTTPS load balancer with our own TLS certificate.
Python Flask app
The app we will be deploying to Cloud Function is a simple Python Flask web server that responds with “Hello world” and the URL path being requested.
In order to prove out the local development lifecycle, let’s run the program locally first and view the output.
git clone https://github.com/fabianlee/gcp-https-lb-vms-cloudfunc.git
cd gcp-https-lb-vms-cloudfunc
cd roles/gcp-cloud-function-gen2/files/hello

# install required pip modules
pip3 install --user -r requirements.txt

# run web server locally on port 8080
python3 -m flask run --port 8080
A call from either a brower or curl will show a “Hello World” message along with the request path.
$ curl http://localhost:8080/mypath?foo=bar
Hello World<br/>mypath?foo=bar
This is the same program that we will now deploy to Cloud Functions. Press <CTRL>-C to break out of the local web server.
Enable Cloud Function
The first step in deployment is to enable the Cloud Function services and Google Artifact Registry (used in gen2).
# variables used in commands
funcname=hellogen2
entry_point=hello
channel=beta
region=us-east1

# enable cloud function services
gcloud services enable cloudfunctions.googleapis.com cloudbuild.googleapis.com
# enable cloud function gen2 required services
gcloud services enable cloudresourcemanager.googleapis.com run.googleapis.com artifactregistry.googleapis.com containerregistry.googleapis.com

# create artifact repository used by gen2
gcloud artifacts repositories create my-repo --location=$region --repository-format=docker
Deploy Cloud Function gen2
Then deploy the gen2 Cloud Function and set the concurrency levels to allow high concurrency.
gcloud $channel functions deploy $funcname --entry-point=$entry_point --gen2 --runtime python38 --trigger-http --allow-unauthenticated --min-instances=1 --region=$region

gcloud $channel run services update $funcname --concurrency 200 --cpu=1 --region=$region
Validate Cloud Function
At this point, the Cloud Function is deployed. Google assigns a secure certificate on the “run.app” domain to the application, and it can be called from a browser or curl.
direct_url=$(gcloud $channel functions describe $funcname --format "value(serviceConfig.uri)" --region=$region --gen2)

# outputs message, then path and request vars
$ curl ${direct_url}/mypath?myvar=2
Hello World<br/>/mypath?myvar=2
Introduce external HTTPS load balancer
If we want to take it a step further, we may want to add this hello service to an existing external HTTPS load balancer so that it can be served up just like our cluster resources. Or we may to use our own custom TLS certificate and domain to serve this function.
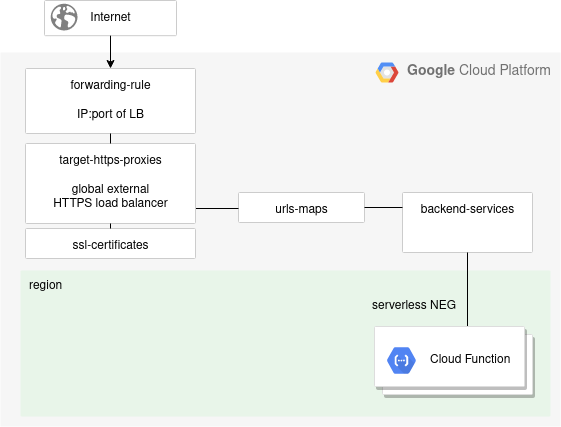
To do that, we can create a serverless NEG (network endpoint group) from the Cloud Function, and then tie it into a load balancer. The diagram below illustrates this concept, and we will spend the rest of the article showing how to create these objects.
Note: There is purposely not a health-checks object in the diagram above, health-checks are not supported for backend services with serverless NEG backends.
Create serverless NEG
The serverless NEG (network endpoint groups) are what allow us to point to a backend service, which is what ties this into the load balancer chain.
gcloud compute network-endpoint-groups create ${funcname}-neg --region=$region --network-endpoint-type=serverless --cloud-run-service=$funcname
Create backend service
gcloud compute backend-services create ${funcname}-backend --load-balancing-scheme=EXTERNAL --global

gcloud compute backend-services add-backend ${funcname}-backend --global --network-endpoint-group=${funcname}-neg --network-endpoint-group-region=$region
Create URL Map
The name given to the URL map is actually what is seen in the console UI as the load balancer name.
gcloud compute url-maps create ${funcname}-lb1 --default-service=${funcname}-backend --global
Create TLS cert
We create a self-signed TLS certificate for convenience, this is where you would provide a commercial certificate for production purposes.
# certificate and key for TLS, created locally
domain=${funcname}.fabianlee.org
if [ ! -f /tmp/$domain.key ]; then
openssl req -x509 -nodes -days 3650 -newkey rsa:2048 \
-keyout /tmp/$domain.key -out /tmp/$domain.crt \
-subj "/C=US/ST=CA/L=SFO/O=myorg/CN=$domain"
fi

# load certificate
gcloud compute ssl-certificates create ${funcname}-lbcert --certificate=/tmp/$domain.crt --private-key=/tmp/$domain.key --global
Create target https proxy
This is the entity that actually runs the envoy proxy, and we associate the certificate and url map created in the previous steps.
gcloud compute target-https-proxies create ${funcname}-https-proxy --ssl-certificates=${funcname}-lbcert --url-map=${funcname}-lb1 --global
Create the global forwarding rule
Finally, we create the global forwarding rule that defines what IP address public traffic is received on.
gcloud compute forwarding-rules create ${funcname}-frontend --load-balancing-scheme=EXTERNAL --target-https-proxy=${funcname}-https-proxy --ports=443 --global
Validate external HTTPS LB
Although you will be able to see all the load balancer objects in the web console UI, it can take up to 10 minutes for the load balancer to configure itself properly and deliver traffic.
public_ip=$(gcloud compute forwarding-rules describe ${funcname}-frontend --global | yq eval ".IPAddress")

echo "Here is the IP address of the ${funcname}-frontend Load Balancer: $public_ip"

# try this, but first wait 10 minutes for LB to configure
# you will get 500 and SSL errors until it is ready
curl -kv https://$public_ip/mytest?myvar=1
Run load test against Cloud Function
If you want to run a load test against the Cloud Function to test concurrency, the “hey” package on Linux is convenient.
sudo apt install hey -y

# get URL directly to Cloud Function
direct_url=$(gcloud $channel functions describe $funcname --region $region --gen2 --format="value(serviceConfig.uri)")

# 200 total requests, 20 concurrent at a time
hey -n 200 -c 20 $direct_url
You can view the number of instances that Cloud Function spun up to meet your request demand in the web console UI.

Script
Here is a script with all the commands from this article, deploy.sh.
REFERENCES
google ref, cloud functions gen2 getting started
google ref, external HTTPS LB for Cloud Functions
google ref, differences in Cloud Functions gen2
google ref, serverless neg concepts
google ref, recipe for external HTTPS LB for Cloud Function
google ref, external HTTPS LB overview
google ref, external HTTPS LB architecture explanation and diagram
google, creating LB health checks
google, writing cloud functions
google ref, gcloud unmanaged instance groups
google ref, gcloud backend-services
xfthhxk, GCP external load balancer with gcloud for App Engine
devs google, cloud functions in Python
warrick on medium, cloud functions using python
alfonsof, cloud function python examples
google ref, cloud functions gen2 with performance test
larry nguen on medium, 2nd gen Cloud Function enhancements
google ref, Cloud Function logging and logging library
google ref, gcloud functions log read
google ref, limitations of serverless neg
NOTES
View logs
gcloud beta functions logs read hellogen2 --region us-east1 --gen2 --format=json --min-log-level=ERROR