![]() Gunicorn is a WSGI HTTP server commonly used to run Flask applications in production. If you are running these types of workloads in production, you should consider an observability platform such a New Relic to ensure availability, service levels, and visibility into transactions and logging.
Gunicorn is a WSGI HTTP server commonly used to run Flask applications in production. If you are running these types of workloads in production, you should consider an observability platform such a New Relic to ensure availability, service levels, and visibility into transactions and logging.
In a previous article, we created a Docker image of a Flask application deployed on Gunicorn. We will take this one step further by enabling the New Relic agent inside the container, and watch it report back to the New Relic One APM dashboard.
New Relic Account and License Key
To use New Relic, you first need to sign up for a free account (no credit card required).
Then click on the top-right menu pulldown, and select “API keys”, or use this direct link.
If you have an “INGEST – LICENSE”, then right-click the 3 dot icon next to it and “copy key”. This is your New Relic License Key and will be passed into the container as an environment variable in a later section.
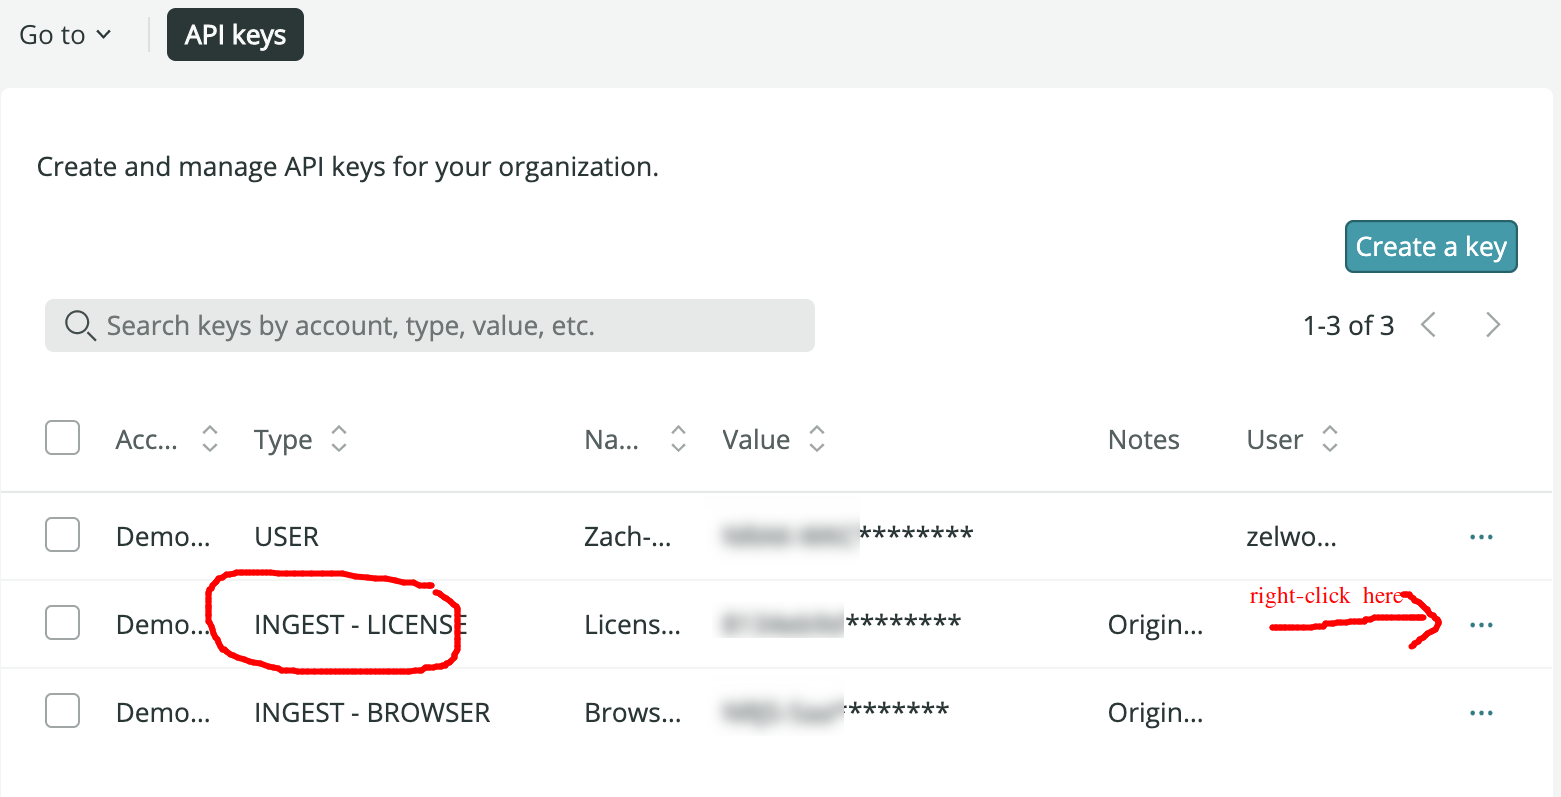
If you do not have an “INGEST-LICENSE”, then press the “Create a key” button, select the type “Ingest – License” and press “Create a key”.
Article prerequisites
To ensure that you are ready to build this image instrumented with a New Relic agent, first follow these sections from my previous article:
- Docker prerequisites
- Python prerequisites
- Download project
- Create Python virtualenv
- Test Gunicorn server run directly
- Build Gunicorn docker image
- Test Gunicorn docker image
With these steps complete, you can move on to adding a New Relic Agent to the image.
Switch branch of project
In the previous article you downloaded the github project and used the 1.0.0 tag. Now switch to the “2.0.0” tag of my github project code, which has the New Relic Agent.
# get tag with New Relic instrumentation
git checkout 2.0.0

# should report back '2.0.0'
grep ^VERSION Makefile

# should report back 'newrelic-admin' entry point
grep ^ENTRYPOINT Dockerfile
Dockerfile with New Relic Agent
Instead of the Dockerfile using gunicorn as the entrypoint, it now uses the newrelic-admin and passes the original entrypoint as parameters as described in the documentation.
# install agent
RUN pip install newrelic

# env vars that control reporting
ENV NEW_RELIC_APP_NAME="docker-gunicorn-hello-world-web"
ENV NEW_RELIC_LOG=stdout
ENV NEW_RELIC_DISTRIBUTED_TRACING_ENABLED=true
ENV NEW_RELIC_LICENSE_KEY=xxxxxxxxxxxxxxxxxxxxxxxxxxxxxxxx
ENV NEW_RELIC_LOG_LEVEL=info

# New Relic entrypoint calls gunicorn
ENTRYPOINT [ "newrelic-admin", "run-program", "/usr/local/bin/gunicorn", "--config", "gunicorn.conf.py", "--log-config", "gunicorn-logging.conf", "myflaskpackage.flask_module:app" ]
Build Gunicorn docker image instrumented with New Relic
Copy the configuration and source code into a container using our Dockerfile to build an image.
# build docker image
docker build -f Dockerfile -t fabianlee/docker-gunicorn-hello-world-web:2.0.0 .
If you list the docker images available, you should see the base python-slim-bullseye take up 125Mb, while our 2.0.0 custom image uses ~143Mb and 1.0.0 uses ~139Mb.
$ docker images
REPOSITORY TAG IMAGE ID CREATED SIZE
fabianlee/docker-gunicorn-hello-world-web 1.0.0 fa8e9a65c5c5 58 minutes ago 139MB
fabianlee/docker-gunicorn-hello-world-web 2.0.0 d8ae4158f2ac 3 hours ago 143MB
...
python 3.10.4-slim-bullseye c3e38abaf684 2 weeks ago 125MB
Run image instrumented with New Relic agent
To run this local image in the foreground, invoke docker and expose the port on local 8000.
# the NR license key you retrieved in first section
export NEW_RELIC_LICENSE_KEY=xxxxxxxxxxxx

# run container, pass NR license key as environment variable
docker run -it -p 8000:8000 -e NEW_RELIC_LICENSE_KEY=$NEW_RELIC_LICENSE_KEY --rm fabianlee/docker-gunicorn-hello-world-web:2.0.0
From another console, validate a curl against the localhost on port 8000.
$ curl http://localhost:8000
Hello, gunicorn
request 0 GET /
Host: localhost:8000
Run batch test against container
Instead of running just one curl request, let’s create some traffic that New Relic can measure. Use Apache Bench to run 10k requests with 25 user concurrency against the container.
# install Apache Bench
$ sudo apt install apache2-utils -y

# run 10k tests with 25 concurrent users
$ ab -n 10000 -c 25 http://localhost:8000/
New Relic UI reports
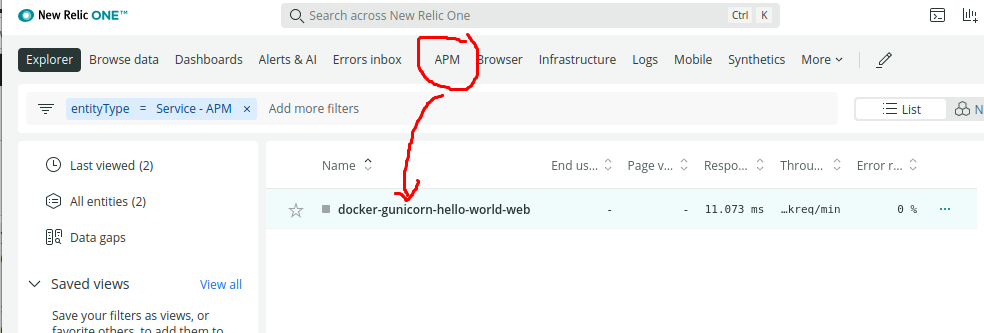
Within 2-5 minutes, you should be able to see the 10k requests from above show up in the New Relic web UI. Click on “APM” in the top menu bar, and you should see our “docker-gunicorn-hello-world-web” app.
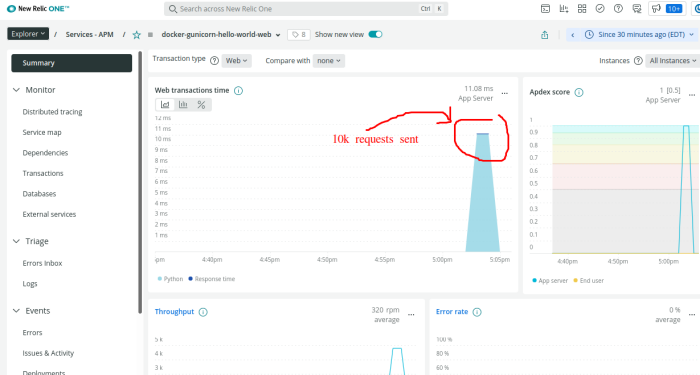
Click on our application, and the summary will be brought up that displays the latest requests, including our large block of requests created by Apache Bench.
REFERENCES
New Relic, install the Python agent for docker
New Relic, Python Agent advanced usage
github project for this article