![]() Based on my previous article on creating a Windows2019 base template using Sysprep, we can now move on to creating a Windows Domain Controller using this template as a backing file.
Based on my previous article on creating a Windows2019 base template using Sysprep, we can now move on to creating a Windows Domain Controller using this template as a backing file.
Once this new Windows 2019 guest OS is provisioned, we will prepare it and then run Powershell scripts that will enable the Active Directory features and create a new AD forest and DNS server.
This guest VM is located on the default KVM 192.168.122.0/24 NAT network, so it is only available from our Host machine and other VMs on its subnet.
Prerequisites
For this article, there is a strict prerequisite for having implemented the steps in my previous article where we create a Windows2019 base template that goes through sysprep.
Create Domain Controller child disk
First, we need to create a child disk, that is backed by our Win2019 base that has gone through sysprep.
# get full path to base disk
fullpath=$(virsh dumpxml win2k19base | grep -Po "<source file=\K.*'" | tr -d "'")

# go into directory
cd $(dirname $fullpath)

# create new child disk, with original as backing
sudo qemu-img create -f qcow2 -F qcow2 -b $(basename $fullpath) win2k19-dc1.qcow2

# validate size of new child disk (will be less than 1Mb)
sudo qemu-img info win2k19-dc1.qcow2 --force-share
Create Domain Controller guest OS
Using this new child disk, we can create the new “win2k19-dc1” guest VM.
virt-install --name=win2k19-dc1 \
--os-type=windows --os-variant=win2k19 \
--cpu host-passthrough \
--ram 2048 --vcpus=1 \
--virt-type=kvm --hvm \
--network network=default,model=e1000 \
--graphics vnc --video=qxl \
--disk $(dirname $fullpath)/win2k19-dc1.qcow2 \
--boot=hd --noautoconsole --force
The Windows logo will show as the new Guest OS goes through the steps detailed in the Sysprep unattend.xml that you prepared in the earlier section.
Login using “Administrator” and the password specified in the original unattend.xml file (ThisIsMyP4ss!).
Prepare for creating Domain
Before we make this host a Domain Controller, we need to prepare the host. Open a command console as Administrator, and start Powershell.
cd c:\users\Administrator\Downloads
powershell -executionpolicy bypass

# get required scripts
$project="https://raw.githubusercontent.com/fabianlee/blogcode/master/windows"
Invoke-WebRequest $project/make-ip-static.ps1 -OutFile make-ip-static.ps1
Invoke-WebRequest $project/create-ca-and-cert.ps1 -OutFile create-ca-and-cert.ps1
Invoke-WebRequest $project/install-dc-2019.ps1 -OutFile install-dc-2019.ps1
Invoke-WebRequest $project/create-test-users-2019.ps1 -OutFile create-test-users-2019.ps1
Rename host
The host has an arbitrary name when first deployed, name it “win2k19-dc1”.
# rename
rename-computer win2k19-dc1
Set Network to static IP
Domain Controllers should not use dynamic IP, so if we are assigned a dynamic IP address, make it static.
./make-ip-static.ps1
Create SAN certificates
# create CA and SAN certificate for DC and future ADFS server
.\create-ca-and-certs.ps1 myCA 'win2k19-dc1.fabian.lee,win2k19-dc1.FABIAN.LEE,win2k19-adfs1.fabian.lee'
# show certificates created on file system
ls c:\certs
# show same certificates loaded into certificate store
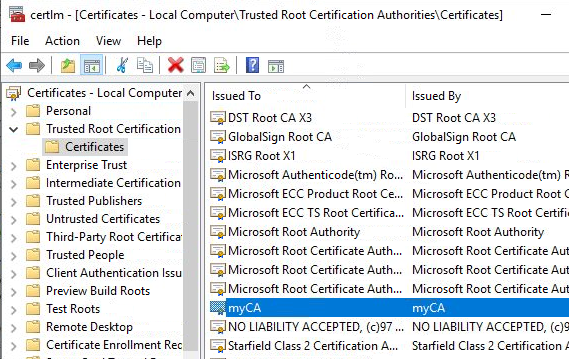
get-ChildItem -Path 'Cert:\LocalMachine\Root' | where-object { $_.Subject -eq 'CN=myCA' }
get-ChildItem -Path 'Cert:\LocalMachine\My'
Reboot
For the hostname change to take affect, reboot.
restart-computer
Create the Active Directory domain
When the guest comes back up, log back in, go to the console again, and start powershell just as before so we can continue with the install-dc-2019.ps1 script.
cd c:\users\Administrator\Downloads
powershell -executionpolicy bypass

# add required features, then create Domain
.\install-dc-2019.ps1
After the domain is created, the system will reboot itself. Log back in as “Administrator” and go to powershell again.
cd c:\users\Administrator\Downloads
powershell -executionpolicy bypass

# check AD domain
Get-ADDomain -current LoggedOnUser

# check AD DNS upstream
Get-DNSServerForwarder

# check local DNS resolution
nslookup win2k19-dc1 127.0.0.1

# check public DNS reslution
nslookup google.com
Create test AD users and groups
To create a suite of test users, you can use the create-test-users-2019.ps1 script.
.\create-test-users-2019.ps1
This will create the following users all with the default password ‘ThisIsMyP4ss!’ if you do not override with a parameter value.
- myadmin, groups=Administrators; for alternate administration
- jdoe, groups=Backup Operators; able to login via console
- adfs1; use later as ADFS service account
- ldap1; use for any LDAP client integrations
- engineer1, groups=engineers
- engineer2, groups=engineers
- manager1, groups=managers
Validate Active Directory connection from inside guest
You can validate a secure LDAP connection over port 636 from inside the guest VM Domain Controller.
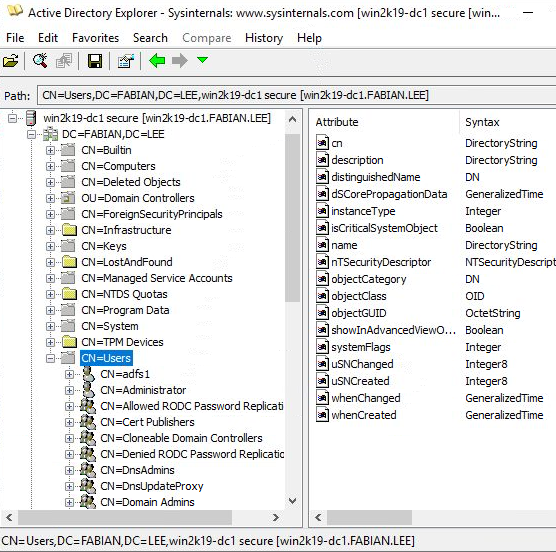
Download Microsoft sysinternals ADExplorer. Unzip it and run “ADExplorer.exe”.
Select File > Connect to pull up the connection dialog and specify the Domain Controller name and secure port “win2k19-dc1:636”. Use the ‘ldap1’ credentials, and press OK.

This secure connection is possible because the myCA root certificate is loaded into the local computer root certificate store. We could have made a connection to the insecure port 389 without the root cert, but TLS over port 636 is only possible when the custom root CA certificate is loaded.
Clicking into “CN=Users,DC=FABIAN,DC=LEE”, shows the list of users.
Validate Active Directory connection from parent Host
Let’s step out of the guest OS and back to the parent KVM Host. We should also be able to use the secure LDAP connection from the host as well.
Host DNS resolution
You will need to either add an entry to your local hosts file, modify your local dnsmasq.conf, or add an entry on your upstream DNS so that name resolution works.
Let’s assume the simplest case, where we add a line to the local /etc/hosts file.
# add IP address of DC, tailor to your environment
echo "192.168.122.4 win2k19-dc1.fabian.lee" | sudo tee -a /etc/hosts

# test lookup
# if using dnsmasq.conf, may need to add 'local=/fabian.lee/'
nslookup win2k19-dc1.fabian.lee

# validate ports are available
nc -vz win2k19-dc1.fabian.lee {389,636}
Test LDAP connection
First, we will test the insecure LDAP connection on port 389 to get a list of all users under “CN=Users”.
ldapsearch -LLL -H ldap://win2k19-dc1.fabian.lee:389 -D ldap1@fabian.lee -w "ThisIsMyP4ss!" -b CN=Users,DC=FABIAN,DC=LEE -s sub | grep ^dn
If this works, then we will move on to testing ‘ldaps’ on port 636 which is a secure port. But we need to copy over the custom root myCA.crt that is on the domain controller at c:\certs\myCA.crt. And actually, it is in DER format, so we also need to covert it to PEM so it can be used by ldapsearch.
# copy myCA.crt from Domain Controller, convert to PEM
openssl x509 -in myCA.crt -inform DER -out myCA.pem

# environment variable to specify custom CA
LDAPTLS_CACERT=myCA.pem ldapsearch -LLL -H ldaps://win2k19-dc1.fabian.lee:636 -D ldap1@fabian.lee -w "ThisIsMyP4ss!" -b CN=Users,DC=FABIAN,DC=LEE -s sub | grep ^dn
You can copy the root CA certificate from the guest Domain Controller to the Host in any way you choose. Newer Windows versions like 2019 have ssh.exe and scp.exe clients that can be used to communicate back to your Linux based Host.
If you would like to check if the leaf certificate returned from the secure port is the expected “win2k19-dc1”, you can use openssl as shown below to see the Subject and SAN names.
echo | openssl s_client -showcerts -servername win2k19-dc1.fabian.lee -connect win2k19-dc1.fabian.lee:636 2>/dev/null | sed -ne '/-BEGIN CERTIFICATE-/,/-END CERTIFICATE-/p' | openssl x509 -in - -text -noout | grep -e Subject -e DNS -e After
REFERENCES
microsoft, step-by-step installing 2019 DC with powershell
petri.com, install 2019 DC with powershell
chetan naik, AD DS with powershell shows how to add DNS
techexpert.tips, use powershell to set static IP
microsoft, set-dnsserverforwarder
fabianlee.org, KVM backing file and linked clones
NOTES
Windows license expiration and renewal
This article uses a trial ISO for Windows 2019. If the licensing watermark as shown in the bottom right of the screen is expired, make sure to run “slmgr.vbs /rearm” and reboot to give it another 180 grace period or your machine will shutdown after about 30 minutes.