![]() Based on my previous article on creating a Windows2019 Windows Domain Controller from a Sysprep template, we now want to move on to creating an Windows 2019 ADFS server in a similar fashion.
Based on my previous article on creating a Windows2019 Windows Domain Controller from a Sysprep template, we now want to move on to creating an Windows 2019 ADFS server in a similar fashion.
Once this new Windows 2019 guest OS is provisioned, we will prepare it and then run Powershell scripts that will enable the Active Directory Federation Services feature and farm.
This guest VM is located on the default KVM 192.168.122.0/24 NAT network, so it is only available from our Host machine and other VMs on its subnet.
Prerequisites
For this article, there is a strict prerequisite for having implemented the steps in my previous articles:
- Create a Windows 2019 base template using Sysprep
- Create a Windows2019 Domain Controller from a Sysprep template.
Create ADFS child disk
First, we need to create a child disk, that is backed by our Win2019 base that has gone through sysprep.
# get full path to base disk
fullpath=$(virsh dumpxml win2k19base | grep -Po "<source file=\K.*'" | tr -d "'")

# go into directory
cd $(dirname $fullpath)

# create new child disk, with original as backing
sudo qemu-img create -f qcow2 -F qcow2 -b $(basename $fullpath) win2k19-adfs1.qcow2

# validate size of new child disk (will be less than 1Mb)
sudo qemu-img info win2k19-adfs.qcow2 --force-share
Create ADFS guest OS
Using this new child disk, we can create the new “win2k19-adfs1” guest VM.
virt-install --name=win2k19-adfs1 \
--os-type=windows --os-variant=win2k19 \
--cpu host-passthrough \
--ram 2048 --vcpus=1 \
--virt-type=kvm --hvm \
--network network=default,model=e1000 \
--graphics vnc --video=qxl \
--disk $(dirname $fullpath)/win2k19-adfs1.qcow2 \
--boot=hd --noautoconsole --force
The Windows logo will show as the new Guest OS goes through the steps detailed in the Sysprep unattend.xml that you prepared in the earlier section.
Login using “Administrator” and the password specified in the original unattend.xml file (ThisIsMyP4ss!).
Prepare for ADFS
Before we make this host an ADFS server we need to prepare the host. Open a command console as Administrator, and start Powershell.
cd c:\users\Administrator\Downloads
powershell -executionpolicy bypass

# get required scripts
$project="https://raw.githubusercontent.com/fabianlee/blogcode/master/windows"
Invoke-WebRequest $project/make-ip-static.ps1 -OutFile make-ip-static.ps1
Invoke-WebRequest $project/create-ca-and-cert.ps1 -OutFile create-ca-and-cert.ps1
Invoke-WebRequest $project/load-ca-and-cert.ps1 -OutFile load-ca-and-cert.ps1
Invoke-WebRequest $project/install-adfs-2019.ps1 -OutFile install-adfs-2019.ps1
Rename host
The host has an arbitrary name when first deployed, name it “win2k19-adfs1”.
# rename
rename-computer win2k19-adfs1
Set static IP
We will make this host use a static IP so that it is convenient to set upstream DNS values.
.\make-ip-static.ps1
Set DNS to Domain Controller
# set to IP address of your domain controller
$dcIP="192.168.122.4"
$thedomain="fabian.lee"

# set DNS to domain controller
$interfaceIndex=(Get-NetIPAddress -AddressFamily IPv4 -InterfaceAlias Ethernet).InterfaceIndex
Set-DNSClientServerAddress -InterfaceIndex $interfaceIndex -ServerAddress $dcIP

# check DNS resolution
Get-DNSClientServerAddress
nslookup win2k19-dc1.$thedomain

# check public DNS resolution
nslookup google.com
Reboot
For the hostname change to take affect, reboot.
restart-computer
Join the Domain
When the host comes back up, log back in, go to the console again, and start powershell just as before so we can continue.
cd c:\users\Administrator\Downloads
powershell -executionpolicy bypass

# create admin credentials to avoid auth popup
$password = ConvertTo-SecureString -string "ThisIsMyP4ss!" -AsPlainText -force
$cred = New-Object System.Management.Automation.PSCredential("Administrator",$password)

# do domain join, then reboot will occur
$thedomain="fabian.lee"
add-computer -domainname $thedomain -restart -Credential $cred
Install ADFS
When the guest comes back up, login again as the domain Administrator (e.g. FABIAN\Administrator, not a local account) and go back to the powershell prompt.
# prove that you are logged into domain (not local user)
> echo %USERDOMAIN%
FABIAN

# go to local Administrator directory
cd c:\users\Administrator\Downloads
powershell -executionpolicy bypass
Load Domain Controller root CA
We need to load the root CA created on the Domain Controller here on the ADFS host so it can use them for secure TLS communication.
# copy certs from domain controller
xcopy \\win2k19-dc1\c$\certs c:\certs\

# load root CA into cert store
.\load-ca-and-cert.ps1 myCA

# show root CA loaded into certificate store
get-ChildItem -Path 'Cert:\LocalMachine\Root' | where-object { $_.Subject -eq 'CN=myCA' }
Create ADFS certificate
Now that we have the root CA, we can create a certificate for this specific ADFS host.
.\create-ca-and-cert.ps1 myCA 'win2k19-adfs1.fabian.lee'
Install ADFS
Enable the ADFS feature and create the ADFS farm.
.\install-adfs-2019.ps1
Check the status of the “Active Directory Federation Services” service.
Get-Service adfssrv
# start if not already running
Start-Service adfssrv
Enable the ADFS global settings
Set-AdfsProperties -EnableIdPInitiatedSignonPage $true
Set-AdfsProperties -AutoCertificateRollover $true
Smoke Test from inside ADFS guest VM
Test URLs with powershell
Check if the insecure ADFS probe is responding with StatusCode=200. This takes a couple of minutes after the service is started to respond properly.
curl http://win2k19-adfs1/adfs/probe
Check if the ADFS Metadata comes back with StatusCode=200 and RawContentLength about 72000 bytes.
curl https://win2k19-adfs1.fabian.lee/FederationMetadata/2007-06/FederationMetadata.xml
Check that this URL returns the Federation trust metadata with StatusCode=200 and RawContentLength about 2350 bytes.
https://win2k19-adfs1.fabian.lee/adfs/fs/federationserverservice.asmx
Test authentication from browser in ADFS guest
Go to either of the URL below and you should be returned a web page saying “You are not signed in”.
https://win2k19-adfs1.fabian.lee/adfs/ls/IdPInitiatedSignOn.aspx
https://win2k19-adfs1.fabian.lee/adfs/ls/idpinitiatedsignon
Press “Sign in” and enter one of the credentials of one of Active Directory users. Here is a reference to the create-test-users-2019.ps1 used in the previous article.

You should be returned a page that says “You are signed in.”.
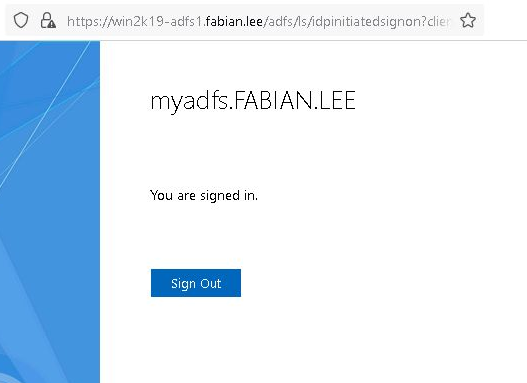
Press the “Sign Out” button to clear your authentication.
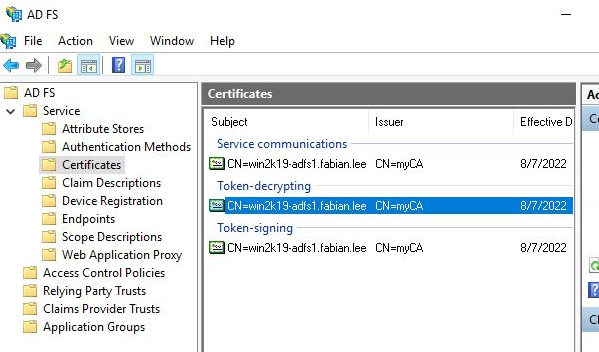
Test ADFS management GUI
From the Start Menu, open the “AD FS Management” program. Navigate to AD FS > Service > Certificates and you will see that our Service communications certificate (the used for TLS communication on port 443) is our “win2k19-adfs1.fabian.lee”.
Smoke Test from parent Host
Let’s step out of the guest OS and back to the parent KVM Host. We should also be able to use ADFS from the parent host.
Host DNS resolution
You will need to either add an entry to your local hosts file, modify your local dnsmasq.conf, or add an entry on your upstream DNS so that name resolution works.
Let’s assume the simplest case, where we add a line to the local /etc/hosts file.
# add IP address of DC, tailor to your environment
echo "192.168.122.244 win2k19-adfs1.fabian.lee" | sudo tee -a /etc/hosts

# test lookup
# if using dnsmasq.conf, may need to add 'local=/fabian.lee/'
nslookup win2k19-adfs1.fabian.lee

# validate ports are available
nc -vz win2k19-adfs1.fabian.lee 443
If you would like to check if the leaf certificate returned from the secure port is the expected “win2k19-adfs1”, you can use openssl as shown below to see the Subject and SAN names.
echo | openssl s_client -showcerts -servername win2k19-adfs1.fabian.lee -connect win2k19-adfs1.fabian.lee:443 2>/dev/null | sed -ne '/-BEGIN CERTIFICATE-/,/-END CERTIFICATE-/p' | openssl x509 -in - -text -noout | grep -e Subject -e DNS -e After
Test authentication from browser
From your Host browser, go to either of the URL below and you should be returned a web page saying “You are not signed in”.
https://win2k19-adfs1.fabian.lee/adfs/ls/IdPInitiatedSignOn.aspx
https://win2k19-adfs1.fabian.lee/adfs/ls/idpinitiatedsignon
Just like before, press “Sign in” and test a login and logout as jdoe@fabian.lee.
This proves that Identity Provider Initiated Sign-in works properly.
REFERENCES
microsoft, create PSCredentials object
microsoft, add-computer with options
microsoft, ADFS role with powershell
rebeladmin Dishan Francis, ADFS part 1
rebeladmin Dishan Francis, ADFS part 4
social technet MS, ADFS step-by-step renew cert for federation metadata xml
blog samlesecurity, ADFS default federation metadata URL value
microsoft, Set-ADFSSSLCertificate
social microsoft, copy certs from one store to another with copy-item
social microsoft, ‘Manage Private Keys’ necessary for ADFS service account
Nicola Delfino, OAuth2 and OIDC support in ADFS 2012R2 vs 2016
ScottLogic.com, Set relying party refresh token lifetime
social microsoft, powershell commands if need to replace ADFS certs and ADFS will not start
NOTES
Error from ADFS if you change the service account password, “adfs error admin0017 1500 policy”. Change from services.msc, restart adfssrv.