![]() Windows AD FS provides enterprise Identity and Authentication services, which includes support for OAuth2 and OIDC authentication flows.
Windows AD FS provides enterprise Identity and Authentication services, which includes support for OAuth2 and OIDC authentication flows.
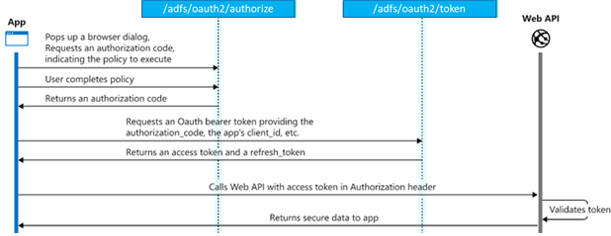
In this article, we will create and configure an ADFS Application group that supports the Authorization Code flow. This flow allows an application to access a 3rd party API on behalf of the end user as illustrated by the diagram below.

Prerequisites
A Windows 2019 Domain Controller, and a Windows 2019 ADFS server where you have Administrator access.
I have articles on creating and configuring these in previous articles:
- Creating a Windows 2019 Domain Controller using Powershell
- Creating a Windows 2019 ADFS server using Powershell
Automated creation of Application Group with Powershell
If you want to shortcut the discussion and jump straight to the automation, I’ve wrapped up all the steps into a Powershell script that can be run directly from the ADFS server.
Open a local command prompt “Run as Administrator”, and run the following commands to create a new ADFS Application Group that supports OAuth2 clients with an Authorization Code flow.
powershell -executionpolicy bypass

# get required script
$project="https://raw.githubusercontent.com/fabianlee/blogcode/master/windows"
Invoke-WebRequest $project/adfs-oauth2-appgroup-2019.ps1 -OutFile adfs-oauth2-appgroup-2019.ps1

# create ADFS Application Group for OAuth2 with app redirect URL
# copy the secret from this output because it is only shown once
.\adfs-oauth2-appgroup-2019.ps1 AppServer-ADFS http://localhost:8080/login/oauth2/code/adfs
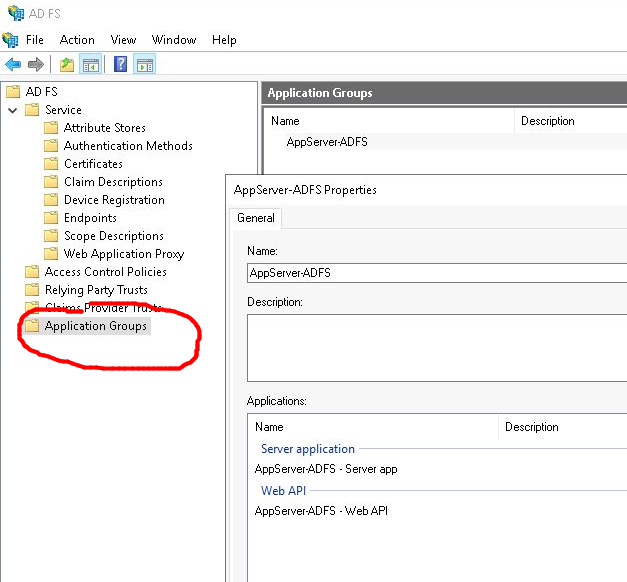
Then if you open “AD FS Management” and navigate to “Application Groups” as shown below, you will have an application group named “AppServer-ADFS”. This app group has a:
- Server application that has the OAuth2 client id and secret, and redirect URL
- Web API containing claims transformation rules and scope permissions
You can tailor the adfs-oauth2-appgroup-2019.ps1 script to your individual environment. If you want more details on these objects, continue reading below.
Note there is no requirement to create an independent Relying Party Trust. There would be if you were configuring ADFS for SAML2, but we are dealing with OAuth2/OIDC and the objects created above are sufficient.
If you have run the Powershell script above and want to skip to the validation, click here.
Manual creation of Application Group
If you would prefer manual steps to create the necessary OAuth2/OIDC objects, or simply wish to delve deeper into each supporting object, use the walk through below.
Create custom Application Scope
From the AD FS Management GUI, right-click on the “Scope Descriptions” node and “Add Scope Description”. Type in “api_delete” for the name, “Allow API deletion” for the description, and press “OK”.

This creates an application specific scope that is passed along with the Access Token, which allows the Resource Server to determine whether a user has access to certain methods/services. This scope will be added to our Web API object in later steps.
Create Application Group
From the AD FS Management GUI, right-click on the “Application Groups” node and “Add Application Group”. This starts a wizard that leads you through the process of adding the objects required for an OAuth2/OIDC authorization code flow.
Use “AppServer-ADFS” as the name, and select “Server application accessing a web API” as the template.
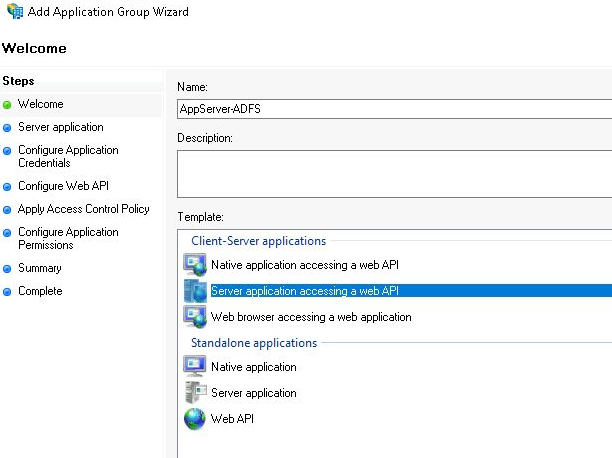
Press “Next” to advance the wizard.
Create Server Application
Use “AppServer-ADFS – Server application” as the server application name, and the client identifier will already be pre-populated with a GUID. Copy this value for a later step in the wizard when we configure the Web API object.
You need to provide a valid redirect URL back to the web Client App where ADFS will send back a code. This will differ based on the Web Client application, but in preparation for a local Java Spring Security app enabled for OAuth2, we will use “http://localhost:8080/login/oauth2/adfs”, then press “Add”.
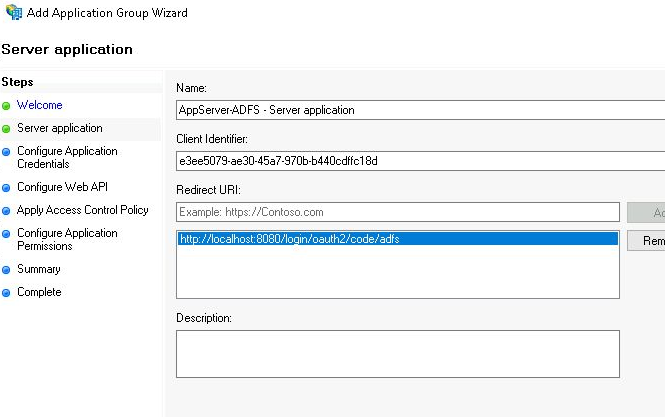
Press “Next” to advanced the wizard.
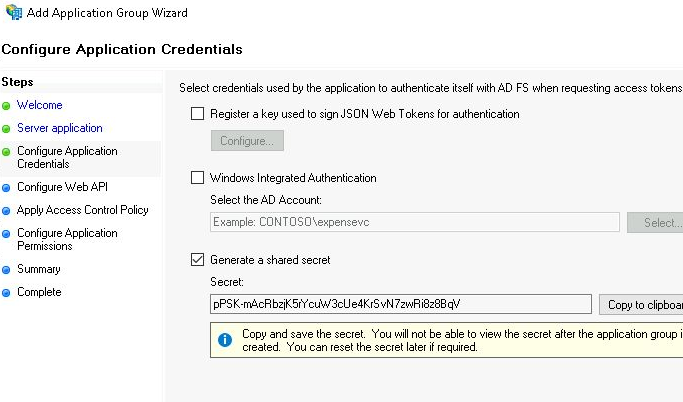
The second part of configuring the server application is to generate a client secret. Check the “Generate a shared secret” checkbox and one will automatically generated. Copy this sensitive value because it will not be shown again, but will need to be used when configuring the Web Client.
Press “Next” to advanced the wizard.
Create Web API
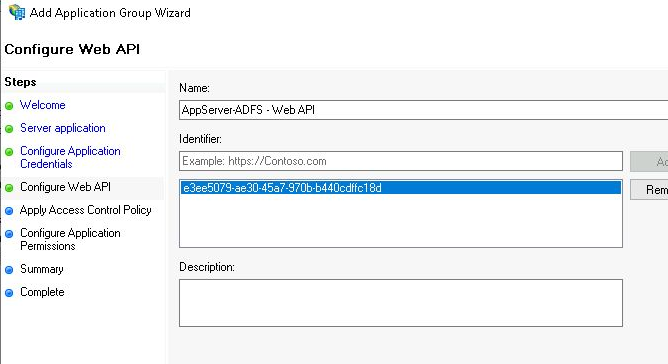
Use “AppServerADFS – Web API” for the Web API name, and paste the GUID client identifier of the Server Application from an earlier step and press “Add”. It is essential that these values match in order for them to be associated.
Press “Next” to advance the wizard.
Configure Web API access control policy
Allow the default “Permit everyone” control policy, and press “Next’ to advance the wizard.

Configure Web API application permissions (scope)
The “openid” scope will already be checked by default. Add “allatclaims” so that our custom claims will be passed along in the id and access token. Also add the custom scope we created earlier “api_delete” which will be passed along in the JWT access token to the Resource Server.

Press “Next” to advance the wizard.
Wizard summary page
The last page will provide a final summary of the gathered values, press “Next”, then “Close” to invoke the creation of our OAuth2/OIDC ADFS objects.
These manual steps are all wrapped into the adfs-oauth2-appgroup-2019.ps1 Powershell script provided earlier.

Add Web API Issuance Transform Rules
One step the wizard did not allow us to configure was adding custom claims rules to the Web API. We want to create two custom claim rules which will add attributes to the JWT Access Token. We will add the following custom rules:
- An LDAP attribute rule that will pull: email, givenName, surName, and group membership from Active Directory
- A transformation rule that will take the scopes separated by spaces, and transform it to an array of “role”
Right-click and open the properties of the Application Group “AppServer-ADFS”, then select the “AppServer-ADFS Web API” and press “Edit”.
The Web API edit dialog will popup, click on the “Issuance Transform Rules” tab.
![]()
Press “Add Rule” to add the LDAP rule
Select “Send LDAP Attributes as Claims” from the dropdown, and press “Next”. Use “AD User properties and Groups” as the name, and select “Active Directory” as the attribute store. Populate the following:
- LDAP=Given-Name; Outgoing=given_name
- LDAP=E-Mail-Addresses; Outgoing=email
- LDAP=Surname; Outgoing=family_name
- LDAP=Token-Groups – Unqualified Names; Outgoing=Group
![]()
Then press “Finish”.
Press “Add Rule” to add the custom rule
Select “Send LDAP Using a Custom Rule” from the dropdown, and press “Next”. Use the name “Populate Roles” and paste in the rule content below, then press “Finish”.
c:[Type == "http://schemas.microsoft.com/identity/claims/scope"]
=> issue(Type = "http://schemas.microsoft.com/ws/2008/06/identity/claims/role", Issuer = c.Issuer, OriginalIssuer = c.OriginalIssuer, Value = c.Value, ValueType = c.ValueType);
This creates an attribute named ‘role’ that contains each entry of scope (scp attribute), but as an array. This makes it easier to parse on the resource server side for some OAuth2 client libraries.
Press “OK” to close off the Web API dialog.
Then “OK” to close the App Group dialog.
Validate flow with sample Client Application
Whether by Powershell automation or by manual entry, you now have the necessary ADFS configuration to support OAuth2/OIDC from the “Authentication Server” perspective.
You can validate by using your browser and a small local web application that will serve as the OAuth2 “Client Application” entity. I would recommend you enable the developer mode of your browser (F12 on Firefox and Chrome), so you can follow along with the network requests being made.
I have built a small Docker image using Go that serves the role of “Client Application” and starts a web server on localhost:8080, and is ready to accept a code back from ADFS at “http://localhost:8080/login/oauth2/adfs”
# ADFS server variables
export AUTH_PROVIDER=adfs
export AUTH_SERVER=win2k19-adfs1.fabian.lee
export CLIENT_ID=<the oauth2 client id>
export CLIENT_SECRET=<the oauth2 client secret>
export SCOPE="openid allatclaims api_delete"

# remove any older container runs
docker rm oauth2-client-app-golang

# run docker image locally, listening on localhost:8080
docker run -it --rm \
--name oauth2-client-app-golang \
--network host \
-p 8080:8080 \
-e AUTH_PROVIDER=$AUTH_PROVIDER \
-e AUTH_SERVER=$AUTH_SERVER \
-e CLIENT_ID=$CLIENT_ID \
-e CLIENT_SECRET=$CLIENT_SECRET \
-e SCOPE="$SCOPE" \
fabianlee/oauth2-client-app-golang:1.0.0
Pointing your browser at http://localhost:8080 will show a simple web page with a login link.
Press “OIDC LOGIN to adfs” and it will redirect you to “localhost:8080/login/ADFS”, which silently redirects to the ADFS server at “/adfs/oauth2/authorize” with parameters for client_id, scope, and redirect_uri.
ADFS will then display a login form where you can enter in the credentials of a valid Active Directory user.
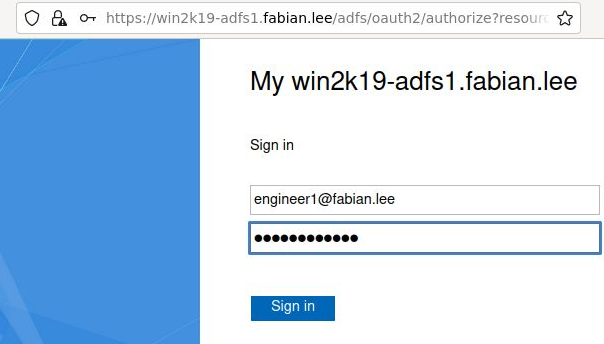
Press “Sign in” and from the browser developer console you will see a GET response back to the “http://localhost:8080/login/oauth2/code/adfs” (the redirect URL) with a code parameter.
Opaque to the end user, the Client web application then takes this code and exchanges it for an ID and Access Token via POST to https://<ADFS>/adfs/oauth2/token. You can see these values in the container console.
The decoded JWT ID Token and raw Access Token are then displayed in the browser, along with a logout link to the ADFS provider.

This Access Token can be used to access services on a 3rd party Resource Server by adding the “Authorization: Bearer <accessToken>” HTTP header to the request.
Feel free to decode the ID or Access JWT at any of the popular JWT decoders.
REFERENCES
microsoft.com, What is new in ADFS 2019
Add-ADFSClient for adding application group to relying party
stackoverflow, configuring Spring Boot for OAuth2
Windows, ADFS OAuth2 and OIDC flow shown by requests
microsoft.com, restrictions on getting custom claim in id tokens
Rory Braybrook, mystery of the missing ADFS JWT claims
onelogin.com, why adopt OpenID Connect (OIDC) and postman collection file
oauth0.com, flow for OIDC with request details and params of each call
microsoft.com, default values in jwt v1 and v2
stackoverflow.com, add hardcoded role to ADFS access token
Rory Braybrook, tips and tricks for ADFS claim rules
social microsoft, adding claim based on regex group name
github fabianlee, Docker image that contains Go implementation of small OAuth2 Client App
docker hub fabianlee, Docker image for OAuth2 Client App
github oauth2login-adfs-sample
microsoft docs, ADFS 2019 customize HTTP security headers for CORS
microsoft docs, example code Web app calling Web API and github to project
fabianlee.org, source for custom OAuth2 swim lane diagram, can be edited at app.diagrams.net
stackoverflow, enable ADFS tracing
forfuncsake, trusting extra CA certs in GoLang
Rory Braybook, validate ADFS access token use jwks_uri (/adfs/discovery/keys)
NOTES
ADFS ldap claims role to populate givenName, Surname, email, and ‘group’ array for access token
c:[Type == "http://schemas.microsoft.com/ws/2008/06/identity/claims/windowsaccountname", Issuer == "AD AUTHORITY"]
=> issue(store = "Active Directory", types = ("given_name", "email", "family_name", "http://schemas.xmlsoap.org/claims/Group"), query = ";givenName,mail,sn,tokenGroups;{0}", param = c.Value);
ADFS claim rule for adding hardcoded role
=> issue(Type = "http://schemas.microsoft.com/ws/2008/06/identity/claims/role", Value = "MyWebApiRole");
ADFS claim rule to add to ‘scp’ if AD group is ‘managers’
c:[Type == "http://schemas.xmlsoap.org/claims/Group", Value == "managers"]
=> issue(Type = "http://schemas.microsoft.com/identity/claims/scope", Issuer = c.Issuer, OriginalIssuer = c.OriginalIssuer, Value = "api_delete", ValueType = c.ValueType);
Authorization code grant diagram from Microsoft