![]() An essential part of the standard build process for Java applications is having a repository where project artifacts are stored.
An essential part of the standard build process for Java applications is having a repository where project artifacts are stored.
Artifact curation provides the ability to manage dependencies, quickly rollback releases, support compatibility of downstream projects, do QA promotion from test to production, support a continuous build pipeline, and provides auditability.
Archiva from the Apache foundation is open-source and can serve as the repository manager for popular build tools such as Maven and Jenkins.
Install On Ubuntu
Prerequisites
The first step is to install Java JDK 1.7+ as a prerequisite, we will go with OpenJDK Java 1.8. On Ubuntu 14.04, this is not part of the standard Ubuntu repository, so we use a ppa.
$ sudo add-apt-repository ppa:openjdk-r/ppa -y
$ sudo apt-get update
$ sudo apt-cache policy openjdk-8-jdk
$ sudo apt-get install openjdk-8-jdk -y
$ sudo update-alternatives --config java
$ sudo update-alternatives --config javac

$ /usr/bin/java -version
$ java -version
On Ubuntu 16.04 this is easier since OpenJDK 1.8 is in the Ubuntu repository.
# for Ubuntu 16.04
$ sudo apt-get install openjdk-8-jre -y
$ sudo update-alternatives --config java
$ sudo update-alternatives --config javac
$ /usr/bin/java -version
$ java -version
Since this will be an Ubuntu service, it should have an independent user for its process and logs. We will create a user named “archivaservice”, we would usually not allow this user to have a shell (e.g. /sbin/nologin), but a valid shell is required for the wrapper this service will run under.
$ sudo useradd archivasvc -s /bin/bash -M
Then create a directory for the logs with the correct ownership:
$ sudo mkdir -p /var/log/archiva
$ sudo chown archivasvc:adm /var/log/archiva
$ sudo chmod 755 /var/log/archiva
As the final prerequisite, make sure port 8080 is open on the host firewall so that the service is externally accessible.
$ sudo ufw allow 8080/tcp
Download
With the JDK installed, now download the latest standalone version of Archiva which is 2.2.3 at the time of this writing. The standalone version uses Jetty as an app server and Derby as the backing database.
The download page is here, and from your browser you can get the mirror link and use it to download the latest version directly to your host.
Download the standalone version of Archiva, and unzip it.
$ wget http://ftp.wayne.edu/apache/archiva/2.2.3/binaries/apache-archiva-2.2.3-bin.tar.gz
$ tar xvfz apache-archiva-2.2.3-bin.tar.gz
$ cd apache-archiva-2.2.3
Configure for Service
Modify the startup script at ‘bin/archiva’ so that the service runs as our designated user, ‘archivasvc’. This line is commented out by default, set it as shown below.
#RUN_AS_USER
RUN_AS_USER=archivasvc
Configure logging
By default, all logging is going to a subdirectory named ‘logs’ directly in the Archiva directory. We need to change this so that it goes to the standard Debian location in ‘/var/log’. This takes modification of several files in the ‘conf’ directory.
conf/wrapper.conf
#wrapper.java.additional.3=-Djetty.logs=%ARCHIVA_BASE%/logs
wrapper.java.additional.3=-Djetty.logs=/var/log/archiva
and this line also
#wrapper.logfile=%ARCHIVA_BASE%/logs/wrapper-YYYYMMDD.log
wrapper.logfile=/var/log/archiva/wrapper-YYYYMMDD.log
conf/jetty.xml
<Set name="filename"><SystemProperty name="jetty.logs" default="/var/log/archiva"/>/request-yyyy_mm_dd.log</Set>
apps/archiva/WEB-INF/classes/log4j2.xml
<property name="logsDirectory">/var/log/archiva</property>
Create Service
Now we can create the service by linking it into the ‘/etc/init.d’ directory, having it set for auto start, and then starting the service.
$ cd ..
$ sudo chown -R archivasvc:archivasvc apache-archiva-2.2.3
$ cd apache-archiva-2.2.3

$ sudo ln -s `pwd`/bin/archiva /etc/init.d/archiva

$ sudo update-rc.d archiva defaults 80

$ sudo service archiva start
Starting Apache Archiva...
Note that on Ubuntu 16.04, this service is really running under Systemd, and so those standard commands are available.
$ sudo systemctl status archiva.service
$ journalctl -u archiva.service
$ sudo systemctl restart archiva.service
Service smoke test
You can verify the service is actually running by looking at the logs:
$ grep "initServers" /var/log/archiva/archiva.log

2018-02-02 21:51:57,948 [WrapperSimpleAppMain] INFO org.apache.archiva.webdav.RepositoryServlet [] - initServers done in 75 m
And also by looking for the service running on port 8080
$ sudo netstat -tlnp | grep "LISTEN " | grep 8080
 tcp6 0 0 :::8080 :::* LISTEN 10132/java
The process id above should also match when you list the running processes:
$ ps -ef | grep archiva
Pulling up web interface
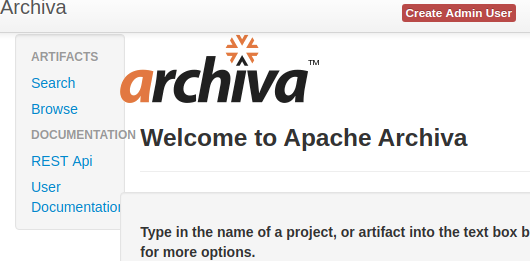
With the smoke test complete, now we can use our browser to pull up the Archiva interface. Use your browser to navigate to port 8080 of the Archiva host, and the below page should display.
Since you do not have an Administrative user yet, press the red button that says “Create Admin User”.
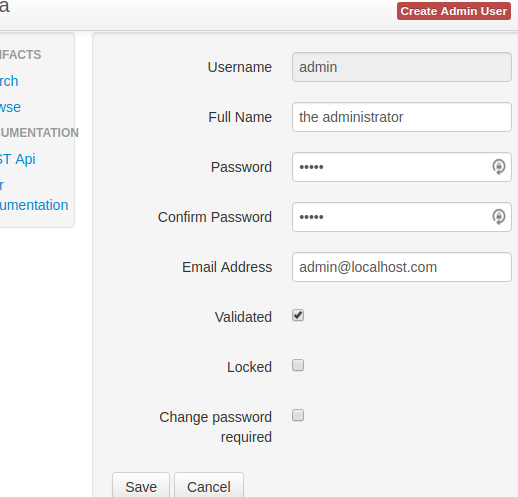
This will get you to a form that allows you to select a password, fill it out as below and press “Save”. I am using ‘adminp4ss’, and this will be reflected later when I create credentials for Maven.
Now you are logged in as ‘admin’, and can search, browse, and upload artifacts.
Test artifact deployment
I have a small github project named maventest that contains two Java projects:
- ‘mavendeploy’ to prove out deploying an artifact to a remote Maven repository with two different versions ‘0.0.2-SNAPSHOT’ and ‘0.0.1-SNAPSHOT’
- ‘mavendeploy-client’ to prove consuming either version of that artifact from a remote repository
Pull it from github with the following commands:
$ sudo apt-get install git openjdk-7-jdk maven -y
$ git clone https://github.com/fabianlee/maventest.git
$ cd maventest
$ cd mavendeploy
Then we need to edit the local pom.xml so that it publishes to the Archiva “snapshots” repository. Under <properties>, change the <archiva.URL> to reflect the IP address of your Archiva host.
With <archiva.URL> now set, this will allow the <distributionManagement> section to deploy the jar to the snapshot repository.
<distributionManagement>

<repository>
 <id>archiva</id>
 <name>releases</name>
 <url>${archiva.URL}/repository/internal</url>
 </repository>

<snapshotRepository>
 <id>snapshots</id>
 <name>snapshots</name>
 <url>${archiva.URL}/repository/snapshots</url>
 </snapshotRepository>

</distributionManagement>
Then we need to provide the credentials necessary to upload these into Archiva. Maven uses the file “~/.m2/settings.xml” to store these values, so this file needs to be created if it does not already exist.
$ mkdir ~/.m2
$ touch ~/.m2/settings.xml
Then modify settings.xml with the content below, using the same password for ‘admin’ set in the web interface.
<settings>
 <servers>

 <server>
 <id>archiva</id>
 <username>admin</username>
 <password>adminp4ss</password>
 </server>

<server>
 <id>snapshots</id>
 <username>admin</username>
 <password>adminp4ss</password>
 </server>

</servers>
</settings>
We are using the admin credentials for Archiva above, but of course this is not best practice and the password should reflect a non-elevated user that has the permissions to deploy. The web interface provides the ability to create roles with their own authorization levels.
And even if you are using a non-admin user, on a shared host (like a Jenkins build system), you would not want to expose a plaintext password. Maven allows encrypted passwords using the ~/.m2/security-settings.xml.
Upload version 0.0.2-SNAPSHOT
By default, pom.xml has the <version> set to ‘0.0.2-SNAPSHOT’. Let’s go ahead and deploy that version to our private repository first:
$ mvn deploy
The test output will show the current version (0.0.2-SNAPSHOT) of the build as well as exercise its use of Apache’s commons-lang library to determine if the CPU is 64bit.
-------------------------------------------------------
 T E S T S
-------------------------------------------------------
Running org.fabianlee.mavendeploy.TestMavenDeployUtils
mavendeploy:0.0.2-SNAPSHOT] is this processor 64bit? true
You should also see output from the deploy task showing the upload of this jar to the remote repository that looks similar to below.
Uploading: http://192.168.2.125:8080/repository/snapshots/org/fabianlee/mavendeploy/0.0.2-SNAPSHOT/mavendeploy-0.0.2-20180204.142859-11.jar
Upload version 0.0.1-SNAPSHOT
But let’s also deploy the “0.0.1-SNAPSHOT’ version of the artifact also, so that we can prove consumption of either later.
Modify pom.xml so that <version> is set to “0.0.1-SNAPSHOT”. This can be done manually with any text editor, or you can use a maven command that understands the pom.xml structure.
$ mvn versions:set -DnewVersion=0.0.1-SNAPSHOT
Now just like before we run through the deployment steps
$ mvn deploy
The test output will show the current version (0.0.1-SNAPSHOT) of the build.
-------------------------------------------------------
 T E S T S
-------------------------------------------------------
Running org.fabianlee.mavendeploy.TestMavenDeployUtils
mavendeploy:0.0.1-SNAPSHOT] is this processor 64bit? true
You should also see output from the deploy task showing the upload of this jar to the remote repository that looks similar to below.
Uploading: http://192.168.2.125:8080/repository/snapshots/org/fabianlee/mavendeploy/0.0.1-SNAPSHOT/mavendeploy-0.0.1-20180204.144058-8.jar
You should now validate in the Archiva web interface that the two different versions of ‘mavendeploy’ are pushed into the snapshots repository.
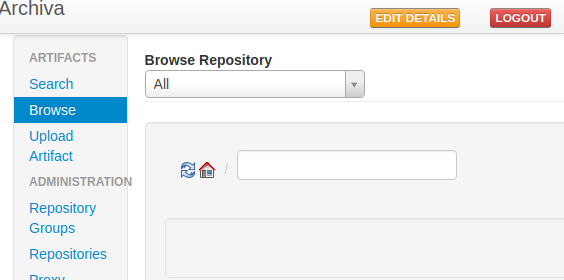
Open your browser to port 8080 of the Archiva host, and press the “Browse” button on the left hand categories. Make sure there is a “Logout” button, because otherwise you will not see any artifacts.
Select the “Snapshots” repository from the pulldown and you should see the “org” package similar to below.
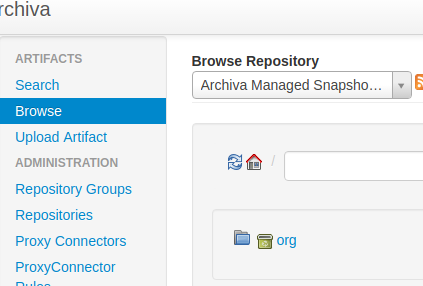
Click into the org > fabianlee > mavendeploy hierarchy, and as shown below you will see the two versions we uploaded “0.0.1-SNAPSHOT” and “0.0.2-SNAPSHOT”.
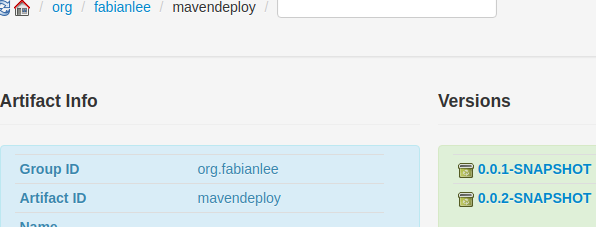
This hierarchy corresponds to the values in pom.xml defining the groupId and artifactId.
 <groupId>org.fabianlee</groupId>
 <artifactId>mavendeploy</artifactId>
Note that this also placed the artifacts into your local “~/.m2/repository/org/fabianlee/mavndeploy” folder. This is your local maven cache.
Test artifact consumption
Now with the two versions of the mavendeploy artifact in the remote repository, let’s test whether we can consume both these in a different project.
If you are going to run this from the same host where you produced the artifact, you’ll need to delete it from the local cache location first. Otherwise, the cached version on disk will be used. Navigate to the folder “~/.m2/repository/org/fabianlee” on your filesystem and delete the entire “mavendeploy” directory.
Remote repository in pom.xml
Edit the local pom.xml so that it pulls from the Archiva “snapshots” repository. Under <properties>, change the <archiva.URL> to reflect the IP address of your Archiva host.
The pom.xml for mavendeployclient does not have a <distributionManagement> section because it will not be uploading its jar artifact to a remote Maven repository. It simply needs to know where to download any extra dependencies, so it only needs a <repositories> section.
 <repositories>
 <repository>
 <id>archiva snapshots</id>
 <name>Archiva Managed Snapshot Repository</name>
 <url>${archiva.URL}/repository/snapshots/</url>
 <releases>
 <enabled>false</enabled>
 </releases>
 <snapshots>
 <enabled>true</enabled>
 </snapshots>
 </repository>
 </repositories>
Consume version 0.0.2-SNAPSHOT
Now run the mavendeploy-client test, which by default uses the “0.0.2-SNAPSHOT” dependency.
$ cd ..
$ cd mavendeploy-cient
$ mvn test
You should first see a download happening of the dependent 0.0.2-SNAPSHOT library:
Downloading: http://192.168.2.125:8080/repository/snapshots/org/fabianlee/mavendeploy/0.0.2-SNAPSHOT/mavendeploy-0.0.2-20180204.143209-12.jar
Then further down, the output of the test which shows the dependent library being used is indeed “0.0.2-SNAPSHOT”.
-------------------------------------------------------
 T E S T S
-------------------------------------------------------
Running org.fabianlee.mavendeploy.TestMavenDeployClient
CLIENT making call to dependency: mavendeploy:0.0.2-SNAPSHOT
CLIENT is this processor 64bit? true
Consume version 0.0.1-SNAPSHOT
Unlike the <version> in pom.xml, we can dynamically override the version used by dependencies with a property set at the console level. Run the command below to use the 0.0.1-SNAPSHOT version of the library:
$ mvn test -Dmavendeploy.version=0.0.1-SNAPSHOT
Now you can see the download of the “0.0.1-SNAPSHOT” version.
Downloading: http://192.168.2.125:8080/repository/snapshots/org/fabianlee/mavendeploy/0.0.1-SNAPSHOT/mavendeploy-0.0.1-20180204.144058-8.jar
And the test ouput reflects the same.
-------------------------------------------------------
 T E S T S
-------------------------------------------------------
Running org.fabianlee.mavendeploy.TestMavenDeployClient
CLIENT making call to dependency: mavendeploy:0.0.1-SNAPSHOT
CLIENT is this processor 64bit? true
REFERENCES
http://archiva.apache.org/docs/2.2.1/adminguide/standalone.html (installation of standalone)
https://www.mkyong.com/maven/how-to-install-apache-archiva-in-ubuntu/ (if you want to change jetty port)
https://hostpresto.com/community/tutorials/how-to-create-a-repository-manager-with-apache-archiva-on-ubuntu-14-04/ (fronting with Nginx proxy, using mysql instead of Derby)
https://github.com/xetus-oss/docker-archiva/issues/4 (bad path to repo in pom.xml will end with 405 error)
https://cwiki.apache.org/confluence/display/MAVEN/Maven+Properties+Guide
NOTES
sudo usermod -s /bin/bash archivasvc (modify shell after user creation)