![]() Update Nov 2021: I have written a newer article that deploys vCenter 7.0.
Update Nov 2021: I have written a newer article that deploys vCenter 7.0.
If you have just virtualized the VMware ESXi 6.7 server on top of KVM, the next step will be to install vCenter 6.7 for its centralized control and additional feature set and management capabilities.
 In my last article we took KVM running on bare metal and deployed an ESXi host on top of it.
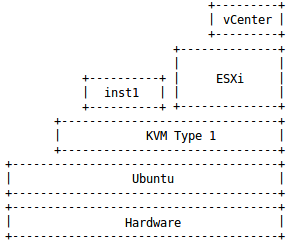
In this article, we will deploy the vCenter Server Appliance (vcsa) on top of the ESXi server as its own virtualized guest OS.
This will be done with the help of a staging KVM Linux guest (‘inst1’) where we will mount the vsca ISO downloaded from vmware.com and run the vcsa CLI installer.
Prerequisites
ESXi
The first prerequisite is obviously an instance of ESXi 6.7. In this series of articles I am virtualizing on top of KVM. You can install KVM on your Ubuntu host and then install ESXi on top of KVM.
Take note that the vcsa installer even in ‘tiny’ mode mandates the ESXi host have 10Gb of memory and 2 vCPU. This can be decreased later for lab environments.
VCSA ISO
Download an evaluation version of vCenter, which comes as a 3.4Gb ISO file. You will need a VMware account.
Ubuntu host for deploying vcsa
The vcsa install can be done from either a Windows or Linux 64 bit host with network connectivity to ESXi. We are going to use a KVM virtualized Ubuntu host named ‘inst1’ to mount the vCenter ISO as the CDROM, and run the command line installer.
Understand this is a throwaway VM only being used to install vcsa, after which it can be discarded.
First, download the Ubuntu network installer named “mini.iso” to your Downloads directory. Then create a small KVM guest OS named “inst1”.
virt-install --virt-type=kvm --name=inst1 --ram 2048 --vcpus=1 --virt-type=kvm --hvm --cdrom ~/Downloads/mini.iso --network network=default --graphics vnc --disk pool=default,size=30,bus=virtio,format=qcow2 --noautoconsole --force
Go through the full Ubuntu installation process accepting all defaults in order to build a basic Ubuntu guest OS. When you get to Software selection, choose “Basic Ubuntu server” and “OpenSSH server”. This whole process should take around 15-30 minutes.
When it gets to the end of the installation process, and asks you to eject the CDROM and restart, go ahead and run the following virsh commands at a console before pressing <ENTER> on the Ubuntu installer screen.
cdrom=`virsh domblklist inst1 --details | grep cdrom | awk {'print $3'}`

virsh change-media inst1 $cdrom --eject
Wait for Ubuntu to stop the guest OS, then start the ‘inst1’ guest OS back up using virsh.
virsh start inst1
After a minute you should be greeted with a console based login prompt. Login with the credentials you used during the Ubuntu setup.
Prepare DNS for vcsa installation
One of the most important prerequisites before installing vcsa is ensuring that you have full DNS resolution AND reverse lookup for both the ESXi host and the yet to be created vCenter host. I can’t stress this point enough, there are various cryptic errors you will get during the install process if FQDN and IP lookup are not configured.
You could set this resolution up on your router, or a global instance of dnsmasq on your host, or you can use the dnsmasq instance that runs for your default libvirt virtual network.
For this article, since all host are being built in the libvirt default 192.168.122.0 virtual network, I’ll modify that specific dnsmasq instance for DNS resolution.
I’m going to assume the ESXi host is at 192.168.122.133 and is named “esxi1.home.lab”. And the yet to be installed vCenter server will be 192.168.122.51 and named “vcenter.home.lab”.
Use virsh to edit the default network:
virsh net-edit default
And add the following content right before the <ip> element:
<dns>
<host ip='192.168.122.133'>
  <hostname>esxi1.home.lab</hostname>
</host>
<host ip='192.168.122.51'>
  <hostname>vcenter.home.lab</hostname>
</host>
</dns>
Then restart the default virtual network.
virsh net-destroy default && virsh net-start default
And test both name and reverse lookup for the names and IP addresses.
$ nslookup esxi1.home.lab 192.168.122.1
$ nslookup 192.168.122.133 192.168.122.1

$ nslookup vcenter.home.lab 192.168.122.1
$ nslookup 192.168.122.51 192.168.122.1
Because we’ve used the virtual network dnsmasq instance, this resolution will not work from your host browser or console by default. If you need these exposed in a larger context, you can setup a service instance of dnsmasq on your host.
Run installation from temporary host
Now let’s use the temporary staging VM ‘inst1’ to install vcsa. This guest holds no purpose other than to run the vcsa installer.
Attach ISO to CDROM device
cdrom=`virsh domblklist inst1 --details | grep cdrom | awk {'print $3'}`

virsh change-media inst1 $cdrom ~/Downloads/VMware-VCSA-all-6.7.0-16708996.iso --insert
Mount CDROM within OS
sudo mkdir -p /media/iso
sudo mount -t iso9660 -o loop /dev/cdrom /media/iso
Validate DNS resolution
Because it is so important to the install process, we need to ensure we have full name and IP resolution from this host. If you have DNS configured as suggested using the dnsmasq for the default virtual network, then “/etc/resolv.conf” should be pointing at 192.168.122.1.
$ nslookup esxi1.home.lab
$ nslookup 192.168.122.133

$ nslookup vcenter.home.lab
$ nslookup 192.168.122.51
JSON configuration
The cli installer is driven by values you set on a json file. The full list of templates available is located on the ISO at “vcsa-cli-installer/templates/install”, the template we are basing this article on is “embedded_vCSA_on_ESXi.json”
Download this json from my github project and place it into the home directory of inst1.
wget https://raw.githubusercontent.com/fabianlee/blogcode/master/vmware/vcsa-esxi.json
Modify the following items to match your environment:
- “esxi” section – pointing to the target ESXi host, credentials, and network/datastore names
- “appliance” section – name of the appliance that will be created
- “network” section – network details of the appliance including name, IP, DNS server, and FQDN of the appliance
- “os” section- configuration details of the appliance including default password
- “sso” section provides the single sign-on domain and password (default admin = “Administrator@vsphere.local”).
Run the installer
Finally we are at the point where we can run the installer. Go into the “vcsa-cli-installer directory and run the installer like below, specifying our json file in the home directory.
cd /media/iso/vcsa-cli-installer
sudo lin64/vcsa-deploy install --no-ssl-certificate-verification --accept-eula --acknowledge-ceip ~/vcsa-esxi.json
The install will take 20+ minutes, and there will be lots of output to the console, but in the end you should see output similar to below.
Appliance Name: vcenter
System Name: vcenter.home.lab
System IP: 192.168.122.51
Log in as: Administrator@vsphere.local
[SUCCEEDED] Successfully executed Task 'ApplianceLoginSummaryTask: Provide
appliance login information.' in TaskFlow 'esxi' at 04:40:34
If you see certificate or thumbprint errors, the most common problem is DNS not being both name and reverse resolvable.
Validate Install
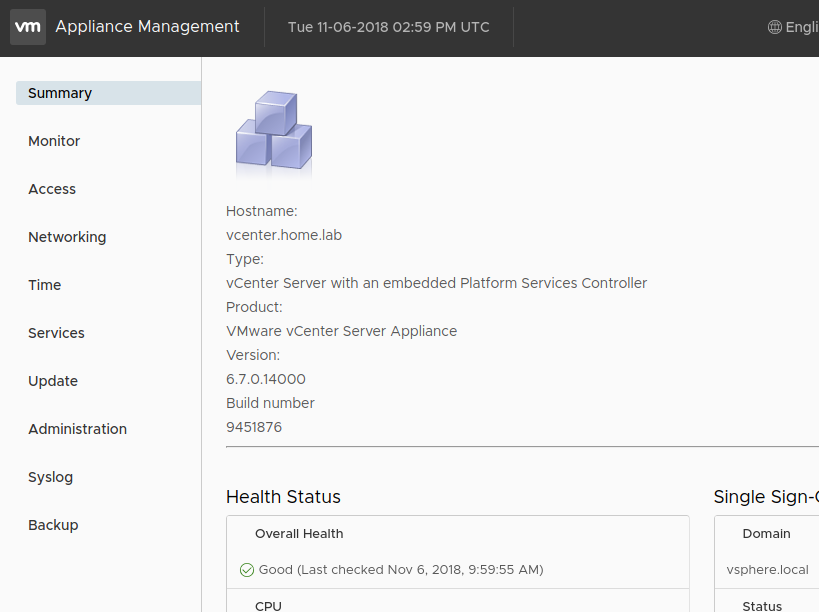
vCenter Appliance Administration Interface
The first validation of the vcsa install can be done by pulling up the vCenter Appliance Administration interface (VAMI). The VAMI can accessed at port 5480 and provides basic administration of the appliance itself.
Depending on where you have configured DNS, it can be reached either by its FQDN or IP address.
https://vcenter.home.lab:5480 OR https://192.168.122.51:5480
user/pass=Administrator@vsphere.local/ExamplePass@456
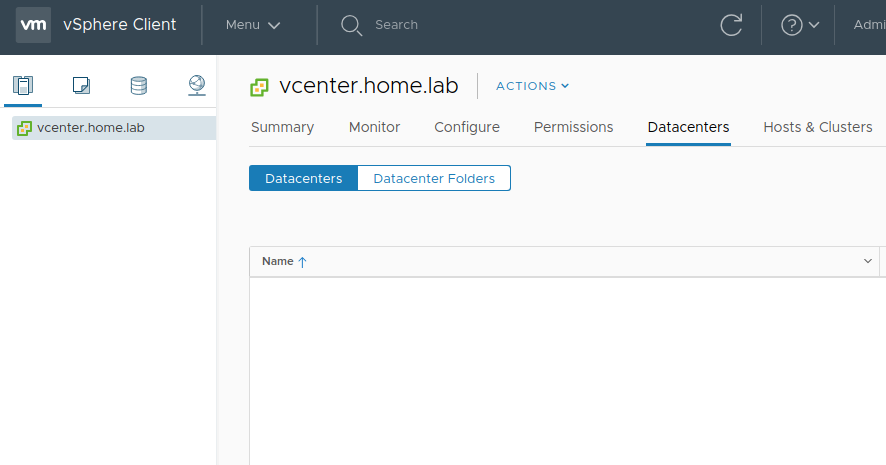
vSphere Web Client
The next validation is of the vCenter web interface. Depending on where you have configured DNS, it can be reached either by its FQDN or IP address. The credentials are from the vcsa-esxi.json file in the “sso” section, and the user is “Administrator@vsphere.local”.
https://vcenter.home.lab OR https://192.168.122.51
user/pass=Administrator@vsphere.local/ExamplePass@456
vCenter Configuration
The first thing you will want to do is create a new datacenter and then add the ESXi instance to the datacenter.
New datacenter
Right-click on the main root node in the left hand tree view “vcenter.home.lab” and select “New Datacenter” with the name “mydc1”.
New cluster
Right-click on the datacenter node created above, “mydc1” and select “New Cluster”. Use the name “mycluster1”, and enable vSphere DRS. If we do not enable DRS, resource pool creation would be disabled.
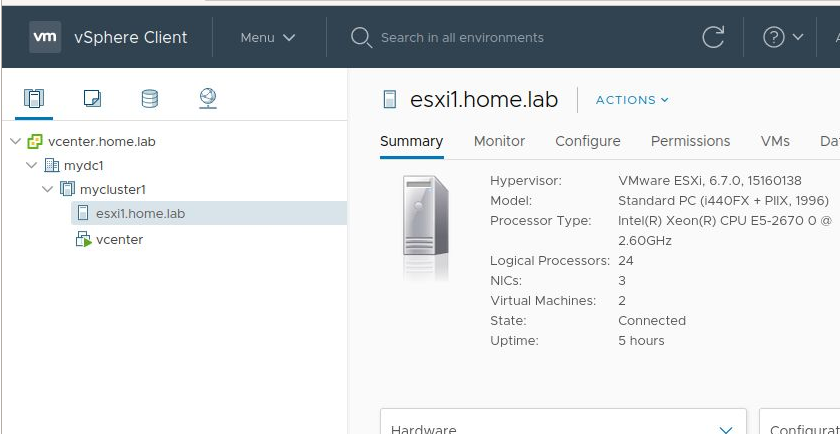
Add ESXi host to datacenter
Then right-click on “mydc1” from the left hand tree view and select “Add Host”. Enter the hostname of the ESXi host “esxi1.home.lab”, and the ESXi credentials (user=root, not the Adminstrator@vsphere.local) and accept any host certificates. Assign the default evaluation license, lockdown mode disabled, and “Finish” the wizard dialog.
This should provide you a basic datacenter>cluster>ESX host as shown below.
REFERENCES
https://docs.vmware.com/en/VMware-vSphere/6.7/vsphere-vcenter-server-67-installation-guide.pdf (pdf official)
https://xenappblog.com/2018/automatically-deploy-vmware-vcsa/ (sample json)
vcsa sample json: sample json and sample json
http://www.enterprisedaddy.com/2016/11/vcsa-deploy-install-vcsa65-cli/
https://s3.amazonaws.com/virtuallyghetto-download/complete_vsish_config.html (list of vsish config keys)
https://www.experts-exchange.com/articles/28896/HOW-TO-Deploy-and-Install-the-VMware-vCenter-Server-Appliance-6-5-VCSA-6-5.html (vcenter image walkthrough)
https://www.virtuallyboring.com/vcenter-server-appliance-6-0-a-fresh-install/ (vcenter image walkthrough)
https://vswitchzero.com/2017/10/19/boosting-vsphere-web-client-performance-in-tiny-deployments/ (avoid warnings on tiny)
https://github.com/lamw/usb-to-sddc/blob/master/DeployVM-Scripts/vcsa.json.template (vcsa json template)
https://docs.vmware.com/en/VMware-vSphere/6.5/com.vmware.vsphere.install.doc/GUID-A1777A0B-9FD6-4DE7-AC37-7B3181D13032.html (explain differences between json templates)
https://www.altaro.com/vmware/unattended-vcsa-installation/ (cli installer, thumbprint as param)
https://www.vgemba.net/vmware/VCSA-CLI-Install/ (cli install, json example)
https://www.virtuallyghetto.com/2014/05/how-to-finally-inject-ovf-properties-into-vcsa-when-deploying-directly-onto-esxi.html (manually using ovftool and injecting OVM properties)
https://www.virtuallyghetto.com/2015/12/how-to-bootstrap-the-vcsa-using-the-esxi-embedded-host-client.html (embedded vcenter on esxi host using ova)
https://esxsi.com/2017/09/11/vcenter-ca-certs/ (vcenter cert replacment)
https://vmarena.com/replace-vcsa-6-7-certificate-vmca-by-an-adcs-signed-certificate/ (vcenter cert replacement)
https://tinkertry.com/how-to-get-rid-of-vsphere-browser-certificate-warnings-in-windows (download all root certs)
https://www.techcrumble.net/2017/05/how-to-mount-the-host-cd-rom-to-the-esxi-shell/
https://www.virtuallyghetto.com/2011/04/how-to-mount-cdrom-using-vsish-on-esxi.html
https://communities.vmware.com/thread/167097 (mount cdrom in esxi shell)
https://vmware.github.io/photon/ (vcsa appliance runs on this OS)
ovf tool manual (pdf)
https://4sysops.com/archives/vmware-single-sign-on-sso-with-active-directory/ (vsphere sso added to AD domain)
https://textik.com/#6d403bedf103d2bc (ascii image for this article)
NOTES
libvirt dnsmasq holding on to names/IP
/var/lib/libvirt/dnsmasq/default.conf, default.hostsfile, default.leases (if host was originally dhch it was assigned IP->name)
copy file from remote host using limit (kb/s of 10k)
scp -v -l 10000 <user>@<host>:/source/file .
static IP for ubuntu 14.04
auto lo
iface lo inet loopback

# The primary network interface
auto eth0
iface eth0 inet static
address 192.168.122.??
netmask 255.255.255.0
network 192.168.122.0
broadcast 192.168.122.255
gateway 192.168.122.1
dns-nameservers: 192.168.122.1
dns-search: home.lab
virsh snapshots
virsh snapshot-list esxi1
virsh snapshot-create-as esxi1 afterinstall
virsh snapshot-revert esxi1 afterinstall
virsh snapshot-delete esxi1 afterinstall
vcsa installer deprecated switch
--no-esx-ssl-verify (deprecated)
--no-ssl-certificate-verification (newer versions)
reducing ESXi memory footprint
If you ssh into the vcsa as root, then run the “shell”, you can run the command below to see the memory allocation. These are adjusted depending on the total RAM given to the appliance.
cloudvm-ram-size -l
See this page for services that can be disabled
govc to create vcenter hierarchy
# create datacenter
govc datacenter.create mydc1

# create cluster with DRS enabled (for res pools)
govc cluster.create mycluster1
govc cluster.change -drs-enabled mycluster1

# add esxi1 host to cluster
# would have used 'host.add' if we wanted it added directly to DC
govc cluster.add -cluster mycluster1 -hostname esxi1.home.lab -username root -password ExamplePass@456 -noverify=true -connect=true
Exact VMware versions used for this article
esxi iso: VMware-VMvisor-Installer-201912001-15160138.x86_64.iso (6.7 u3b)
vcenter iso: VMware-VCSA-all-6.7.0-16708996.iso (6.7 u3j)
seabios used on esxi: rel-1.14.0-13-g94f0510