![]() If you need to enable JDWP debugging of your Spring Boot web application in an IDE such as Eclipse, you can append the ‘debug-jvm’ flag to the gradle task, and then from your IDE enable a remote debugging connection to port 5005.
If you need to enable JDWP debugging of your Spring Boot web application in an IDE such as Eclipse, you can append the ‘debug-jvm’ flag to the gradle task, and then from your IDE enable a remote debugging connection to port 5005.
I will walk you through a full example, but very quickly, here is the flag you need to use to enable JDWP listening on localhost port 5005.
./gradlew bootRun --debug-jvm
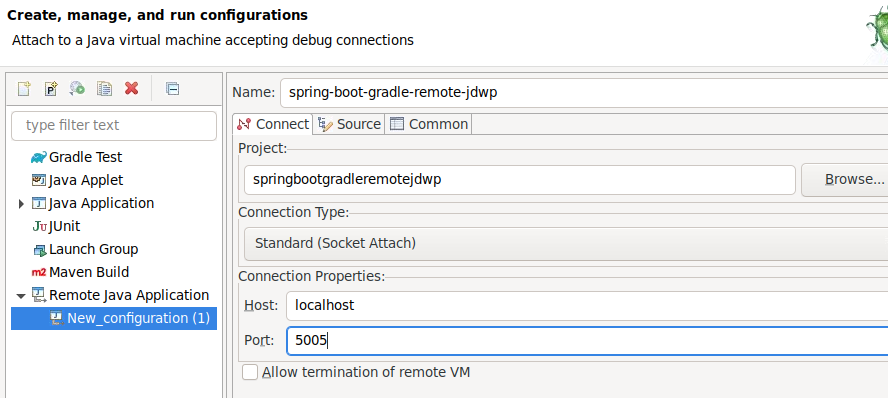
And then from Eclipse, you should create a Debug configuration for a “Remote Java Application”. With a standard socket attach to host=localhost, port=5005.
Continue reading for a walk-through using my small Spring Boot application, spring-boot-gradle-remote-jdwp.
Example project overview
My spring-boot-gradle-remote-jdwp project is a simple Spring Boot web application that exposes a REST microservice. I will use it to show how a gradle built project can be remotely and interactively debugged via JDWP from the Eclipse IDE with breakpoints and tracing into 3rd party source libraries.
The application listens on port 8080 and exposes the following:
- GET /api/class/user – list of all students in class
- POST /api/class/user – creates a new student in the the class, using a random name
- DELETE /api/class/user – deletes a user in the class
- index.html – test harness that allows you to invoke each of the REST API endpoints above
We will use the java-faker library to make up names for our newly created students. This will give us the opportunity to step-into 3rd party source code when we debug in the IDE.
Start gradle project with JDWP enabled
# need OpenJDK 17+
javac --version
java --version

# get project code
git clone https://github.com/fabianlee/spring-boot-gradle-remote-jdwp.git
cd spring-boot-gradle-remote-jdwp

BASEDIR=$(realpath .)
echo "When you import the existing gradle project from Eclipse later, use this folder: $BASEDIR"

# start on port 8080, JDWP debugging enabled on port 5005
./gradlew bootRun --debug-jvm
Get copy of 3rd party code for step-into debugging
When we create a student, we will make up a name using the java-faker library. This gives us the perfect opportunity to show how 3rd party code can be stepped into in our interactive debugging session.
# get correct tagged version (matching our build.gradle)
cd /tmp
git clone https://github.com/DiUS/java-faker.git java-faker-src
cd java-faker-src

# version specified in build.gradle is 0.12
git checkout javafaker-0.12

# HEAD detached is expected
git branch
Import gradle project into Eclipse
Eclipse Main Menu File > Import > Existing Gradle Project
- Project Root Directory=the $BASEDIR output earlier
- Press “Finish”
Import 3rd party source folder into Eclipse
Eclipse Main Menu File > Open Projects from File System
- import source=/tmp/java-faker-src
- Press “Finish”
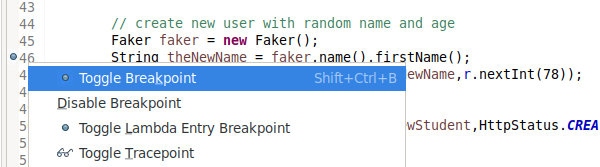
Create breakpoint for newly added user name generation
During our debugging session, we want to figure out where the new student name is generated, so we are going to put a breakpoint in our code at the line where it is accessed. Then, during our debugging session we can “step into” this method call and down into the 3rd party source code.
Open src/main/java/org/fabianlee/springbootgradleremotejdwp/ClassroomController.java
- Find method where student is added:
String theNewName = faker.name().firstName(); - Right-click on left side column and select “Toggle Breakpoint” at that line
Create Eclipse remote debugging session connecting to JDWP agent
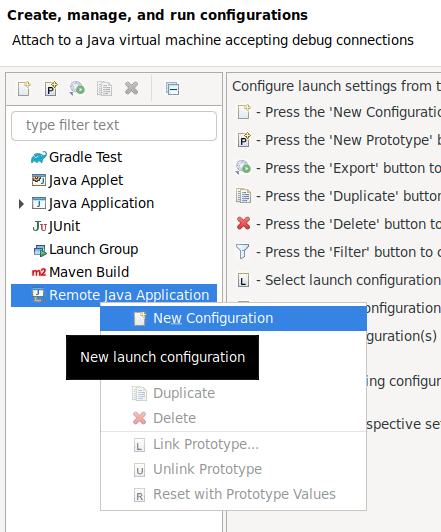
Eclipse Main Menu > Run > Debug Configurations
Right-click “Remote Java Application”, select “New Configuration”
- name=spring-boot-gradle-remote-jdwp
- Press “Browse” button by project and select our imported project = springbootgradleremotejwdp
- connection type=standard socket, host=localhost, port=5005
Select “Source” tab

- Press “Add” and then “File System Directory” type
- use “/tmp/java-faker-src” to point to the 3rd party source we cloned earlier
- Press “OK”
- Press “OK”
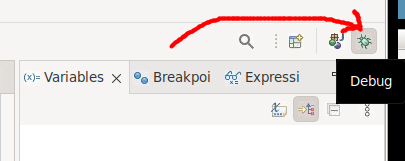
Then press “Debug” to start the remote debugging session.
Select Run>Resume (F8) if the web app stops immediately at the SilentExitExceptionHandler. This is a known issue because of the spring-boot-devtools and live reloading.
Put Eclipse IDE into Debug view
In top-right of browser, make sure you selected “debug” view (not Java). This is so you can get a view of the stack and variables while debugging.
Index page, list users
Now use your browser to pull up http://localhost:8080 and you will get the main page. It has 3 buttons corresponding to the REST api calls described earlier.
- GET /api/class/user – list of all students in class
- POST /api/class/user – creates a new student in the the class (with random name from 3rd party library)
- DELETE /api/class/user – deletes a user in the class
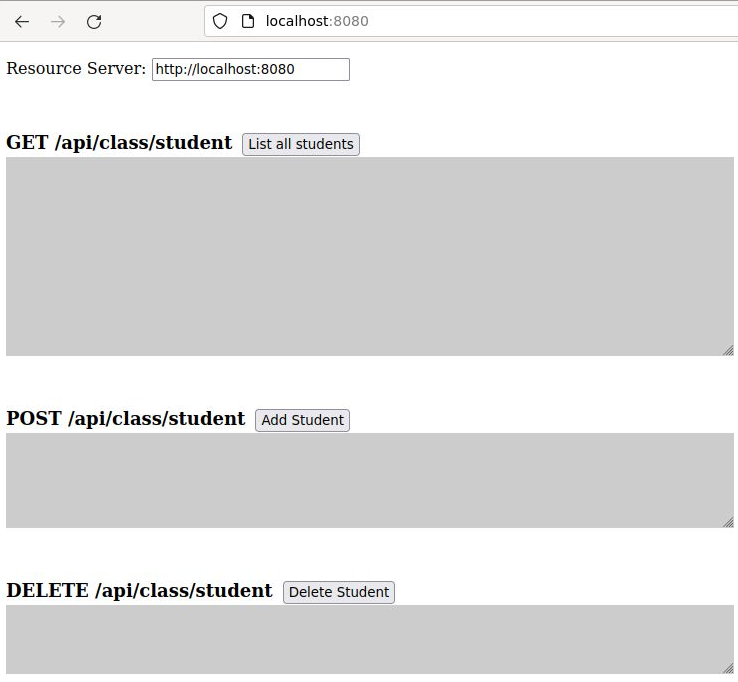
If you press “List all students”, you will see 3 student records in json format, which is the initial list. There are no breakpoints on that method, so the web application will continue to run as normal.
Add user, trip breakpoint for name generation
But if you press “Add Student”, you will then see your IDE change cursor position to the breakpoint we set earlier on the line in ClassroomController.java where the random name is chosen from the 3rd party library.
String theNewName = fake.name().firstName();
Because we wanted to explore where in this 3rd party library the name is coming from, we want to press F5 for Run>Step Into. The IDE pulls up com.github.javafaker.Faker.class from the 3rd party source folder we referenced earlier.
But we are in now in a small name() method, with only a return of a variable, which does not explain how the variable got this value. But notice that Name is a custom object, not just a java.lang.String.
public Name name() {
  return name;
}
So, if we follow that definition by press F3 on “Name”, the IDE opens up the com.github.javafaker.Name class. And looking at the name() method below we can see it uses the FakeValuesService to provide a random name to our Student.
public String name() {
  return faker.fakeValuesService().resolve("name.name", this, faker);
}
If you dug in further, you would see that there are a set of yaml files in the src/main/resources classpath folder that are pulled from in order to randomly create names, addresses, etc.
But it is not necessary to dig deeper, the point of this article is just to provide the mechanisms by which you can enable the JDWP agent, and configure your IDE to communicate with that agent with interactive breakpoints and variable inspection.
REFERENCES
thomaskeller blog, Debugging with Gradle
github, java-faker project for creating random names, addresses