![]() It is relatively straightforward to create a GCP public subnet where the compute instances have access to the public internet via the default internet gateway.
It is relatively straightforward to create a GCP public subnet where the compute instances have access to the public internet via the default internet gateway.
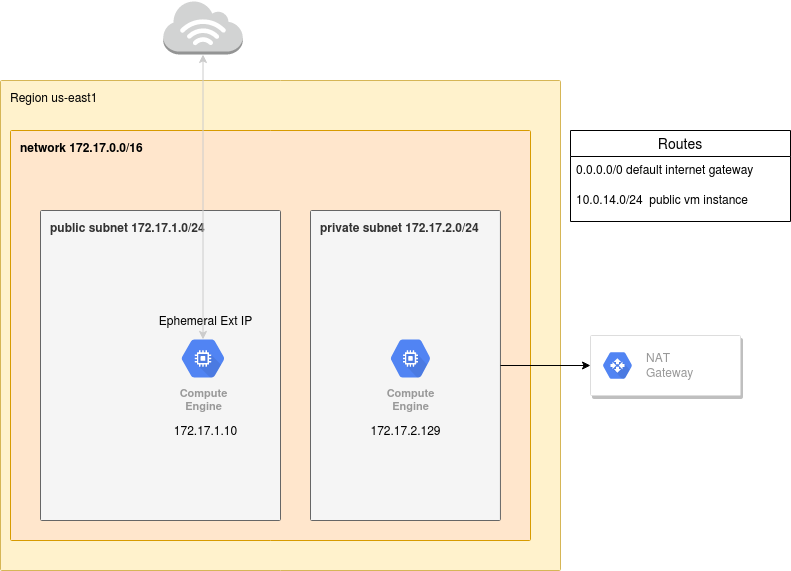
But once you start building private subnets behind it, you must start considering firewall, routing, and the NAT gateways required to reach public services.
In this article, I will use Terraform to provision a public subnet 172.17.1.0/24, and a private subnet 172.17.2.0/24. The Linux compute instance placed at 172.17.1.10 will be publicly accessible via an external IP address. The Linux instance placed at 172.17.2.129 will not be accessible publicly, and must use a NAT gateway to reach the public internet.
Prerequisite: Install Terraform
See my previous article on installing Terraform.
Prerequisite: GCP Service Account credentials
For a local test, we could allow Terraform to operate under our identity directly. But in order to accommodate non-interactive/headless usage in build and deployment stages, let’s create an IAM user that Terraform uses for all its infrastructure building.
Based on the way I’ve created the Terraform scripts, these credentials need to be in a file named ‘tf-creator.json’.
So you can either create this service account manually from the console and download the json file credentials, or you can install the gcloud api and run my create-tf-service-account.sh script in the section below.
It is important to note that the Terraform google provider does not require the gcloud CLI tool.
Provision GCP infrastructure
This Terraform code is part of a larger github project, but we are just using the GCP infrastructure building.
# packages required
sudo apt-get install make git -y

# pull project
git clone https://github.com/fabianlee/wireguard-test-gcp-aws-roaming.git
cd wireguard-test-gcp-aws-roaming

# create ssh keypair for login to compute instances
make create-keypair
ls -l ansible_rsa*
WARNING: GCP will bill you for this provisioning!
# build infrastructure in GCP using terraform
cd gcp-infra

# uses gcloud to create the service account used for terraform
# creates 'tf-creator.json'
./create-tf-service-account.sh

# build GCP infrastructure
make
Terraform will display its progress, and at the end you should see something similar to below.
...
Apply complete! Resources: 2 added, 1 changed, 2 destroyed.

Outputs:

gcp-ubuntu-priv-web-private_ip = "172.17.2.129"
gcp-ubuntu-pub-wg_private_ip = "172.17.1.10"
gcp-ubuntu-pub-wg_public_ip = "34.75.19.58"
This shows the public and private IP address of:
- ‘gcp-ubuntu-pub-wg_*’ – host in public subnet
- ‘gcp-ubuntu-priv-web_*’ – host in private subnet
Test access
First test access to the public host. In my example output, the public IP address is ‘34.75.19.58’. Replace with your relevant value.
# test netcat to ssh port 22
nc -vz 34.75.19.58 22

# test remote ssh to public instance, then exit back
ssh -i ../ansible_rsa ubuntu@34.75.19.58
hostname
exit
Now we want to test access to the host (172.16.2.129) in the private subnet, but the only way to reach it is through the host on the public subnet. So, we first jump into the public host, and from there jump to the private host.
# copy ssh private auth key to public jumphost
scp -i ../ansible_rsa ../ansible_rsa ubuntu@34.75.19.58:/home/ubuntu/.

# ssh to public host first
ssh -i ../ansible_rsa ubuntu@34.75.19.58

# test netcat to private host
nc -vz 172.17.2.129 22

# make sure private key has limited permissions
cd /home/ubuntu
chmod 600 ./ansible_rsa

# ssh to private host
ssh -i ./ansible_rsa 172.17.2.129
hostname
exit

# remove private key from public host and exit one last time
rm /home/ubuntu/ansible_rsa
exit
There are other ways to reach this private host, for example the ssh commands takes a ‘-J’ flag that allows you to specify an intermediary.
ssh -J <user>@<bastion>:22 <targetuser>@<targethost> -vvv
But this requires creating an ~/.ssh/config so ssh knows which target host matches which bastion key as described in a previous article. But this also saves you from copying the private key to the bastion, which is highly desirable from a security perspective.
Destroy
When done, remove all infrastructure:
make destroy
REFERENCES