![]() Update Dec 2021: I have written an updated version of this article for vCenter 7.0U1 and Anthos 1.8.
Update Dec 2021: I have written an updated version of this article for vCenter 7.0U1 and Anthos 1.8.
Anthos GKE on-prem is a managed platform that brings GKE clusters to on-premise datacenters. This product offering brings best practice security measures, tested paths for upgrades, basic monitoring, platform logging, and full enterprise support.
Setting up a platform this extensive requires many steps as officially documented here. However, if you want to practice in a lab or home environment this is possible using an Ubuntu host with 32Gb physical RAM running a nested version of ESXi 6.7 on KVM.
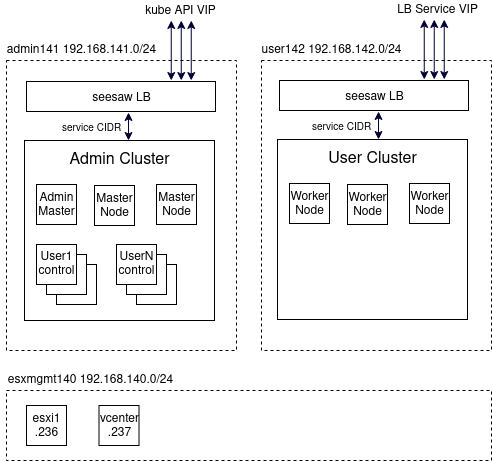
Multiple networks are required for: ESX management, Anthos Admin, and User clusters. But this can be emulated with KVM routed networks using virtual bridges. Below is a logical diagram of our target Anthos on-prem build.
Google Cloud Prerequisites
Create a Google cloud project and subscribe to Anthos per the documentation.
- Login to the cloud console https://console.cloud.google.com with your Google Id
- Enable billing for the GCP project, Hamburger menu > Billing
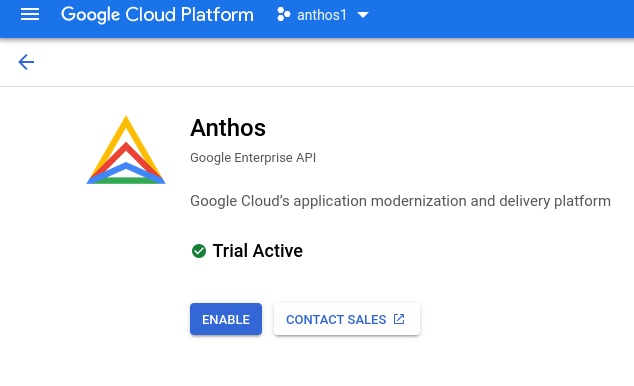
- Enable the Anthos API, Hamburger menu > Anthos, click ‘Start Trial’
Install Ansible (on Host)
There are many commands and templating steps in this article, I have used Ansible to simplify those commands.
Install Ansible using my article here.
Install KVM (on Host)
Install KVM on your Ubuntu host, see my article here.
This provides a type 1 Hypervisor on your bare metal Ubuntu host where we will virtualize multiple networks and a nested ESXi server.
Install Terraform (on Host)
The VM and networking infastructure is setup with Terraform wherever possible.
Install Terraform using my article here.
Install dnsmasq service (on Host)
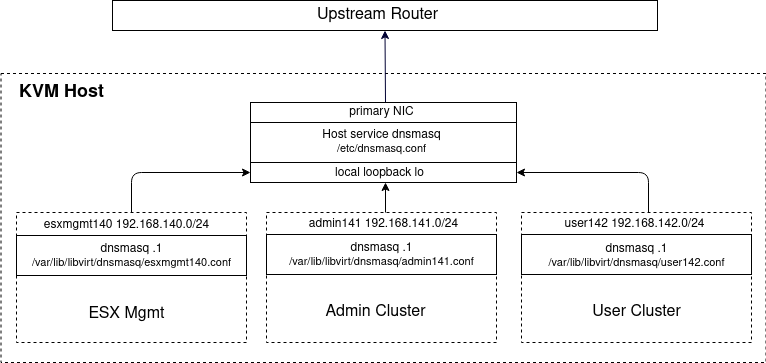
As described in one of my articles, use an independent host instance of dnsmasq so that all the KVM routed networks can point at it for upstream DNS resolution. The routed networks we are going to create with KVM in later steps are be able to reach your KVM Host at is primary NIC as shown below.
Install dnsmasq service on KVM host
# is the host dnsmasq service already installed?
sudo systemctl status dnsmasq.service --no-pager

# if not, then install
sudo apt install dnsmasq -y
Use the following lines in “/etc/dnsmasq.conf”, which will limit the binding to the local (lo) and public interface so it does not interfere with the private libvirt bindings.
listen-address=127.0.0.1
# you want a binding to the loopback
interface=lo
# and additional binding to public interface (e.g. br0,ens192)
# I've seen 'unrecognized interface' errors when using interface name
# use liste-address as an alternative
#interface=ens192
listen-address=<yourNIC_IP>

bind-interfaces
server=<yourUpstreamDNSIPAddress>
log-queries

# does not go upstream to resolve addresses ending in 'home.lab'
local=/home.lab/
And although you could add custom hostname mappings directly to dnsmasq.conf, dnsmasq also reads “/etc/hosts” as part of its lookup logic, so this is a nice way to easily add entries. Go ahead and add the following entries to “/etc/hosts”.
echo 192.168.140.136 esxi1.home.lab | sudo tee -a /etc/hosts
echo 192.168.140.137 vcenter.home.lab | sudo tee -a /etc/hosts
echo 192.168.142.253 anthos.home.lab | sudo tee -a /etc/hosts

# restart dnsmasq
sudo systemctl restart dnsmasq

# make sure there are no errors
sudo systemctl status dnsmasq
Configure host to use local dnsmasq service
To have your host use this local dnsmasq service, configure your resolv configuration. In older versions of Ubuntu, this typically meant modifying “/etc/resolv.conf”.
However, in newer versions of Ubuntu modifying this file is not the correct method because resolv is managed by Systemd. Instead, you want to modify “/etc/systemd/resolved.conf”.
# view current resolv for each interface
resolvectl dns

# change 'DNS' to 127.0.0.1
sudo vi /etc/systemd/resolved.conf

# restart systemd resolv and then check status
sudo systemctl restart systemd-resolved
sudo systemctl status systemd-resolved

# global DNS should now be '127.0.0.1' pointing to local dnsmasq
resolvectl dns

# check full settings
sudo systemd-resolve --status
Validate
This should allow you to use nslookup or dig against the local dnsmasq service to do either a name resolution or reverse lookup.
$ dig @127.0.0.1 esxi1.home.lab +short
192.168.140.236
$ dig @127.0.0.1 -x 192.168.140.236 +short
esxi1.home.lab.

$ dig @127.0.0.1 vcenter.home.lab +short
192.168.140.237
$ dig @127.0.0.1 -x 192.168.140.237 +short
vcenter.home.lab.
This lookup and reverse lookup is mandatory in order for the vCenter installation to perform correctly.
Tail the syslog to see the most recent DNS queries made.
sudo tail /var/log/syslog -n1000 | grep dnsmasq
Pull github project
In order to start the Anthos installation, go ahead and pull my project code from github.
# make sure git is installed
sudo apt install git realpath -y

# clone project
git clone https://github.com/fabianlee/anthos-nested-esx-manual.git

# go into project, save directory into 'project_path' variable
cd anthos-nested-esx-manual
export project_path=$(realpath .)
We will use the files and scripts in this directory throughout the rest of the article as we step through the deployment.
Generate environment specific files
There are certain variables such as GCP project name/id, and host IP address that need to be inserted in the Anthos configuration files. We will use Ansible to define the variables and generate environment specific files from the jinja2 templates.
First, modify the Ansible variables, then call the playbook that will generate the local environment specific files.
cd $project_path

# modify at the very least host public NIC and GCP project name/id
# the rest of the variables will be default if you have
# been following my articles
vi group_vars/all

# generate environment specific files
ansible-playbook playbook_generate_files.yml
Create 3 routed KVM networks (on host)
Create KVM routed networks for use by esxi host: esxmgmt140, admin141, user142. Do this with the terraform libvirt provider.
cd $project_path/tf-create-local-kvm-routed-networks

# should only have 'default' kvm nat, 192.168.122.0/24
virsh net-list

# run terraform to create 3 routed KVM networks
make
Viewing the host routing table should now show the below
$ route -n
Kernel IP routing table
Destination Gateway Genmask Flags Metric Ref Use Iface
...
192.168.140.0 0.0.0.0 255.255.255.0 U 0 0 0 virbr3
192.168.141.0 0.0.0.0 255.255.255.0 U 0 0 0 virbr2
192.168.142.0 0.0.0.0 255.255.255.0 U 0 0 0 virbr1
And listing the KVM networks should show you the default KVM network at 192.168.122 as well as the 140, 141, and 142 networks you defined.
$ virsh net-list
Name State Autostart Persistent
------------------------------------------------
default active yes yes
esxmgmt140 active yes yes
admin141     active yes yes
user142      active yes yes
These are routed KVM networks. Therefore you will need to handle the routing of these networks. The easiest way is typically to add 3 static routes on your upstream router that points these subnets back to the public interface of this host server.
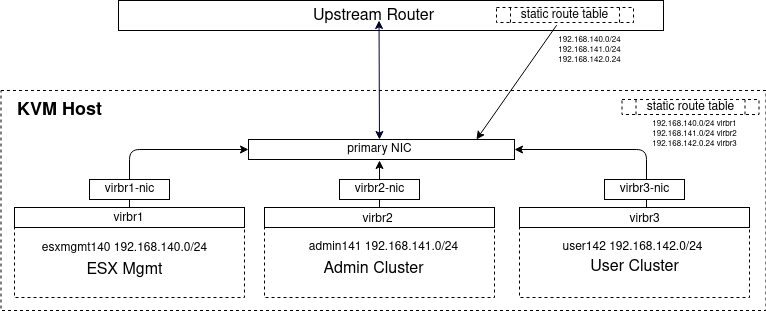
Adding these static routes on your upstream router is unfortunately something I cannot show you how to do exactly, because some of you will be in lab environments using commercial routers while others are on consumer routers from varying manufacturers. As an example, below is a screenshot of the static routes of the upstream OpenWRT router in my lab environment.
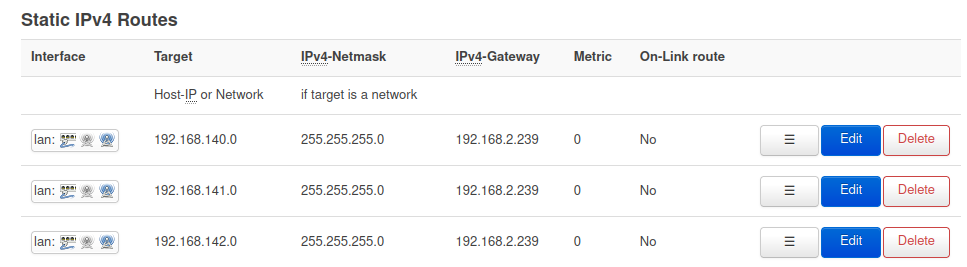
This points all traffic on 192.168.140, .141, and .142 back to my KVM host network public interface at 192.168.2.239, which knows how to handle these CIDR blocks because of its host routing table shown earlier. The method you use to route these networks is dependent on your network topology and devices.
This is complex enough that I think it’s important to validate that these KVM routed networks have connectivity between them and have the ability to do nslookup properly. I’ve provided a terraform file that can create an Ubuntu instance in each KVM routed network and run a connectivity test.
cd $project_path/tf-test-routed-networks-kvm

# show guest hosts currently available
virsh list

# create 3 KVM Ubuntu guests, each in different network
make

# show 3 guest hosts now available
# creates 'kvm140', 'kvm141', 'kvm142'
virsh list

# test connectivity to each other,
# and forward+reverse resolution to [esxi1,vcenter].home.lab
./run-tests.sh

# tear down test vms
make destroy
The test goes into each of these guest VMs, and does:
- netcat to port 22 of all the other VMs to prove it can make a connection
- DNS lookups and reverse lookups to verify the ‘esxi1.home.lab’ entries from previous dnsmasq section are valid
- DNS lookup and ping to ‘archive.ubuntu.com’ to prove outside connectivity
You do not have to immediately tear these VM down and delete them. They are helpful when troubleshooting any routing issues between these virtual networks and your upstream router at the KVM level.
Deploy nested ESXi server (from Host)
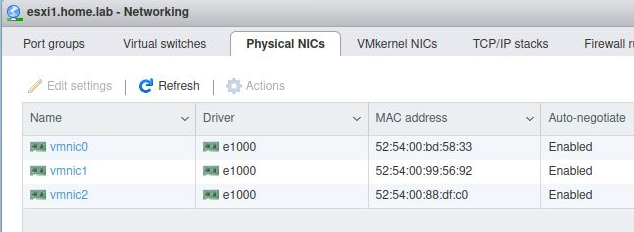
Use my article on nested ESXi lab installation as your guide, but instead of just a single NIC on the default KVM network (192.168.122.0/24), add 3 NIC to the KVM host, all of type e1000 for: esxmgmt140, admin141, and user142.
Use at least a 1500Gb sparse disk. If your default pool location will not accommodate that much space, create another pool.
# show location of 'default' disk pool
virsh pool-dumpxml default | grep path

# if you need to put this large esxi disk in another location
virsh pool-define-as kvmpool --type dir --target /data/kvm/pool
Reserve as much cpu as possible and overallocate your RAM (use more than your host, allow KVM to use swap). This nested ESXi will be running a significant load: vCenter, the Anthos Workstation, the Admin Cluster master nodes and its seesaw LB, and the User Cluster worker nodes and its seesaw LB.
With a 1500Gb sparse disk, 40Gb RAM overcommitted on a 32Gb host, and 16 vcpu overcommited on a 8 cpu host (2 threads/core,4 cores/socket), the screenshot below shows the resources used when the build is complete. Memory is the hardest pressed resource here with signficant file swapping.
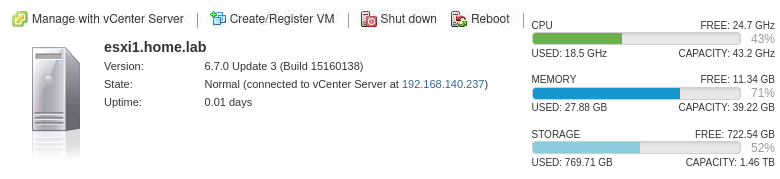
NOTE: I believe you will need at least 32Gb RAM on your KVM host to deploy this full solution. I see hiccups from swapping even at 32Gb RAM with swap on a different SSD than the KVM qcow2 backing file.
Below is the command from the article, modified for 3 NIC on our routed networks, larger vcpu/RAM allocations, and using a custom disk pool named “kvmpool”.
virt-install --virt-type=kvm --name=esxi1 --cpu host-passthrough --ram 40160 --vcpus=16 --virt-type=kvm --hvm --cdrom /data/VMware-VMvisor-Installer-201912001-15160138.x86_64_u3b.iso --network network:esxmgmt140,model=e1000 --network network:admin141,model=e1000 --network network:user142,model=e1000 --graphics vnc --video qxl --disk pool=kvmpool,size=1500,sparse=true,bus=ide,format=qcow2 --boot cdrom,hd --noautoconsole --force
That article also shows how to use the latest SeaBIOS, which can only be changed before ESXi installation.
Create Seed VM (from Host)
The seed vm is a KVM Guest VM (a peer of the ESXi server) that we will use to install vCenter as well as the Anthos Admin Workstation.
Let’s use KVM to create a VM in the same subnet as ESXi, 192.168.124.0/22.
# create Ubuntu seed vm at 192.168.124.220
cd $project_path/tf-kvm-seedvm

# list of current kvm guests
virsh list

# create KVM seed VM
make

# run basic set of ping and outside connectivity tests
./run-tests.sh

# now shows 'seedVM'
virsh list
Now install basic utilities on the seed VM: gcloud, kubectl, terraform, etc.
# run prequisite ansible scripts
cd $project_path

# ansible has module dependencies in galaxy
ansible-playbook install_ansible_dependencies.yml

# now install utiltiies needed on seed
ansible-playbook playbook_seedvm.yml
Install vCenter (from seed)
The KVM domain name of the seed vm is ‘seedvm-192.168.140.220’.
Following the basic instructions in my article here, let’s insert the CD for the vCenter installer. You may need to reboot the seed VM. The below command are done from the KVM host.
# all commands below or
# cd $project_path/needed_on_vcenter_installer
# ./insert-vcenter-installer-iso.sh

seedvm=seedvm-192.168.140.220

# get current device and ISO file being used
cdrom=`virsh domblklist $seedvm --details | grep cdrom | awk {'print $3'}`
currentISO=`virsh domblklist $seedvm --details | grep cdrom | awk {'print $4'}`

# eject current disk
virsh change-media $seedvm $cdrom --eject $currentISO

# insert vcenter installer iso
virsh change-media $seedvm $cdrom --insert /data/VMware-VCSA-all-6.7.0-16708996_u3j.iso


# copy the files needed unto host
cd $project_path/needed_on_vcenter_installer
./copy_to_seedvm.sh
cd ..
Now login to the seed VM and mount the cdrom from the OS level.
# ssh into seed vm
ssh -i $project_path/tf-kvm-seedvm/id_rsa ubuntu@192.168.140.220

# check nslookup and reverse (MUST work or vcenter will fail!)
nslookup esxi1.home.lab
nslookup 192.168.140.236
nslookup vcenter.home.lab
nslookup 192.168.140.237

# mount vcenter iso
sudo mkdir -p /media/iso
sudo mount -t iso9660 -o loop /dev/cdrom /media/iso

# do installation, takes about 15 min
cd /media/iso/vcsa-cli-installer
sudo lin64/vcsa-deploy install --no-ssl-certificate-verification --accept-eula --acknowledge-ceip ~/vcsa-esxi.json
Validate the vcenter installation as described in the article, and configure the datacenter and add the esxi host. You can always use govc to create these object as well as shown below.
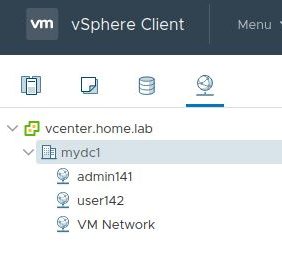
source ~/govc/source-govc-vars.sh

# create datacenter
govc datacenter.create mydc1

# add esxi1 host to datacenter
govc host.add -hostname esxi1.home.lab -username root -password ExamplePass@456 -noverify=true -connect=true
Add vCenter service account for Anthos (from seed)
Using govc commands:
source ~/govc/source-govc-vars.sh

govc sso.user.ls

# create anthos@vsphere.local
govc sso.user.create -p 'ExamplePass@456' -R Administrators anthos

# add anthos user to Administrators groups
govc sso.group.update -a anthos Administrators
OR if you insist on doing from the browser.
https://vcenter.home.lab (user/pass=Administrator@vsphere.local/ExamplePass@456)
Menu > Administration
Single Sign On > Users and Groups > Users tab
Domain “vsphere.local”, press “Add”; Username = anthos, first name=anthos, Press Add
Single Sign On > Users and Groups > Groups tab
Right click ‘Administrators’ group, select “Edit”. Enter “anthos” in member search, press <enter> to place in group listing. Press “Save”
Expose routed networks from vCenter
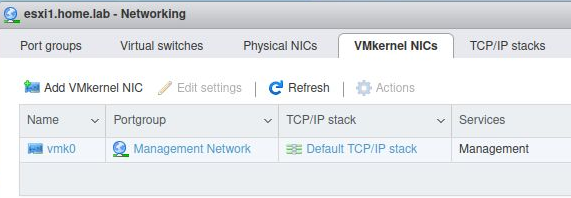
Each of the routed networks needs its own Port group associated with a Virtual Switch. The virtual switch is associated with a different physical nic. There is only a single vmkernel nic ‘vmk0’.
To do this manually in vcenter, login to vcenter and go to ‘Hosts and Clusters’. Right-click on ‘esxi1.home.lab’ and select ‘Add Networking’.
- Select ‘Virtual Machine Port group for a standard switch’
- new standard switch with 1500 MTU
- Add active adapter ‘vmnic1’
- Network label ‘admin141’, vlan=0
- Finish
Manually repeat for ‘vmnic2’ on ‘user142’. Or you can use add these from the seed VM using govc, as shown below.
# for vmnic1, create switch and add port group 'admin141'
govc host.vswitch.add -mtu 1500 -nic vmnic1 vSwitch1
govc host.portgroup.add -vswitch vSwitch1 -vlan 0 admin141

# for vmnic2, create switch and add port group 'user142'
govc host.vswitch.add -mtu 1500 -nic vmnic2 vSwitch2
govc host.portgroup.add -vswitch vSwitch2 -vlan 0 user142
When completed successfully, the “Networking” section from the esxi web UI (https://esxi1.home.lab.ui, user=root) should look like below. With three physical NIC.
A single VMkernel NIC.
Two additional virtual switches (vSwitch1,vSwitch2)
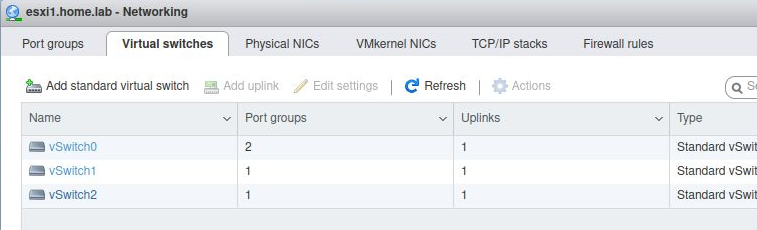
And additional Port Group names (admin141,user142)
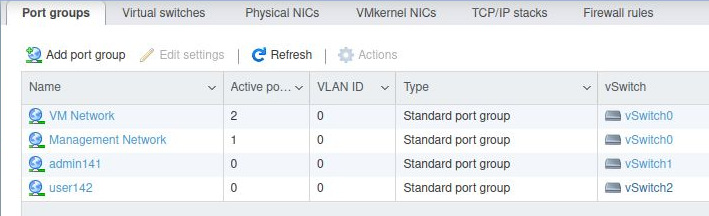
From the vCenter client (https://vcenter.home.lab, user=Administrator@vsphere.local), these same port group names (admin141,user142) will now be shown in the network list.
Testing vsphere networks (from host)
In a previous section we tested the KVM routed networks (esxmgmt140,admin141,user142) by using guests VMs running in the KVM hypervisor. They were all able to communicate freely and use DNS properly.
We should do the same type of test, but with guest VMs provisioned nested inside the nested vSphere hypervisor. One in each of the three vSphere networks below.
Create Ubuntu 20 Focal template needed for testing
But first we need an Ubuntu Focal 20 template, which I provide instructions for in this article. This takes about 30 minutes to put together, and when done you will have a vSphere template named “ubuntu-focal”.
Create guest VMs using template
With the ‘ubuntu-focal’ template now in place, you can build an Ubuntu VM in each network and run validations to be sure we have the same connectivity for VMs running inside the nested ESXi host.
cd $project_path/tf-test-routed-networks-vsphere

# create 3 VMs, one in each vsphere network
# named 'vsphere140', 'vsphere141', 'vsphere142'
make

# test that each can reach the others
# and that 'esxi1.home.lab' is dns resolvable
./run-tests.sh
Each one of these vms can reach each other as well as the outside world.
They can also reach their own dnsmasq instance at the .1 address of their network. However, they cannot reach the dnsmasq .1 of the other networks. So, if you want a common DNS for them, use the IP address of dnsmasq instance of the host.
Configuring GCP project (from seed)
From the host, copy the files needed to the seed VM.
cd $project_path/needed_on_seedvm
./copy_to_seedvm.sh
Then log in to the seed VM and setup the GCP project. If you select the project pulldown circled below, you can get the details on your project name and id.
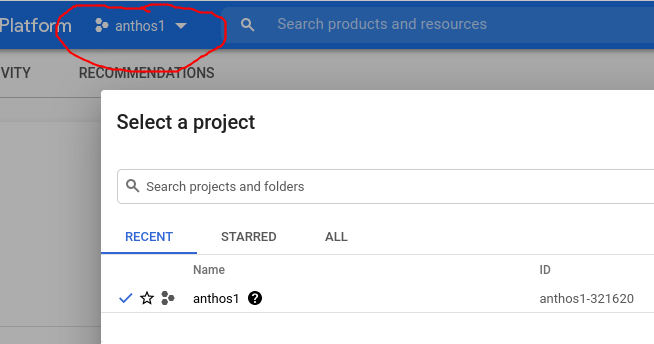
Use this project name to set a Bash variable per below and prepare your GCP project to register an Anthos on-prem cluster.
# ssh into seed vm
ssh -i $project_path/tf-kvm-seedvm/id_rsa ubuntu@192.168.140.220

# use your own GCP project name!
# based on the screenshot above this would be 'anthos1'
export project=anthos1

# do all of the below, OR just use these shell commands
# cd ~/seedvm
# source ./source-gcp-login.sh $project
# ./enable-gcp-services.sh


gcloud auth login

# get project id
projectId=$(gcloud projects list --filter="name=$project" --format='value(project_id)')

# set project
gcloud config set project $projectId


# enable GCP services required for Anthos on-prem
gcloud services enable \
anthos.googleapis.com \
anthosgke.googleapis.com \
cloudresourcemanager.googleapis.com \
container.googleapis.com \
gkeconnect.googleapis.com \
gkehub.googleapis.com \
serviceusage.googleapis.com \
stackdriver.googleapis.com \
monitoring.googleapis.com \
logging.googleapis.com

# was not asked for in 1.4 docs, but am having problems
# with image back-off pulling image
# during admin cluster creation so trying
gcloud services enable containerregistry.googleapis.com
GCP Service Account (from seed)
As described in the documentation, you must create a GCP service account referred to as the ‘Allowlisted‘ service account.
# do all of the commands below, OR just these shell commands
# cd ~/seedvm
# source ./source-gcp-login.sh $project
# create-anthos-allowlisted-sa.sh

# list current service accounts
gcloud iam service-accounts list

# create service account
newServiceAccount="anthos-allowlisted"
gcloud iam service-accounts create $newServiceAccount --display-name "anthos allowlisted" --project=$projectId

# wait for service account to be fully consistent
sleep 45
# get email address form
accountEmail=$(gcloud iam service-accounts list --project=$projectId --filter=$newServiceAccount --format="value(email)")

# download key
gcloud iam service-accounts keys create $newServiceAccount.json --iam-account $accountEmail

# path used in admin-ws-config.yml
realpath $newServiceAccount.json
This produced “anthos-allowlisted.json” which is a key that will be used to gain access to this account in the Anthos configuration files.
Set roles for this service account.
# do all of the commands below, OR just these shell commands
# cd ~/seedvm
# source ./source-gcp-login.sh $project
# set-roles-anthos-allowlisted-sa.sh

gcloud projects add-iam-policy-binding $projectId --member "serviceAccount:$accountEmail" --role "roles/serviceusage.serviceUsageViewer"

gcloud projects add-iam-policy-binding $projectId --member "serviceAccount:$accountEmail" --role "roles/iam.serviceAccountCreator"

gcloud projects add-iam-policy-binding $projectId --member "serviceAccount:$accountEmail" --role "roles/iam.roleViewer"

# was not asked for in 1.4 docs, but am having problems with back-off pulling image during admin cluster creation so trying
gcloud projects add-iam-policy-binding $projectId --member "serviceAccount:$accountEmail" --role "roles/storage.objectViewer"
There are 3 more service accounts neeed during the Anthos installation.
- connect-register service account (connect-register-sa.json)
- roles/gkehub.admin
- connect-agent service account (connect-agent-sa.json)
- roles/gkehub.connect
- logging-monitoring service account (log-mon-sa.json)
- roles/stackdriver.resourceMetadata.writer
- roles/logging.logWriter
- roles/monitoring.metricWriter
But we do not have to create them manually, because during the admin worktation creation, use the ‘–auto-create-service-accounts’ to have gkeadm create them.
GCP Current Context roles
The logged in GCP user must have these roles to auto create the other service accounts (which is needed by gkeadm).
# all commands below or
# seedvm/set-gcp-current-user-iam-roles.sh

gcpUser=$(gcloud config get-value account)

gcloud projects add-iam-policy-binding $projectId --member="user:${gcpUser}" --role="roles/resourcemanager.projectIamAdmin"

gcloud projects add-iam-policy-binding $projectId --member="user:${gcpUser}" --role="roles/serviceusage.serviceUsageAdmin"

gcloud projects add-iam-policy-binding $projectId --member="user:${gcpUser}" --role="roles/iam.serviceAccountCreator"

gcloud projects add-iam-policy-binding $projectId --member="user:${gcpUser}" --role="roles/iam.serviceAccountKeyAdmin"
Create and set vcenter role (from seed)
As described in the documentation, create an ‘anthos’ role and assign it to the ‘anthos’ vcenter service account created earlier.
cd
source ~/govc/source-govc-vars.sh

# show available resource pools
govc find / -type p

# create resource pools for admin and user clusters
govc pool.create */Resources/admin
govc pool.create */Resources/user

# show folders
govc find / -type f
# create vcenter folder for admin workstation
govc folder.create /mydc1/vm/admin-ws

# set roles for anthos service account in on-prem vcenter
seedvm/set-vcenter-roles-for-anthos.sh
Create admin workstation (from seed)
# copy down gkeadm utility
cd seedvm
gsutil cp gs://gke-on-prem-release-public/gkeadm/1.4.3-gke.3/linux/gkeadm ./
chmod +x gkeadm
Do not use gkeadm to ‘create config’, because we already copied a tailored ‘admin-ws-config.yaml‘ to the seed.
Get vcenter CA cert (from seed)
# all commands below, OR
# cd seedvm ; ./get-vcenter-ca.sh

# get vcenter certs
wget --no-check-certificate https://vcenter.home.lab/certs/download.zip
unzip download.zip
find certs

# smoke test cert to ensure validity
openssl x509 -in certs/lin/139b6ea5.0 -text -noout | grep Subject
# copy file to standardized name
cp certs/lin/139b6ea5.0 vcenter.ca.pem
Create Admin Workstation VM (from seed)
The Anthos admin and user cluster will not be deployed from this Seed VM. Instead, Anthos requires us to create a new VM called the “Admin Workstation”.
It is from this standardized “Admin Workstation” that we do the work of creating admin and user clusters. Below is the ‘gkeadm’ command that checks local and GCP prerequisites, and then uses the vCenter API to create the Admin Workstation.
# leave off flag if gcp serice accounts already created
$ ./gkeadm create admin-workstation --config admin-ws-config.yaml -v 5 --auto-create-service-accounts

Using config file "admin-ws-config.yaml"...
Running preflight validations...
- Validation Category: Tools
    - [SUCCESS] gcloud
    - [SUCCESS] ssh
    - [SUCCESS] ssh-keygen
    - [SUCCESS] scp

- Validation Category: Config Check
    - [SUCCESS] Config

- Validation Category: SSH Key
    - [SUCCESS] SSH key path

- Validation Category: Internet Access
    - [SUCCESS] Internet access to required domains

- Validation Category: GCP Access
    - [SUCCESS] Read access to GKE on-prem GCS bucket

- Validation Category: vCenter
    - [SUCCESS] Credentials
    - [SUCCESS] Version
    - [SUCCESS] Datacenter
    - [SUCCESS] Datastore
    - [SUCCESS] Resource Pool
    - [SUCCESS] Folder
    - [SUCCESS] Network
    - [SUCCESS] Datadisk

All validation results were SUCCESS.

Downloading OS image "gs://gke-on-prem-release/admin-appliance/1.4.3-gke.3/gke-on-prem-admin-appliance-vsphere-1.4.3-gke.3.ova"...
Verifying OS image gke-on-prem-admin-appliance-vsphere-1.4.3-gke.3.ova...  DONE
Setting up OS image as a VM template in vSphere...
[01-08-21 20:54:45] Uploading OS image "gke-on-prem-admin-appliance-vsphere-1.4.3-gke.3" to vSphere...OK
Creating admin workstation VM "gke-admin-ws-210801-174313"... /Generated SSH key "/home/ubuntu/.ssh/gke-admin-workstation" for the admin workstation
Creating admin workstation VM "gke-admin-ws-210801-174313"...  DONE
Waiting for admin workstation VM "gke-admin-ws-210801-174313" to be assigned an IP....  DONE

******************************************
Admin workstation VM successfully created:
- Name:    gke-admin-ws-210801-174313
- IP:      192.168.124.221
- SSH Key: /home/ubuntu/.ssh/gke-admin-workstation
******************************************

Printing gkectl and docker versions on admin workstation...
gkectl version
gkectl 1.4.3-gke.3 (git-699f4ef6f)

docker version
Client:
 Version:           19.03.2
 API version:       1.40
 Go version:        go1.12.9
 Git commit:        6a30dfca03
 Built:             Mon Sep 30 22:47:02 2019
 OS/Arch:           linux/amd64
 Experimental:      false

Server:
 Engine:
  Version:          19.03.2
  API version:      1.40 (minimum version 1.12)
  Go version:       go1.12.9
  Git commit:       6a30dfca03
  Built:            Mon Sep 30 22:42:07 2019
  OS/Arch:          linux/amd64
  Experimental:     false
 containerd:
  Version:          1.2.10-0ubuntu1~18.04.0.1
  GitCommit:
 runc:
  Version:          spec: 1.0.1-dev
  GitCommit:
 docker-init:
  Version:          0.18.0
  GitCommit:


Checking NTP server on admin workstation...
ntptime
ntp_gettime() returns code 0 (OK)
  time e4b189f6.b950dae4  Sun, Aug  1 2021 21:00:38.723, (.723890327),
  maximum error 22500 us, estimated error 0 us, TAI offset 0
ntp_adjtime() returns code 0 (OK)
  modes 0x0 (),
  offset 57.294 us, frequency 0.511 ppm, interval 1 s,
  maximum error 22500 us, estimated error 0 us,
  status 0x2001 (PLL,NANO),
  time constant 2, precision 0.001 us, tolerance 500 ppm,

Getting whitelisted service account...

Creating other service accounts and JSON key files...
    - connect-agent-sa-2108012100
    - connect-register-sa-2108012100
    - log-mon-sa-2108012100

Enabling APIs...
    - project anthos1 (for anthos-allowlisted)
        - serviceusage.googleapis.com
        - iam.googleapis.com
        - cloudresourcemanager.googleapis.com

Configuring IAM roles for service accounts...
    - anthos-allowlisted for project anthos1
        - roles/serviceusage.serviceUsageViewer
        - roles/iam.serviceAccountCreator
        - roles/iam.roleViewer
    - connect-agent-sa-2108012100 for project anthos1
        - roles/gkehub.connect
    - connect-register-sa-2108012100 for project anthos1
        - roles/gkehub.admin
        - roles/serviceusage.serviceUsageViewer
    - log-mon-sa-2108012100 for project anthos1
        - roles/stackdriver.resourceMetadata.writer
        - roles/logging.logWriter
        - roles/monitoring.metricWriter

Copying files to admin workstation...
    - /home/ubuntu/certs/lin/139b6ea5.0
    - /home/ubuntu/anthos-allowlisted.json
    - connect-agent-sa-2108012100.json
    - connect-register-sa-2108012100.json
    - log-mon-sa-2108012100.json


Preparing "admin-cluster.yaml" for gkectl...
Preparing "user-cluster.yaml" for gkectl...

********************************************************************
Admin workstation is ready to use.

Admin workstation information saved to /home/ubuntu/gke-admin-ws-210801-174313
This file is required for future upgrades
SSH into the admin workstation with the following command:
ssh -i /home/ubuntu/.ssh/gke-admin-workstation ubuntu@192.168.124.221
********************************************************************
If you examine the output, you can see the json files for the service accounts were copied directly over to the Admin Workstation.
...

Copying files to admin workstation...
- vcenter.ca.pem
- connect-register-sa-2108191919.json
- log-mon-sa-2108191919.json
- anthos-allowlisted.json
- connect-agent-sa-2108191919.json

...
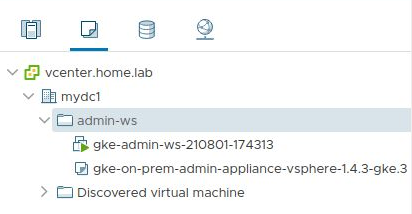
And if you look in vcenter, the ‘admin-ws’ folder now contains the vm ‘gke-admin-ws-xxxx-yyyyy’. And the vm template ‘gke-on-prem-admin-appliance-vsphere-x.y.z-gke.x’
Manually cat the private key of the admin workstation so we can use it from our host, and not just the seed vm.
# cat private key then exit seed vm
cat /home/ubuntu/.ssh/gke-admin-workstation

# exit ssh, go back to host
exit
Now from our host, paste the Admin Workstation private key so we can reach it directly (instead of needing to go through the seed VM).
# put adminws ssh key so we can ssh directly to admin ws
cd $project_path/needed_on_adminws
# paste in content manually
vi $project_path/needed_on_adminws/gke-admin-workstation
# stricter key permissions
chmod 400 gke-admin-workstation

# copy prepared files to admin workstation
./copy_to_adminws.sh
Login to Admin Workstation (from host)
Now that we have the adminws ssh private key available on our host, ssh directly to the Admin WS. The seed VM served its purpose, and we will not use it in this article again.
cd $project_path/needed_on_adminws

# login to admin ws
ssh -i $project_path/needed_on_adminws/gke-admin-workstation ubuntu@192.168.140.221

# standardize json key names, so they work with prepared files
mv connect-agent-sa-*.json connect-agent-sa.json
mv connect-register-sa-*.json connect-register-sa.json
mv log-mon-sa-*.json log-mon-sa.json


# look at file listing on admin ws
ls -l
You will find a listing that looks similiar to below, where many of the files were copied over from the seed VM.
- ‘admin-cluster.yaml’ for creating admin cluster
- ‘user-cluster.yaml’ for creating user cluster
- ‘vcenter-ca.pem’ vcenter CA cert
- ‘anthos-allowlisted.json’ anthos -allowlisted service account json
- ‘connect-agent-sa.json’ – long running connection from on-prem cluster to cloud console
- ‘connect-register-sa.json’ gcp service account key
- ‘log-mon-sa.json’ gcp service account key for stackdriver
Validate configuration files for Admin Cluster (from Admin WS)
# run config check
# takes 20+ minutes even in fast mode because initial bundle decompression
# use '--cleanup=false' if you want to troubleshoot the test VM
$ gkectl check-config --config admin-cluster.yaml -v 5


- Validation Category: Config Check
    - [SUCCESS] Config

- Validation Category: Internet Access
    - [SUCCESS] Internet access to required domains

- Validation Category: GCP
    - [SUCCESS] GCP Service
    - [SUCCESS] GCP Service Account

- Validation Category: Docker Registry Credential
    - [SUCCESS] docker registry access

- Validation Category: admin cluster vCenter
    - [SUCCESS] Credentials
    - [SUCCESS] Version
    - [SUCCESS] Datacenter
    - [SUCCESS] Datastore
    - [SUCCESS] Resource Pool
    - [SUCCESS] Folder
    - [SUCCESS] Network
    - [SUCCESS] Data Disk

- Validation Category: Bundled LB
    - [SUCCESS] Seesaw Validation

- Validation Category: Network Configuration
    - [SUCCESS] CIDR, VIP and static IP (availability and overlapping)

- Validation Category: DNS
    - [SUCCESS] DNS (availability)

- Validation Category: TOD
    - [SUCCESS] TOD (availability)

- Validation Category: VIPs
    - [SUCCESS] ping (availability)

- Validation Category: Node IPs
    - [SUCCESS] ping (availability)

Now running slow validation checks. Press ctrl-c twice to cancel. Use flag --fast to disable. Use flag --cleanup=false to keep the test VMs for debugging afterwards.

Using OS image OVA file: "/tmp/gke-on-prem-bundle-cache/770007/gke-on-prem-osimage-1.16.11-gke.11-20200910-f6d4bbbf68.ova"
Setting up OS image as a VM template in vSphere...
[02-08-21 11:05:35] Uploading OS image "gke-on-prem-osimage-1.16.11-gke.11-20200910-f6d4bbbf68" to vSphere...(0%, 768.0K
...
[02-08-21 11:08:31] Uploading OS image "gke-on-prem-osimage-1.16.11-gke.11-20200910-f6d4bbbf68" to vSphere...OK

Creating test VMs with admin cluster configuration...  DONE
Waiting to get IP addresses from test VMs...  DONE
Waiting for test VMs to become ready...  DONE

- Validation Category: Internet Access
    - [SUCCESS] Internet access to required domains

- Validation Category: vCenter on test VMs
    - [SUCCESS] Test VM: VCenter Access and Permission

- Validation Category: DNS on test VMs
    - [SUCCESS] Test VM: DNS Availability

- Validation Category: TOD on test VMs
    - [SUCCESS] Test VM: TOD Availability

- Validation Category: Docker Registry
    - [SUCCESS] docker registry access
    - [SUCCESS] gcr.io/gke-on-prem-release access

Deleting test VMs with admin cluster configuration...  DONE
All validation results were SUCCESS
The check-config can take a while (20 minutes), you can tail the logs from another session to monitor progress in more detail. During the processing you will see a temporary “check-config-static-xxx” vm created in vcenter.
# tail from another session to monitor progress of gkectl
# symlink 'gkectl.INFO' has the latest run
tail -f .config/gke-on-prem/logs/gkectl.INFO

# or tail remotely
ssh -i $project_path/needed_on_adminws/gke-admin-workstation ubuntu@192.168.140.221 "tail -f /home/ubuntu/.config/gke-on-prem/logs/gkectl.INFO"
Upload OS images (from Admin WS)
Prepares for the admin cluster install by doing prerequisite checks and uploading the seesaw ova images.
# takes about 10 minutes to upload OVA
$ gkectl prepare --config admin-cluster.yaml -v 5

Reading config with version "v1"
- Validation Category: Config Check
    - [SUCCESS] Config

- Validation Category: Internet Access
    - [SUCCESS] Internet access to required domains

- Validation Category: GCP
    - [SUCCESS] GCP Service
    - [SUCCESS] GCP Service Account

- Validation Category: GCR Credential
    - [SUCCESS] gcr.io/gke-on-prem-release access

- Validation Category: Docker Registry Credential
    - [SKIPPED] docker registry access: No Registry Config specified

- Validation Category: admin cluster vCenter
    - [SUCCESS] Credentials
    - [SUCCESS] Version
    - [SUCCESS] Datacenter
    - [SUCCESS] Datastore
    - [SUCCESS] Resource Pool
    - [SUCCESS] Folder
    - [SUCCESS] Network

Some validations were SKIPPED. Check the report above.
Logging in to gcr.io/gke-on-prem-release
Using OS image OVA file: "/tmp/gke-on-prem-bundle-cache/770007/gke-on-prem-osimage-1.16.11-gke.11-20200910-f6d4bbbf68.ova"
Setting up OS image as a VM template in vSphere...
[01-08-21 22:07:02] Uploading OS image "gke-on-prem-osimage-1.16.11-gke.11-20200910-f6d4bbbf68" to vSphere...(0%, 768.0B/s)

...
[01-08-21 22:09:45] Uploading OS image "gke-on-prem-osimage-1.16.11-gke.11-20200910-f6d4bbbf68" to vSphere...OK
Using OS image OVA file: "/tmp/gke-on-prem-bundle-cache/770007/seesaw-os-image-v1.4-20200910-f988ff757a.ova"
Setting up OS image as a VM template in vSphere...
[01-08-21 22:12:18] Uploading OS image "seesaw-os-image-v1.4-20200910-f988ff757a" to vSphere...OK
If you look in vcenter, two VM templates now exist:
- gke-on-prem-osimage-x.y.z-gke.xxxxxx
- seesaw-os-image-vx.y-xxxxxxxx
Create load balancer for admin cluster (from Admin WS)
# takes about 4 minutes
$ gkectl create loadbalancer --config admin-cluster.yaml -v 5

Reading config with version "v1"
- Validation Category: admin cluster vCenter
    - [SUCCESS] Credentials
    - [SUCCESS] Version
    - [SUCCESS] Datacenter
    - [SUCCESS] Datastore
    - [SUCCESS] Resource Pool
    - [SUCCESS] Folder
    - [SUCCESS] Network

- Validation Category: Bundled LB
    - [SUCCESS] Seesaw Validation

- Validation Category: Network Configuration
    - [SUCCESS] CIDR, VIP and static IP (availability and overlapping)

All validation results were SUCCESS.

Creating 1 LB VMs in group "seesaw-for-gke-admin"...  DONE
Saved Seesaw group information of "seesaw-for-gke-admin" to file: seesaw-for-gke-admin.yaml
Waiting LBs in group "seesaw-for-gke-admin" to become healthy...  DONE
A vm “seesaw-for-gke-admin-xxxxx-y” is created in vCenter. And the seesaw group file “seesaw-for-gke-admin.yaml” is generated that contains info and keys.
Create admin cluster (from Admin WS)
It is now time to create your Anthos Admin Cluster that will manage all the user clusters as well as serve as the control plane for all user clusters.
# takes about 35 minutes
$ gkectl create admin --config admin-cluster.yaml -v 5

Reading config with version "v1"
- Validation Category: Config Check
    - [SUCCESS] Config

- Validation Category: OS Images
    - [SUCCESS] Admin Cluster OS Image Exists

- Validation Category: Cluster Version
    - [SUCCESS] Cluster versions for creating admin cluster

- Validation Category: Reserved IPs
    - [SKIPPED] Admin cluster reserved IP for new user master: No AdminClusterApiClient

- Validation Category: Internet Access
    - [SUCCESS] Internet access to required domains

- Validation Category: GCP
    - [SUCCESS] GCP Service
    - [SUCCESS] GCP Service Account

- Validation Category: Docker Registry Credential
    - [SUCCESS] docker registry access

- Validation Category: admin cluster vCenter
    - [SUCCESS] Credentials
    - [SUCCESS] Version
    - [SUCCESS] Datacenter
    - [SUCCESS] Datastore
    - [SUCCESS] Resource Pool
    - [SUCCESS] Folder
    - [SUCCESS] Network
    - [SUCCESS] Data Disk

- Validation Category: Bundled LB
    - [SUCCESS] Seesaw Validation

- Validation Category: Network Configuration
    - [SUCCESS] CIDR, VIP and static IP (availability and overlapping)

- Validation Category: DNS
    - [SUCCESS] DNS (availability)

- Validation Category: TOD
    - [SUCCESS] TOD (availability)

- Validation Category: VIPs
    - [SUCCESS] ping (availability)

- Validation Category: Node IPs
    - [SUCCESS] ping (availability)

Some validations were SKIPPED. Check the report above.
DEBUG: docker/images.go:70] Pulling image: gcr.io/gke-on-prem-release/kindest/node:v0.6.1-gke.10-v1.16.11-gke.11 ...
 ✓ Ensuring node image (gcr.io/gke-on-prem-release/kindest/node:v0.6.1-gke.10-v1.16.11-gke.11) 🖼
 ✓ Preparing nodes 📦
 ✓ Writing configuration 📜
 ✓ Starting control-plane 🕹️
 ✓ Installing CNI 🔌
Could not read storage manifest, falling back on old k8s.io/host-path default ...
 ✓ Installing StorageClass 💾
 ✓ Waiting ≤ 5m0s for control-plane = Ready ⏳
 • Ready after 1m0s 💚
    Waiting for external cluster control plane to be healthy...  DONE
    Applying vSphere certificate configmap to external cluster...  DONE
    Applying vSphere credentials secret to external cluster...  DONE
    Creating data disk for internal cluster....  DONE
Applying admin bundle to external cluster...  DONE
    Waiting for cluster to be ready for external cluster...  DONE
Provisioning master vm for internal cluster via external cluster
    Creating cluster object  on external cluster...  DONE
    Creating master...  DONE
    Updating external cluster object with master endpoint...  DONE
Creating internal cluster
    Getting internal cluster kubeconfig...  DONE
    Waiting for internal cluster control plane to be healthy...  DONE
    Applying docker registry [gcr.io/gke-on-prem-release] credentials secret to internal cluster...  DONE
    Applying vSphere certificate configmap to internal cluster...  DONE
    Applying vSphere credentials secret to internal cluster...  DONE
    Applying Seesaw credentials secret to internal cluster...  DONE
    Checking Bundle requirements...  DONE
    Applying Bundle CRDs...  DONE
    Applying Bundle YAML...  DONE
    Applying admin base bundle to internal cluster...  DONE
    Pivoting Cluster API objects from external to internal cluster...  DONE
    Waiting for kube-apiserver VIP to be configured on the internal cluster...  DONE
Creating node Machines in internal cluster...  DONE
Applying admin addon bundle to internal cluster...  DONE
Waiting for admin cluster machines and pods to be ready... -Warning: Ignoring namespace regular expressions "gke-system,gke-connect.*,knative-serving", which do not match existing namespaces "default,kube-node-lease,kube-public,kube-system".

....

Waiting for admin cluster machines and pods to be ready...  DONE
Cleaning up external cluster...  DONE

Done provisioning Admin Control Plane cluster. You can access it with `kubectl --kubeconfig kubeconfig`
At the end, you will have these vms in vcenter:
- gke-admin-master-xxxx
- gke-admin-node-xxxx-yyy
- gke-admin-node-xxxx-zzz
And a file ‘kubeconfig’ in the directory. Try a kubectl command:
$ kubectl --kubeconfig kubeconfig get nodes

NAME          STATUS   ROLES    AGE   VERSION
admin-host1   Ready    master   18m   v1.16.11-gke.11
admin-host2   Ready       11m   v1.16.11-gke.11
admin-host3   Ready       11m   v1.16.11-gke.11

# do same but shows IP addresses
$ kubectl --kubeconfig kubeconfig get nodes -o wide
NAME          STATUS   ROLES    AGE   VERSION           INTERNAL-IP       EXTERNAL-IP       OS-IMAGE             KERNEL-VERSION     CONTAINER-RUNTIME
admin-host1   Ready    master   35m   v1.16.11-gke.11   192.168.141.222   192.168.141.222   Ubuntu 18.04.5 LTS   5.3.0-67-generic   docker://19.3.2
admin-host2   Ready       28m   v1.16.11-gke.11   192.168.141.223   192.168.141.223   Ubuntu 18.04.5 LTS   5.3.0-67-generic   docker://19.3.2
admin-host3   Ready       28m   v1.16.11-gke.11   192.168.141.224   192.168.141.224   Ubuntu 18.04.5 LTS   5.3.0-67-generic   docker://19.3.2
Notice the IP addresses in the wide listing are the IP from the admin-hostconfig.yaml.
Now ssh into a master node. Use kubectl to get the secret and decode it.
# create key
kubectl --kubeconfig kubeconfig get secrets -n kube-system sshkeys -o jsonpath='{.data.vsphere_tmp}' | base64 -d > ~/.ssh/admin-cluster.key && chmod 600 ~/.ssh/admin-cluster.key

# get list of docker images on master node
ssh -i ~/.ssh/admin-cluster.key 192.168.141.222 "sudo docker images; hostname"
To ssh into the admin seesaw LB [1]
# seesaw for admin cluster
kubectl --kubeconfig kubeconfig get -n  kube-system secret seesaw-ssh -o jsonpath='{@.data.seesaw_ssh}' | base64 -d | base64 -d > /tmp/admin-seesaw-ssh-key
chmod 400 /tmp/admin-seesaw-ssh-key

# use IP from admin-seesaw-hostconfig.yaml
ssh -i /tmp/admin-seesaw-ssh-key ubuntu@192.168.141.251 "netstat -tulnp"
Check config file for User Cluster
With the Admin Cluster now built, it is time to switch over to the User Cluster build.
This will use the prepared files: user-cluster.yaml, user-hostconfig.yaml, user-seesaw-hostconfig.yaml
NOTE: the loadBalancer.vips.controlPlaneVIP in user-cluster.yaml sits in the admin141 network and is where the kubeapi for the User Cluster is exposed. All other IP addresses related to User Cluster are in the user142 network.
# takes about 7 minutes
$ gkectl check-config --kubeconfig ./kubeconfig --config user-cluster.yaml -v 5

- Validation Category: Config Check
    - [SUCCESS] Config

- Validation Category: Internet Access
    - [SUCCESS] Internet access to required domains

- Validation Category: GCP
    - [SUCCESS] GCP Service
    - [SUCCESS] GCP Service Account

- Validation Category: GKEHub
    - [SUCCESS] GKEHub New Membership

- Validation Category: Docker Registry Credential
    - [SUCCESS] docker registry access

- Validation Category: user cluster vCenter
    - [SUCCESS] Credentials
    - [SUCCESS] Version
    - [SUCCESS] Datacenter
    - [SUCCESS] Datastore
    - [SUCCESS] Resource Pool
    - [SUCCESS] Folder
    - [SUCCESS] Network
    - [SUCCESS] Datastore

- Validation Category: Bundled LB
    - [SUCCESS] Seesaw Validation

- Validation Category: Network Configuration
    - [SUCCESS] CIDR, VIP and static IP (availability and overlapping)

- Validation Category: DNS
    - [SUCCESS] DNS (availability)

- Validation Category: TOD
    - [SUCCESS] TOD (availability)

- Validation Category: VIPs
    - [SUCCESS] ping (availability)

- Validation Category: Node IPs
    - [SUCCESS] ping (availability)

Now running slow validation checks. Press ctrl-c twice to cancel. Use flag --fast to disable. Use flag --cleanup=false to keep the test VMs for debugging afterwards.

Creating test VMs with user cluster configuration...  DONE
Waiting to get IP addresses from test VMs...  DONE
Waiting for test VMs to become ready...  DONE

- Validation Category: Internet Access
    - [SUCCESS] Internet access to required domains

- Validation Category: vCenter on test VMs
    - [SUCCESS] Test VM: VCenter Access and Permission

- Validation Category: DNS on test VMs
    - [SUCCESS] Test VM: DNS Availability

- Validation Category: TOD on test VMs
    - [SUCCESS] Test VM: TOD Availability

- Validation Category: Docker Registry
    - [SUCCESS] docker registry access

Deleting test VMs with user cluster configuration...  DONE
All validation results were SUCCESS.
Create seesaw LB for User Cluster
# takes about 4 minutes
$ gkectl create loadbalancer --kubeconfig ./kubeconfig --config user-cluster.yaml -v 5

Reading config with version "v1"
- Validation Category: user cluster vCenter
    - [SUCCESS] Credentials
    - [SUCCESS] Version
    - [SUCCESS] Datacenter
    - [SUCCESS] Datastore
    - [SUCCESS] Resource Pool
    - [SUCCESS] Folder
    - [SUCCESS] Network
    - [SUCCESS] Datastore

- Validation Category: Bundled LB
    - [SUCCESS] Seesaw Validation

- Validation Category: Network Configuration
    - [SUCCESS] CIDR, VIP and static IP (availability and overlapping)

All validation results were SUCCESS.

Creating 1 LB VMs in group "seesaw-for-user1"...  DONE
Saved Seesaw group information of "seesaw-for-user1" to file: seesaw-for-user1.yaml
Waiting LBs in group "seesaw-for-user1" to become healthy...  DONE
A vm “seesaw-for-user1-xxxxx-y” is created in vCenter. And the seesaw group file “seesaw-for-user1.yaml” is generated that contains info and keys.
Create User Cluster
# takes about 35 minutes
$ gkectl create cluster --kubeconfig ./kubeconfig --config user-cluster.yaml -v 5

Reading config with version "v1"
- Validation Category: Config Check
    - [SUCCESS] Config

- Validation Category: OS Images
    - [SUCCESS] User Cluster OS Image Exists

- Validation Category: Cluster Version
    - [SUCCESS] Cluster versions for creating user cluster

- Validation Category: Reserved IPs
    - [SUCCESS] Admin cluster reserved IP for new user master

- Validation Category: Internet Access
    - [SUCCESS] Internet access to required domains

- Validation Category: GCP
    - [SUCCESS] GCP Service
    - [SUCCESS] GCP Service Account

- Validation Category: GKEHub
    - [SUCCESS] GKEHub New Membership

- Validation Category: Docker Registry Credential
    - [SUCCESS] docker registry access

- Validation Category: user cluster vCenter
    - [SUCCESS] Credentials
    - [SUCCESS] Version
    - [SUCCESS] Datacenter
    - [SUCCESS] Datastore
    - [SUCCESS] Resource Pool
    - [SUCCESS] Folder
    - [SUCCESS] Network
    - [SUCCESS] Datastore

- Validation Category: Bundled LB
    - [SUCCESS] Seesaw Validation

- Validation Category: Network Configuration
    - [SUCCESS] CIDR, VIP and static IP (availability and overlapping)

- Validation Category: DNS
    - [SUCCESS] DNS (availability)

- Validation Category: TOD
    - [SUCCESS] TOD (availability)

- Validation Category: VIPs
    - [SUCCESS] ping (availability)

- Validation Category: Node IPs
    - [SUCCESS] ping (availability)

All validation results were SUCCESS.
    Applying vSphere certificate configmap to user cluster...  DONE
    Applying SSH tunnel secret to user cluster...  DONE
Creating user cluster object...  DONE
Creating user cluster's control plane machine deployments...  DONE
    Getting user cluster kubeconfig and saving to user1-kubeconfig...  DONE
Waiting for user cluster object in admin cluster to be healthy... \

...

user1: ReconcileFailed: failed to apply bundle addon objects from client-config v1.4.3-gke.3 to cluster user1: no maWaiting for user cluster object in admin cluster to be healthy... -

...

Waiting for user cluster object in admin cluster to be healthy... -
    user1: ReconcileFailed: failed to apply bundle addon objects from monitoring-operator-addon v1.4.3-gke.3 to cluster

...

  user1: ReconcileFailed: failed to apply bundle addon objects from metrics-server-operator-addon v1.4.3-gke.3 to clusWaiting for user cluster object in admin cluster to be healthy... \
...

    user1: ReconcileFailed: failed to apply bundle addon objects from stackdriver-operator-addon v1.4.3-gke.3 to clusterWaiting for user cluster object in admin cluster to be healthy...  DONE

    user1: ReconcileFailed: failed to apply bundle addon objects from stackdriver-operator-addon v1.4.3-gke.3 to cluster user1: no matches for kind "Stackdriver" in version "addons.sigs.k8s.io/v1alpha1"
    Logs from clusterapi-controller-manager container in clusterapi-controllers deployment has more info on cluster erro    Waiting for user cluster control plane to be healthy...  DONE
Waiting for user cluster control plane to be accessible...  DONE
    Applying proxy config secret to user cluster...  DONE
    Applying docker registry [gcr.io/gke-on-prem-release] credentials secret to user cluster...  DONE
    Applying Seesaw credentials secret to user cluster...  DONE
    Waiting for Cluster API within user cluster to be ready...  DONE
    Wait for Cluster API Endpoint to be populated within the user cluster...  DONE
Creating node MachineDeployment(s) in user cluster...  DONE

...

Waiting for user cluster machines and pods to be ready... /Warning: Ignoring namespace regular expressions "gke-connect.*,knative-serving", which do not match existing namespaces "config-management-system,default,gke-system,kube-node-lease,kube-public,kube-system".
Waiting for user cluster machines and pods to be ready...  DONE


Done provisioning user cluster user1. You can access it with `kubectl --kubeconfig user1-kubeconfig`
You will see 3 new VMS representing the User Cluster worker nodes: “pool-1-xxx.yyy” and one additional VM on the Admin Cluster which is the control plane for the user1 cluster: “user1-x-yyyy”
And a new file ‘user1-kubeconfig’, which can be used to reach the User Cluster with kubectl.
# export user cluster kubeconfig
$ export KUBECONFIG=$(realpath user1-kubeconfig)

$ kubectl --kubeconfig user1-kubeconfig get nodes

NAME         STATUS   ROLES    AGE     VERSION
user-host1   Ready       5h47m   v1.16.11-gke.11
user-host2   Ready       5h47m   v1.16.11-gke.11
user-host3   Ready       5h47m   v1.16.11-gke.11

$ kubectl --kubeconfig user1-kubeconfig get nodes -o wide

NAME         STATUS   ROLES    AGE   VERSION           INTERNAL-IP       EXTERNAL-IP       OS-IMAGE             KERNEL-VERSION     CONTAINER-RUNTIME
user-host1   Ready       45m   v1.16.11-gke.11   192.168.142.230   192.168.142.230   Ubuntu 18.04.5 LTS   5.3.0-67-generic   docker://19.3.2
user-host2   Ready       45m   v1.16.11-gke.11   192.168.142.231   192.168.142.231   Ubuntu 18.04.5 LTS   5.3.0-67-generic   docker://19.3.2
user-host3   Ready       45m   v1.16.11-gke.11   192.168.142.232   192.168.142.232   Ubuntu 18.04.5 LTS   5.3.0-67-generic   docker://19.3.2
The IP addresses match the range from user-hostconfig.yaml.
Now ssh into a user node. Use kubectl to get the secret and decode it.
# create key for user cluster
kubectl --kubeconfig kubeconfig get secrets -n user1 ssh-keys -o jsonpath='{.data.ssh\.key}' | base64 -d > ~/.ssh/user1.key && chmod 600 ~/.ssh/user1.key

# get list of docker images on user1 worker node
ssh -i ~/.ssh/user1.key 192.168.142.230 "sudo docker images; hostname"
To ssh into the user cluster seesaw LB [1]
# seesaw for user cluster
kubectl --kubeconfig user1-kubeconfig get -n  kube-system secret seesaw-ssh -o jsonpath='{@.data.seesaw_ssh}' | base64 -d | base64 -d > /tmp/user-seesaw-ssh-key
chmod 400 /tmp/user-seesaw-ssh-key

# use IP from user-seesaw-hostconfig.yaml
ssh -i /tmp/user-seesaw-ssh-key ubuntu@192.168.142.248 "netstat -tulnp"
Register cluster with GCP
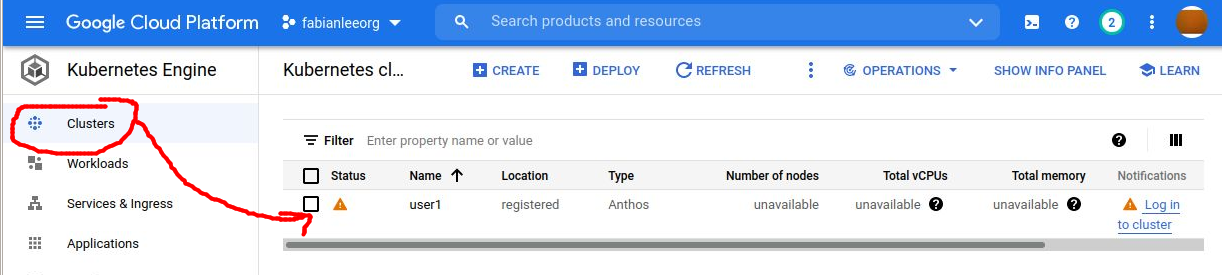
Now that the cluster is created and registered with GCP, you should go into the web console, console.cloud.google.com and establish a login context so you have visibility into cluster health and details.
Click on the hamburger menu > Kubernetes Engine > Clusters. And click into the ‘users1’ cluster just created.
If you press “Login”, it is going to prompt you to authenticate with a list of several methods. While you could use your personal Google identity, this is not an ideal solution and you should use a token which is not tied to your personal identity.
Generating a token (from Admin Workstation)
This procedure is documented on the official page here. From the Admin Workstation:
$ cd ~k8s

# run all commands below OR ./register-user-cluster-with-gcp.sh

# verify that gke connect agent is running
# this is using 'connect-agent-sa-xxx.json' service account
$ kubectl get pods -n gke-connect

NAME                                               READY   STATUS    RESTARTS   AGE
gke-connect-agent-20200625-11-00-b5c6f474b-6j2nz   1/1     Running   2          8h

# create the 'cloud-console-reader' Kubernetes role
$ kubectl apply -f cloud-console-reader.yaml
clusterrole.rbac.authorization.k8s.io/cloud-console-reader created

# create the Kubernetes service account (KSA).
$ KSA_NAME=remote-cloud-console-reader
$ kubectl create serviceaccount ${KSA_NAME}
serviceaccount/remote-cloud-console-reader created

# create bindings
$ kubectl create clusterrolebinding VIEW_BINDING_NAME --clusterrole view --serviceaccount default:${KSA_NAME}

clusterrolebinding.rbac.authorization.k8s.io/VIEW_BINDING_NAME created


$ kubectl create clusterrolebinding CLOUD_CONSOLE_READER_BINDING_NAME  --clusterrole cloud-console-reader --serviceaccount default:${KSA_NAME}


clusterrolebinding.rbac.authorization.k8s.io/CLOUD_CONSOLE_READER_BINDING_NAME created

# get bearer token that can be used in the console for login
$ SECRET_NAME=$(kubectl get serviceaccount $KSA_NAME -o jsonpath='{$.secrets[0].name}')

# get decoded token
$ kubectl get secret ${SECRET_NAME} -o jsonpath='{$.data.token}' | base64 --decode
This decoded token is the value you should use after you press “Login” at the web console and authenticate with a token type. Once done, it will take you to a screen showing the cluster details like below.

Validate User Cluster service (from admin workstation)
Per the documentation here we will create a deployment of the Hello application. And then create a service which will expose it via the User Cluster seesaw load balancer.
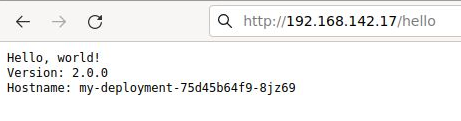
$ cd ~/k8s

# create deployment and pods
$ kubectl apply -f my-deployment.yaml
deployment.apps/my-deployment created

# view status of deployment
$ kubectl get deployment my-deployment

NAME            READY   UP-TO-DATE   AVAILABLE   AGE
my-deployment   3/3     3            3           20s

# view status of pods
$ kubectl get pods
NAME                             READY   STATUS    RESTARTS   AGE
my-deployment-75d45b64f9-pv47g   1/1     Running   0          28s
my-deployment-75d45b64f9-q7jrg   1/1     Running   0          28s
my-deployment-75d45b64f9-sgdjn   1/1     Running   0          28s

# existing set of services
$ kubectl get services
NAME         TYPE        CLUSTER-IP    EXTERNAL-IP   PORT(S)   AGE
kubernetes   ClusterIP   10.96.233.1           443/TCP   13h


# create a service for our deployment
# loadBalancerIP set to '192.168.142.17'
$ kubectl apply -f my-service.yaml
service/my-service created

# view service and external IP
$ kubectl get services

NAME         TYPE           CLUSTER-IP     EXTERNAL-IP      PORT(S)        AGE
kubernetes   ClusterIP      10.96.233.1               443/TCP        13h
my-service   LoadBalancer   10.96.233.96   192.168.142.17   80:32693/TCP   5s

# do HTTP request against service IP
$ curl -k http://192.168.142.17:80/hello
Hello, world!
Version: 2.0.0
Hostname: my-deployment-75d45b64f9-sgdjn
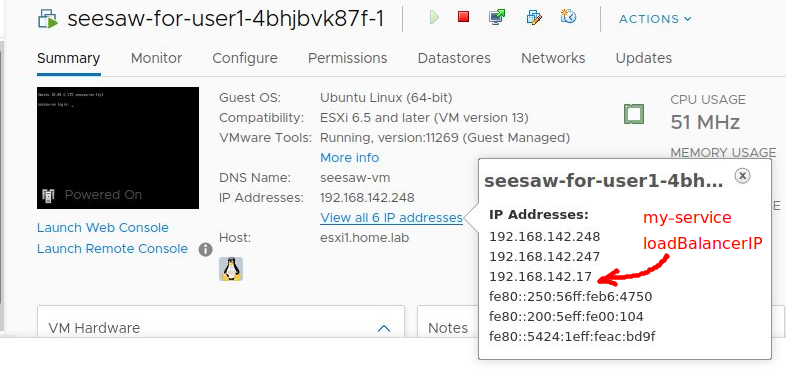
You can also see this new 192.168.142.17 VIP on the user cluster seesaw LB.
Which also makes it available from the host browser at http://192.168.142.17/hello
Validate Istio Ingress
The standard Anthos installer by default puts a small Istio ingress gateway into the ‘gke-system’ namespace. We can use this to test exposing a deployment via a VIP on the seesaw LB.
Using the basic instructions here, create an Istio Ingress Gateway named ‘istio-autogenerated-k8s-ingress’. This name is required for the Istio install that comes with the out-of-the-box Anthos cluster.
# go into generic istio subfolder
cd ~/k8s/istio

# create cert and key for 'CN=anthos.home.lab'
./make-self-signed-cert.sh

# create our own service 'my-istio-service'
# but pointing at same deployment
kubectl apply -f my-service-for-istio.yaml


# go into OOTB (out-of-the-box) istio folder
cd ~/k8s/istio-ootb

# create istio tls secret in gke-system namespace
kubectl create -n gke-system secret tls ingressgateway-wildcard-certs --key=../istio/anthos.home.lab.key --cert=../istio/anthos.home.lab.pem


# create istio Gateaway that conforms to naming requirement
# has listener on port 80
# and port 443 doing TLS with secret created above
kubectl apply -f istio-autogenerated-k8s-ingress.yaml


# create a virtualservice that points at 'my-istio-service'
# note that gateway must use 'gke-system/' prefix
kubectl apply -f my-istio-virtualservice.yaml
Now that the necessary objects have been created, let’s examine them.
# list services in default namespace
# notice 'my-istio-service' just created does not have an external IP
$ kubectl get services

NAME               TYPE           CLUSTER-IP     EXTERNAL-IP      PORT(S)        AGE
kubernetes         ClusterIP      10.96.233.1               443/TCP        3h52m
my-istio-service   ClusterIP      10.96.233.30              80/TCP         62m
my-service         LoadBalancer   10.96.233.96   192.168.142.17   80:32379/TCP   68m

# list services in gke-system namespace
# however, the 'istio-ingress' does have an externalIP
# and this corresponds to a VIP on the user cluster seesaw
$ kubectl get services -n gke-system

NAME            TYPE           CLUSTER-IP      EXTERNAL-IP       PORT(S)                                 AGE
istio-ingress   LoadBalancer   10.96.233.185   192.168.142.253   80:31617/TCP,443:32139/TCP              3h51m
istio-pilot     ClusterIP      10.96.233.112               15010/TCP,15011/TCP,8080/TCP,9093/TCP   3h51m

# using curl with HTTP, we can pull directly by IP
$ curl http://192.168.142.253/istio

Hello, world!
Version: 2.0.0
Hostname: my-deployment-75d45b64f9-x8z5n


# KVM host has "anthos.home.lab" in dnsmasq, setup earlier

# validate cert at the istio ingress endpoint
echo | openssl s_client -showcerts -servername anthos.home.lab -connect 192.168.142.253:443

# pull using TLS
$ curl -k https://anthos.home.lab/istio/

Hello, world!
Version: 2.0.0
Hostname: my-deployment-75d45b64f9-x8z5n

# or you can use '--resolve' if you do not want a local hosts entry
$ curl -k --resolve anthos.home.lab:443:192.168.142.253 https://anthos.home.lab:443/istio
VIP exposed by seesaw
The number of references to the seesaw loadbalancers in ‘admin-cluster.yaml’, ‘admin-seesaw-hostconfig.yaml’, ‘user-cluster.yaml’, and ‘user-seesaw-hostconfig.yaml’ can be confusing. But if you start by looking at the seesaw IPs from vCenter and work backwards, it makes more sense.
Below are the IP addresses on the seesaw-for-gke-admin VM.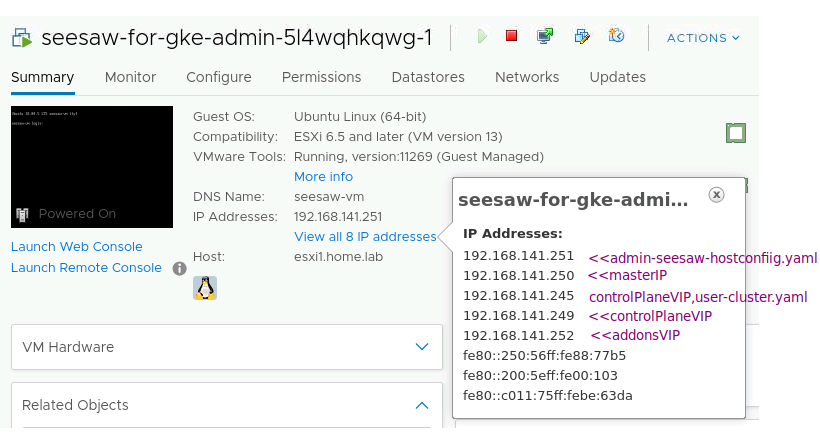
- 192.168.141.251 – static block of IP, open to ssh (admin-seesaw-hostconfig.yaml)
- 192.168.141.250 – ‘masterIP’ advertised IP (admin-cluster.yaml)
- 192.168.141.245 – user cluster ‘controlPlaneVIP’ kubectl endpoint (user-cluster.yaml)
- controlPlaneVIP – admin cluster ‘controlPlaneVIP’ kubectl endpoint (admin-cluster.yaml)
- addonsVIP – used for multi-cluster features (admin-cluster.yaml)
Adding new user clusters would add new ConrolPlaneVIP kubectl endpoints.
Below are the IP addresses on the seesaw-for-user1 VM.
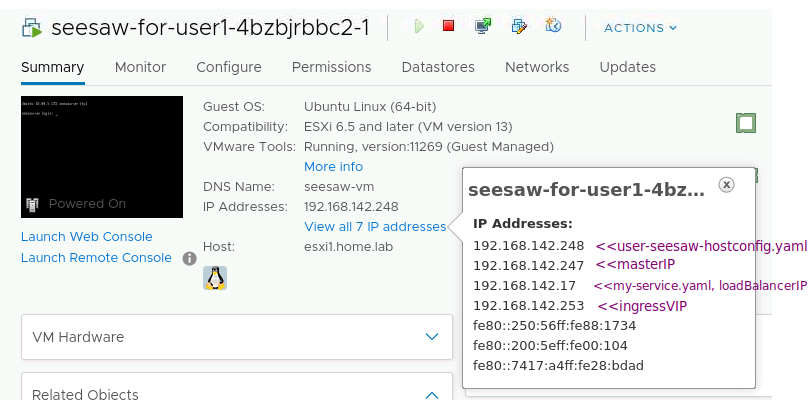
- 192.168.142.248 – static block of IP, open to ssh (user-seesaw-hostconfig.yaml)
- 192.168.142.247 – ‘masterIP’ advertised IP (user-cluster.yaml)
- 192.168.142.17 – ‘loadBalancerIP’ from custom Service (my-service.yaml)
- 192.168.142.253 – ‘ingressVIP’ LB ingress, where istio ingress gateway is exposed (user-cluster.yaml)
REFERENCES
Anthos, 1.4 on-prem documentation
Anthos, 1.7 on-prem documentation
Anthos, F5 installation and configuration
Anthos, seesaw fields explained
F5, F5 CIS (container ingress service) compatability with F5 versions
netapp docs, step-by-step deploying anthos admin and user cluster with F5 LB and Trident
rotelok.com, enabling KSM on Ubuntu
github fabianlee, link to diagrams in this blog post (edit on diagrams.net)
NOTES
If you need to delete the Admin workstation
delete the VM from vcenter, “gke-admin-ws-xxx-yy”
If in admin-ws-config.yaml, the ‘dataDiskName’ is prefixed with a folder path, then you need to manually recreate the “daastore1/<folder>” vcenter datastore folder.
# delete current ssh keys
rm ~/.ssh/gke-admin-workstation*

# clear known fingerprint
ssh-keygen -f ~/.ssh/known_hosts -R <AdminWS-IPAddress>
# or clear known_hosts completely
# truncate -s 0 ~/.ssh/known_hosts
And if you recreate the admin ws with ‘gkeadm create’, do not use the flag ( –auto-create-service-accounts) to create service accounts because they are already there.
If you need to delete an admin cluster for 1.4 [1]
The 1.4 instructions for cluster deletion, are basically to clean out the objects in the cluster, then delete the vms from vcenter. That would mean you would just delete the seesaw from vcenter the same way.
But if you want to allow gkectl to delete the admin seesaw VM, then do the below first.
# copy seesaw store file
cp admin-cluster.yaml admin-cluster.yaml.old
cp seesaw-for-gke-admin.yaml seesaw-for-gke-admin.yaml.bak

gkectl delete loadbalancer --config admin-cluster.yaml --seesaw-group-file seesaw-for-gke-admin.yaml
Then follow instructions in 1.4 docs, then delete the “dataDisk” referenced from admin-cluster.yaml which is on the vcenter datastore. Which in our case is “datstore1/admin-disk/vmdk”
If you need to delete a user cluster [1]
cp seesaw-for-user1.yaml seesaw-for-user1.yaml.old
cp user-cluster.yaml user-cluster.yaml.old

# delete the LB first in 1.4
# if you delete the user cluster first, this fails
gkectl delete loadbalancer --config user-cluster.yaml --seesaw-group-file seesaw-for-user1.yaml --kubeconfig user1-kubeconfig

# then delete the user cluster
# add '--force' if necessary
gkectl delete cluster --kubeconfig [ADMIN_CLUSTER_KUBECONFIG=kubeconfig] --cluster user1
If you recreate this exact cluster, use the ‘–fast’ and –skip-validation-load-balancer’ on check-config to avoid errors.
If your user cluster is only partially created, you will have to delete the hub membership either in the web console or cli
gcloud container hub memberships unregister user1
If you need to delete the seesaw load balancer [1,2]
# for admin
gkectl delete loadbalancer --config admin-cluster.yaml --seesaw-group-file seesaw-for-gke-admin.yaml

# for user
gkectl delete loadbalancer --config user-cluster.yaml --seesaw-group-file seesaw-for-user1.yaml

# move old seesaw store file
mv seesaw-for-gke-admin.yaml seesaw-for-gke-admin.yaml.bak
For gkectl <=1.4, if you need to force a deletion of the user seesaw LB
# for gkectl with version <=1.4, see docs for vsphere.yaml fields
# beware this deletes 'seesaw-for-user1.yaml'
cp seesaw-for-user1.yaml seesaw-for-user1.yaml.old

gkectl delete loadbalancer --config vsphere.yaml --seesaw-group-file seesaw-for-user1.yaml
govc to find available entities
# res pools, fodlers, datastores
govc find / -type p
govc find / -type f
govc find / -type s
Delete Istio components
Out-of-the-box, the Anthos installer puts a small istio deployment into the ‘gke-system’ namespace. Let’s delete this so we can use the full-fledged Istio operator in later sections.
The order below is important. We have to delete the horizontal pod autoscalers before the deployments.
# run all the commands below OR ./delete-istio-ootb-components.sh
#
# show istio components
$ kubectl get all -n gke-system

# show horizontal pod autoscalers
$ kubectl get hpa -n gke-system

# delete hpa
$ kubectl delete hpa/istio-ingress-hpa -n gke-system
$ kubectl delete hpa/istio-pilot-hpa -n gke-system

# show pod disruption budgets
$ kubectl get pdb -n gke-system

# delete pdb
$ kubectl delete pdb/istio-ingress -n gke-system
$ kubectl delete pdb/istio-pilor -n gke-system
# delete deployments
$ kubectl delete deployment/istio-pilot -n gke-system
$ kubectl delete deployment/istio-ingress -n gke-system

# delete services
$ kubectl delete service/istio-pilot -n gke-system
$ kubectl delete service/istio-ingress -n gke-system

# show components now
$ kubectl get all -n gke-system
Then delete the istio service accounts and secrets from the gke-system namespace.
# show secrets
$ kubectl get secrets -n gke-system
# show service account which use secrets
$ kubectl get sa -n gke-system

# delete service accounts
$ kubectl delete sa/istio-ingressgateway-service-account -n gke-system
$ kubectl delete sa/istio-pilot-service-account -n gke-system

# now delete all secrets starting with 'istio'
$ for name in $(kubectl get secrets -n gke-system -o=jsonpath="{.items[*].metadata.name}"); do [[ $name != istio* ]] || kubectl delete secret/$name -n gke-system; done

# show secrets
$ kubectl get secrets -n gke-system
Finally, delete the namespace.
$ kubectl delete ns gke-system
namespace "gke-system" deleted
If you have issues with the namespace not deleting, you may have to empty the finalizers array.
Installing full operator Istio (not the ootb)
Be sure to create admin cluster role first as described.
If esxi hangs on esxi “nfs41client loaded” then goes to paused state
check for disk full on KVM host pool location
check cqow2 sparse disk size when VM is powered on
sudo qemu-img info seedvm.qcow2 --force-share