Managing ![]() certificates is one of the most mundane, yet critical chores in the maintenance of environments. However, this manual maintenance can be off-loaded to cert-manager on Kubernetes.
certificates is one of the most mundane, yet critical chores in the maintenance of environments. However, this manual maintenance can be off-loaded to cert-manager on Kubernetes.
In this article, we will use cert-manager to generate TLS certs for a public NGINX ingress using Let’s Encrypt. The primary ingress will have two different hosts using the HTTP solver. The secondary ingress will have a wildcard certificate issued by the DNS solver.

Overview
When an NGINX ingress is first stood up, it can serve TLS communication, but the auto-generated certificate will be “CN=Kubernetes Ingress Controller Fake Certificate”.
We could manually address this by generating our own TLS secret with the proper key and certificate name and modifying the ingress. But even better would be having some entity periodically and automatically generate the certificate based on a high level of trust that we were the owners of the certificate domain.
This is where cert-manager can assist us. As long as we can prove we own the domain, it will provide us with a secure certificate that can be used for public traffic. Proving we own the domain can be done one of two ways:
- HTTP solver – if we can publish an HTML page with a specific ID at an specific domain URL, then we have proved we own the domain
- DNS solver – if we can insert a TXT record containing a specific ID into the public DNS record, that proves we own the domain
In this article we will install and configure cert-manager on our Kubernetes cluster so that it can solve both of these challenges. There will be a:
- primary NGINX ingress where we use the http01 solver to generate a cert with SAN names for two hostnames
- secondary NGINX ingress where we use the dns01 solver to generate a wildcard cert
Prerequisites
As a prerequisite to this article, you should have followed the steps of my previous article on Kubernetes on DigitalOcean.
The previous article setup the proper environment vars, CLI tools, kubeconfig, DigitalOcean Kubernetes cluster, and DigitalOcean LoadBalancer.
As a test of the prerequisites, go into the local directory where you already cloned the docean-k8s-ingress git repository, and run the following commands.
# go into git repo directory from first article
cd docean-k8s-ingress
BASEPATH=$(realpath .)

# validate DigitalOcean login is established
doctl account get

# list K8S clusters
doctl kubernetes cluster list

# list nodes of K8S cluster
export KUBECONFIG=$BASEPATH/kubeconfig
kubectl get nodes

# public load balancer IP where ingress is exposed
EXTIP_PRIMARY=$(kubectl get svc ingress-nginx-controller -n default -o 'jsonpath={ .status.loadBalancer.ingress[0].ip }')

# test secure https pull at public loadbalancer for first service
# this FQDN is currently in the local /etc/hosts
fqdn=first.fabianlee-lab.online
curl -kv https://$fqdn 2>&1 | grep -E "subject:|hello"
Root DNS settings
Clearly, your domain names will be different than the one I use in this article, so adjust accordingly.
I own and control the domain “fabianlee-lab.online”, so I have modified my root level DNS settings as follows:
| DNS entry | entry type | answer |
| first.fabianlee-lab.online | A | <EXTIP_PRIMARY> |
| second.fabianlee-lab.online | A | <EXTIP_PRIMARY> |
| do.fabianlee-lab.online | NS | ns1.digitalocean.com ns2.digitalocean.com ns3.digitalocean.com |
Your root domain can be acquired at any of the commercial DNS providers. The settings above point the ‘first’ and ‘second’ subdomain names to the IP address of the DigitalOcean public loadbalancer that exposes our primary NGINX ingress.
The NS entries for the ‘do’ subdomain mean that we are delegating control of the entire subdomain to DigitalOcean nameservers. We will configure the subdomain later in this article.
Validate public DNS
Do not move forward until these public entries propagate to the public internet. Here are the commands to validate.
echo "the public loadbalancer is at $EXTIP_PRIMARY"

# should both resolve to public lb
nslookup first.fabianlee-lab.online
nslookup second.fabianlee-lab.online

# remove any local hosts entries
grep fabianlee-lab /etc/hosts
Now that we have public DNS resolution, be sure to remove the manual entries from /etc/hosts that we inserted earlier. They are no longer necessary.
As a final validation before getting real TLS certs from Let’s Encrypt, verify that the hello first and hello second service are reachable from the public Loadbalancer with public DNS resolution for the names.
# verify public access to first service
fqdn=first.fabianlee-lab.online
curl -kv https://$fqdn 2>&1 | grep -E "subject:|hello"

# verify public access to first service
fqdn=second.fabianlee-lab.online
curl -kv https://$fqdn 2>&1 | grep -E "subject:|hello"
Although they are reachable with TLS, clearly the cert does match the hostname, and that is what we will be addressing in the coming sections.
Installing cert-manager
Note that the primary NGINX ingress was already defined with annotations to support cert-manager, and also a secret name for the TLS communication. So, as soon as we install cert-manager using helm we will see activity invoked.
Here are the annotations from the primary ingress.
kind: Ingress
metadata:
  name: primary-ingress
  annotations:
    kubernetes.io/ingress.class: nginx
    # not here before TLS
    kubernetes.io/tls-acme: "true"
    cert-manager.io/cluster-issuer: letsencrypt-http01-prod
    # allow insecure http
    nginx.ingress.kubernetes.io/ssl-redirect: "false"
Install cert-manager using helm.
# create namespace
kubectl create ns cert-manager

# add helm repo
helm repo add jetstack https://charts.jetstack.io
helm repo update
helm repo list
helm show values jetstack/cert-manager

# install cert-manager, use specific nameservers for dns01 check
helm install cert-manager jetstack/cert-manager --namespace cert-manager --version v1.2.0 --set installCRDs=true --set 'extraArgs={--dns01-recursive-nameservers-only,--dns01-recursive-nameservers=ns1.digitalocean.com:53\,ns2.digitalocean.com:53\,ns3.digitalocean.com:53}'


# objects created by cert-manager installation
kubectl get all -n cert-manager


# 'primary-lets-encrypt-tls-xxx' cert request just created
kubectl get certificaterequests -n default

# 'primary-letsencrypt-tls' certificate just created
# created private key 'primary-letsencrypt-xxx' with tls.key only
kubectl get certificates -n default
If you describe the certificaterequest above, you will see an event saying “ClusterIssuer” not found. This is expected. Although cert-manager is installed, the ClusterIssuer defining the http01 solver is not created yet. We will do that in the next step.
Configuring ClusterIssuer with http01 solver
cd $BASEPATH/k8s/letsencrypt-http

# added cert manager annotation and tls.hosts section
kubectl apply -f production_issuer.yaml
kubectl describe clusterissuer letsencrypt-http01-prod
kubectl describe secret letsencrypt-prod-private-key -n cert-manager

# check for certs generated by letsencrypt
kubectl describe certificate primary-letsencrypt-tls
# this is the secret referenced from ingress.tls
kubectl describe secret/primary-letsencrypt-tls

#  name of certificaterequest
reqname=$(kubectl get certificaterequest -o=jsonpath='{.items[?(@.metadata.annotations.cert-manager\.io/certificate-name=="primary-letsencrypt-tls")].metadata.name}')
# describe cert request
kubectl describe certificaterequest/$reqname

# get orders
ordername=$(kubectl get orders -o=jsonpath='{.items[?(@.metadata.annotations.cert-manager\.io/certificate-name=="primary-letsencrypt-tls")].metadata.name}')

# when last event is 'Order completed successfully'
# then secret/primary-letsencrypt-tls has been updated
# and certificate delivered from ingress will be from LetsEncrypt
kubectl describe order/$ordername
Once the order is processed successfully, then you can validate the certificate pulled from the public ingress.
# verify public access to first service
# success, hostname matches cert now
fqdn=first.fabianlee-lab.online
curl -v https://$fqdn 2>&1 | grep -E "subject:|subjectAltName:|hello"

# verify public access to second service
# notice hostname matches cert alternative name now
fqdn=second.fabianlee-lab.online
curl -v https://$fqdn 2>&1 | grep -E "subject:|subjectAltName:|hello"

# shows CN, SAN alternate names, and issuer
echo | openssl s_client -showcerts -servername $fqdn -connect $fqdn:443 | sed -ne '/-BEGIN CERTIFICATE-/,/-END CERTIFICATE-/p' | openssl x509 -in - -text -noout | grep -E "Subject:|DNS:|Issuer:"
If all you were interested in was http01 solvers for Let’s Encrypt, then you can stop here. If you want to dive into dns01 solvers, and their ability to generate wildcard certs, then continue reading.
Overview for DNS solver
Below is the overview diagram. Pay special attention to the right-hand side, because we are about to build the LoadBalancer, NGINX instance, secondary ingress, and other objects required for the generation of a Let’s Encrypt wildcard certificate with DNS solver.
Adding secondary NGINX instance
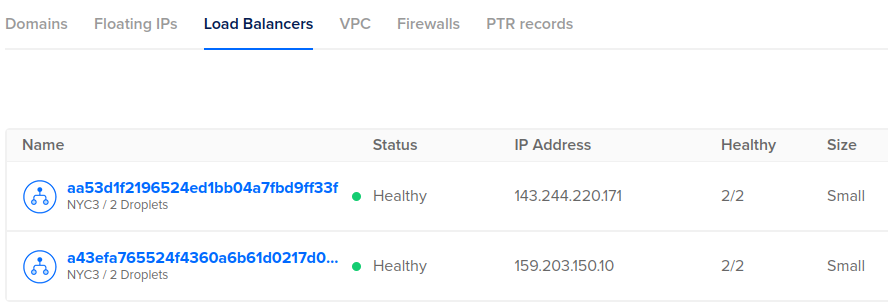
In order to test cert-manager with a DigitalOcean DNS solver, we will setup a distinct secondary ingress and test service, which will create another DigitalOcean loadbalancer with its own public IP address.
cd $BASEPATH/k8s

# install 'foo' service that secondary ingress will serve up
kubectl apply -f hello-foo.yaml

# namespace for secondary ingress
kubectl create ns nginx-secondary

# install secondary NGINX instance into different namespace
# publishService enabled will create loadbalancer
helm install ingress-nginx-secondary ingress-nginx/ingress-nginx --set controller.ingressClassResource.name=nginx-secondary --set controller.ingressClassResource.controllerValue="k8s.io/ingress-nginx-secondary" --set controller.ingressClassResource.enabled=true --set controller.ingressClassByName=true --set controller.publishService.enabled=true --create-namespace --namespace nginx-secondary -f helm-ingress-secondary-values.yaml --debug


# takes ~5min for the DigitalOcean loadbalancer to be created
# wait until External-IP is populated
kubectl get services -n nginx-secondary

# the external IP will also show here when ready
doctl compute load-balancer list --format ID,Name,IP
This second Loadbalancer will be visible in the DigitalOcean console at Networking > LoadBalancers
Create secondary ingress
# configure secondary NGINX ingress
# annotation of ingress.class = "nginx-secondary"
# which matches secondary helm values
kubectl apply -f ingress-secondary-wildcard.yaml

# wait a minute or so until secondary ingress
# is associated with secondary public loadbalancer IP
kubectl get ingress secondary-ingress -n default

# public IP where secondary ingress is exposed
EXTIP_SECONDARY=$(kubectl get svc ingress-nginx-secondary-controller -n nginx-secondary -o 'jsonpath={ .status.loadBalancer.ingress[0].ip }')

# test secure https pull at secondary public loadbalancer
fqdn=foo.do.fabianlee-lab.online
resolveStr="--resolve $fqdn:443:$EXTIP_SECONDARY"
curl -kv $resolveStr https://$fqdn 2>&1 | grep -E "subject:|foo"
The public DNS for this new Loadbalancer IP is not configured yet, and that is why we are using the “resolve” flag above to reach the secondary ingress. We will take care of DNS in the next section.
DigitalOcean DNS subdomain management
Toward the beginning of this article, we created root NS records pointing the “do.fabianlee-lab.online” subdomain to DigitalOcean nameservers. This delegated control of that specific subdomain to DigitalOcean, and now we want to go into DigitalOcean console and manage that subdomain.
From the DigitalOcean side, navigate to Networking > Domains. Create a domain for DigitalOcean to manage by entering the subdomain “do.fabianlee-lab.online”, then “Add Domain”.

By default, the web admin creates 3 NS records on the new domain. Leave those, and create an additional “A” record for the wildcard.
Add the wildcard record for this domain by entering “*” as the hostname, then selecting the public LoadBalancer of the secondary ingress (EXTIP_SECONDARY) with a 600 second TTL.
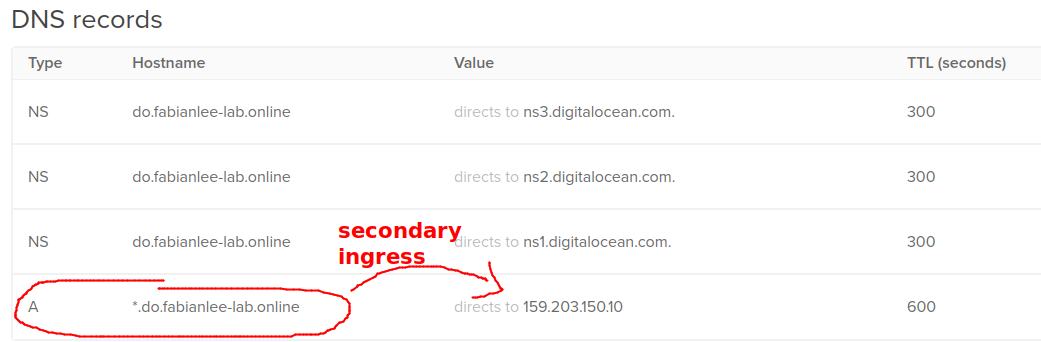
echo "secondary public ingress is $EXTIP_SECONDARY"

# should have "A" record pointing at secondary ingress IP
doctl compute domain records list do.fabianlee-lab.online

# should return ns1,ns2,ns3 DigitalOcean nameservers
dig NS do.fabianlee-lab.online @ns1.digitalocean.com +short

# this lookup should resolve to IP of secondary ingress
dig foo.do.fabianlee-lab.online +short @ns1.digitalocean.com

# wait until this same change propagates to public DNS
dig foo.do.fabianlee-lab.online +short
Do not continue until resolutions above return the expected values.
While the root domain can be managed by any commercial DNS providers, it is critically important that DigitalOcean specifically controls the subdomain because DigitalOcean is one of the built-in dns challenge providers for cert-manager.
This mean that cert-manager knows how to automatically add and remove DNS entries using the DigitalOcean API with a valid set of credentials. Which allows it to interact autonomously with Let’s Encrypt to prove ownership of the domain by creating a tailored TXT DNS record (TXT=_acme-challenge.do.fabianlee-lab.online).
Validate secondary ingress
Now that public DNS is configured, we can try pulling from the secondary ingress.
# verify public access to foo service on secondary ingress
fqdn=foo.do.fabianlee-lab.online
curl -kv https://$fqdn 2>&1 | grep -E "subject:|foo"

# 'secondary-lets-encrypt-tls-xxx' cert request just created
kubectl get certificaterequests -n default

# 'secondary-letsencrypt-tls' certificate just created
# created private key 'secondary-letsencrypt-xxx' with tls.key only
kubectl get certificates -n default
As before, we can see that although the NGINX secondary ingress is delivering TLS traffic successfully, it is using the “CN=Kubernetes Ingress Controller Fake Certificate” because we have not yet configured the Issuer.
Configuring Issuer with dns01 solver
For cert-manager to control the DigitalOcean DNS via API, we have to provide our DigitalOcean personal access token. This is the $DO_PAT variable we defined in earlier sections.
cd $BASEPATH/k8s/letsencrypt-dns

# base64 version of DigitalOcean personal access token
DO_PAT64=$(echo $DO_PAT | base64 -w 0)

# use this to create DO API credentials secret
cat digitalocean-dns-secret.yaml | sed "s/{{DO_PAT}}/$DO_PAT64/" | kubectl apply -f -

# 'access-token' value
kubectl describe secret/digitalocean-dns
Now we need to create the ‘Issuer’ with a dns01 solver for the wildcard domain.
# create Issuer with dns01 solver
kubectl apply -f production_issuer_do_dns_wildcard.yaml

# show Issuer and its private secret
kubectl describe issuer letsencrypt-dns-wildcard-prod
kubectl describe secret letsencrypt-dns-wildcard-prod-private-key -n cert-manager

# apply wildcard certificate specification
kubectl apply -f do_wildcard_cert.yaml
kubectl describe certificate do-wildcard-certificate

# look for DNS TXT record being created in subdomain
# run from different console to monitor independently
while [[ 1==1 ]]; do dig TXT _acme-challenge.do.fabianlee-lab.online @ns1.digitalocean.com +short; sleep 5; echo -n "."; done
It takes a few minutes for the DNS TXT record to be created. It has to create CertificateRequests, Certificates, and the finally create the TLS secret for the ingress. In the meantime, you can view the objects interacting using the commands below.
# name of certificaterequest
reqname=$(kubectl get certificaterequest -o=jsonpath='{.items[?(@.metadata.annotations.cert-manager\.io/certificate-name=="do-wildcard-certificate")].metadata.name}')
# describe cert request
kubectl describe certificaterequest/$reqname

# name of order
orderName=$(kubectl get orders -o=jsonpath='{.items[?(@.metadata.annotations.cert-manager\.io/certificate-name=="do-wildcard-certificate")].metadata.name}')
# describe order
kubectl describe order/$orderName

# show challenges, then describe the dns challenge
# (will disappear when fulfilled)
kubectl get challenges
kubectl describe challenges

# state will be 'valid' when fulfilled
kubectl get orders

# TLS secret used by secondary ingress
kubectl describe secret secondary-letsencrypt-tls
# show tls cert, should be wildcard
kubectl get -n default secret secondary-letsencrypt-tls -o jsonpath="{.data.tls\.crt}" | base64 -d | openssl x509 -in - -text -noout | grep -E "Subject|Before|After|DNS"

# show latest events from cert-manager
kubectl get events --sort-by='.metadata.creationTimestamp' -o=json | jq -r '.items[] | select(.source.component=="cert-manager") | .firstTimestamp,.involvedObject.kind,.message'

# test pull using public DNS
# valid wildcard cert should be in place
curl -v https://foo.do.fabianlee-lab.online 2>&1 | grep -E "subject:|foo"

# show wildcard cert
echo | openssl s_client -showcerts -servername food.do.fabianlee-lab.online -connect foo.do.fabianlee-lab.online:443 | sed -ne '/-BEGIN CERTIFICATE-/,/-END CERTIFICATE-/p' | openssl x509 -in - -text -noout | grep -E "Subject:|DNS:|foo"
Summary
In this article, we have used cert-manager to provide multiple-host SAN certs using the http solver. And continued by using cert-manager with its DigitalOcean DNS solver to generate a wildcard certificate.
Teardown DigitalOcean infrastructure
To avoid more charges on this DigitalOcean infrastructure, have Terraform destroy the Kubernetes cluster and manually destroy any loadbalancers and domains that remain.
# destroy K8S cluster
cd $BASEPATH/tf
terraform destroy -var "do_token=${DO_PAT}"

# manually destroy any loadbalancers
doctl compute load-balancer list --format ID,Name,IP
doctl compute load-balancer delete <ID>

# manually destroy any VPC
doctl vpcs list --format ID,Name,IPRange | grep 10.10.10.0
doctl vpcs delete <ID>

# manually destroy any domain
doctl compute domain list
doctl compute domain delete <ID>
REFERENCES
DigitalOcean, dns01 digitalOcean provider
eff.org, deep dive into lets encrypt dns validation
kosyfrances.com, letsencrypt with DNS01 challenge on GKE
cert-manager, using specific dns servers for dns01 solver
NOTES
create ssh key in DigitalOcean [1]
doctl compute ssh-key list
doctl compute ssh-key create id_rsa --public-key="$(cat id_rsa.pub)"
Testing public ingress without local /etc/hosts entries, using –resolve
# test insecure http
resolveStr="--resolve $domain:80:$EXTIP_PRIMARY"
curl -k $curlOpt https://$fqdn | grep hello

# test secure https pull at public loadbalancer
# notice that certificate used is self-signed and does not match host resolveStr="--resolve $domain:443:$EXTIP_PRIMARY"
curl -kv $curlOpt https://$fqdn 2>&1 | grep -E "subject:|hello"